background image

Summary of Contents for 106707

Page 1: ...AT2260BS2 Belt Sander Code 106707 Original Instructions AT 27 01 2021 BOOK REF APT008054 BOOK VERSION 04 ...

Page 2: ...chinery Co Ltd at Yutai West Street Laizhou Shandong 261400 China Mainland and complies with the relevant essential health and safety requirements 2006 42 EC 2014 30 EU EN 55014 1 2017 EN 55014 2 2015 declares that the machinery described This machine complies with the following directives EU Declaration of Conformity EN 61000 3 2 2014 EN 61000 3 3 2013 EN 55014 1 2006 A1 A2 EN 55014 2 1997 A1 A2 ...

Page 3: ...ed lumber Your risk of exposure varies depending on how often you do this type of work To reduce your exposure to these chemicals work in a well ventilated area and work with approved safety equipment such as face or dust masks that are specifically designed to filter out microscopic particles 10 Do not operate this machine while tired or under the influence of drugs alcohol or any medication 11 M...

Page 4: ... or compressed air to remove dust or debris do not use your hands 28 Do not stand on the machine Serious injury could occur if the machine tips over 29 Never leave the machine running unattended Turn the power off and do not leave the machine until it comes to a complete stop 30 At all times hold the stock firmly Familiarize yourself with the following safety notices used in this manual This means...

Page 5: ...two M5 flat washers and two M5 lock washers G 6 Finish the stand assembly by attaching the rear panel H to side panels C with four 5 16 x 5 8 hex cap screws eight 5 16 flat washers four 5 16 lock washers and four 5 16 hex nuts J 7 Make sure stand is sitting evenly on a level surface before tightening hardware Installing Table and Motor Unit to Stand The Table and Motor Unit is heavy Use great care...

Page 6: ...to Figure 5 1 From the rear of the sander remove the belt guard A by unscrewing two lock knobs B Take out the sanding belt and removable fence from behind the belt guard 2 Place the handle C on belt tensioning lever D Remove the tension from the mechanism by moving the handle C to the Loose position 3 Place belt on both rollers so that the edge of the belt is even with the edge of the rollers Note...

Page 7: ...ug The plug must be plugged into a matching outlet that is properly installed and grounded in accordance with all local codes and ordinances Do not modify the plug provided If it will not fit the outlet have the proper outlet installed by a qualified electrician Improper connection of the equipment grounding conductor can result in a risk of electric shock The conductor with insulation having an o...

Page 8: ...en Lock Tension Adjustment 1 Disconnect the machine from the power source 2 Loosen unlock the handle B Fig 10 and place the platen in the horizontal position as shown in A Fig 10 Do not lock 3 Tension eccentric block by tightening the nut B Fig 11 with a 14mm wrench Turn the nut in by 1 4 turn increments and test locking handle for proper tension The lock handle is properly tensioned when it requi...

Page 9: ...sh the belt by hand from left to right the direction indicated top of the platen and observe the belt s position on the rollers The oscillating movement of the belt is by design Observe the belt s range of movement from its highest to lowest position The edges of the belt should not have a tendency to move above or below the edges of the rollers If adjustment is still necessary 3 Insert the round ...

Page 10: ...rews A 4 Turn one screw A a 1 4 turn and rotate the sanding belt by hand to observe which direction the adjustment is causing the belt to move If it is traveling in the direction needed to correctly track the belt go to step 6 5 If the belt starts to travel in the wrong direction back off a quarter turn and tighten the other screw a quarter turn This should start the belt moving in the proper dire...

Page 11: ......

Page 12: ...um guard dust port E 2 Swing the end guard E back bringing the drive drum D into view 3 Tighten the lock knobs C 4 Mount the extension table A to the sander by inserting the post B into the bracket F 5 Set the table to the desired height then secure into position by tightening the lock knob G Important When the extension table B is not in use the drum guard dust port E should always be in the clos...

Page 13: ...ing 3 Contact a qualified electrician Machine vibrates excessively 1 Stand on uneven floor 2 Motor mounts are loose 3 Tension spring is worn or broken 1 Adjust stand so that it rests evenly on the floor 2 Tighten motor mount bolts 3 Replace spring Abrasive belt keeps tearing 1 Belt is running in the wrong direction 1 Arrow on the sanding belt and machine should be pointing in the same direction Sa...

Page 14: ......

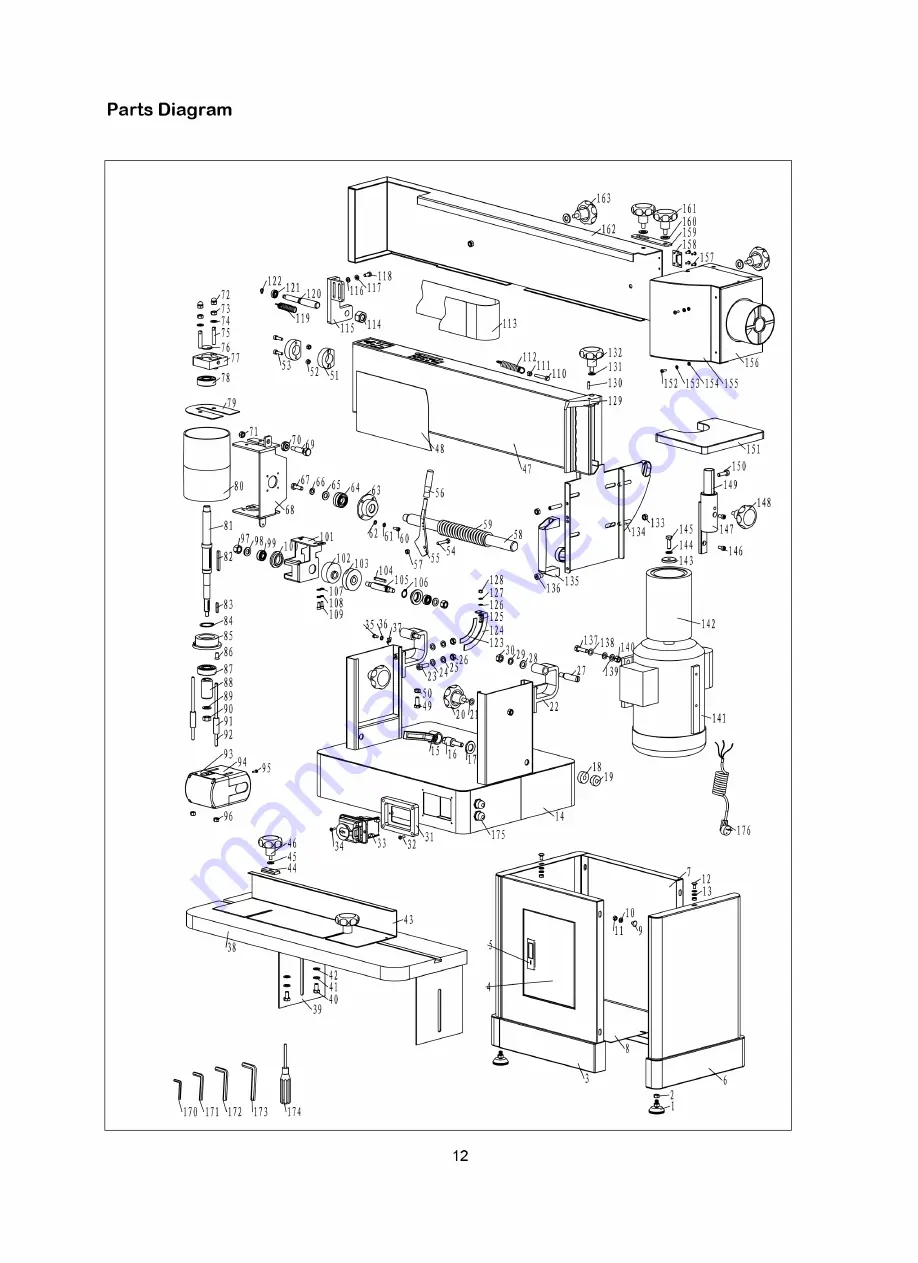
Page 15: ...FLAT WASHER 4 78 BALL BEARING 1 25 LOCK WASHER 4 79 GUARD 1 26 NUT 4 80 IDLE DRUM 1 27 SCREW 2 81 DRIVE SHAFT 1 28 FLAT WASHER 2 82 KEY 1 29 LOCK WASHER 2 83 KEY 1 30 HEX NUT 2 84 RETAINING RING 1 31 SWITCH BOX 1 85 DOWN BEARING HOUSING 1 32 PAN HEAD SCREW 4 86 PH COUNTERSUNK HEAD SCREW 3 33 Emergency switch 1 87 BALL BEARING 1 34 TAPPING SCREW 2 88 WORM 1 35 PAN HEAD SCREW 1 89 FLAT WASHER 1 36 E...

Page 16: ......

Page 17: ...15 Wiring Diagram 220 240 Volt 50Hz 1 Phase M SWITCH 380 415 Volt 50Hz 3 Phase M SWITCH 110 120 Volt 60Hz 1 Phase or 220 240 Volt 60Hz 1 Phase M LOCK SWITCH L1 L2 L3 PE L N PE PE PE PE L N PE ...

Page 18: ...te material By law they must be collected and recycled separately EU Countries Only The Axminster guarantee Buy with confidence from Axminster So sure are we of the quality we cover all parts and labour free of charge for three years For more information visit axminstertools com 3years Axminster Tools Axminster Devon EX13 5PH axminstertools com ...

Reviews: