Changing the Cutter Block/Changing the Spindle Speed
23
IMPORTANT NOTES:
• There is a risk of personal injury by cuts from the
cutter knives. Wear suitable gloves when changing cutters.
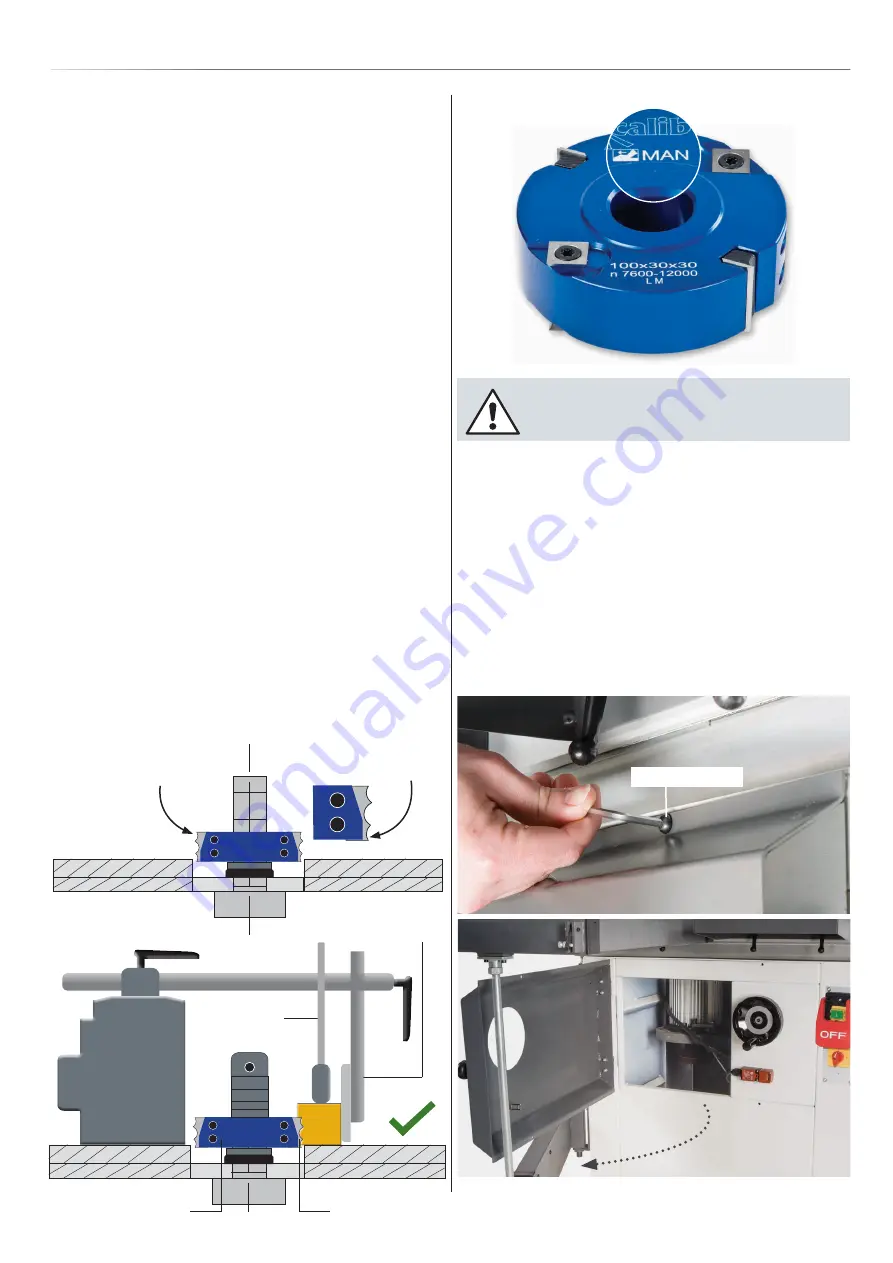
Only use tooling with manual feed cutter blocks marked
“MAN”, see fig 60.
• Clean all surfaces of cutters and spindle arbor before
remounting the cutter block.
• Unsuitable, incorrectly mounted, dull, cracked or bent cutter
knives can break or increase the risk of kickback considerably.
• The installation of sanding or polishing tools is not permissible.
• The cutter block must be positioned on the arbor as low as
possible, see diagrams below.
• Watch the direction of rotation (counter-clockwise) when
mounting the cutter.
• Fill the space between cutter and clamping washer with
spacing collars.
• Tighten the arbor cap head screw securely.
• Don’t use a wrench extension or a hammer to tighten the
cap head screw.
• Cover the clearance zone around the cutter with table
insert rings
Fig 60
Changing the Spindle Speed
Open the motor access door to the front of the machine, by
removing the two cap head screws, see figs 61-62 lower the
spindle to it’s lowest point, if not done so already. Locate the
10mm Hex key (F), loosen the cap head bolt (G) on top of the
motor, pull the motor tension lever (H) out, to allow the belt
to go slack and reposition the belt on the pulleys as required.
When you are happy, push back the tension lever H) and
tighten the cap head bolt (G) to keep the tension, see fig 63-64.
Fig 61-62
Continues Over...
Cap head screw
DISCONNECT THE MACHINE FROM THE
MAINS SUPPLY
Cutter block
The base of the lower
blade tip should sit just
below the suface of the
table
Anti-kickback Plate
Blade
Work Guide
Cutter Block


