9
Setting Up
Tracking the Belt
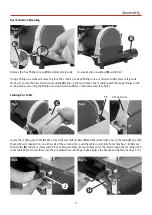
To check the sanding belt is tracking properly you first have to remove the side cover, follow the instruction below:
First undo the two Phillips screws (a) and (b) as shown in figs 21-22 and place the screws safely aside. Undo and remove
the clamping knob (c) below the guard, remove the belt access cover (d) and place safely aside (See figs 23-24 overleaf).
b
a
Fig 17.
Fig 19.
Fig 21.
Fig 18.
Fig 20.
Fig 22.
Adjust the table (D) until it is perpendicular to the belt
90° Square perpendicular to sanding belt
Using a Hex key, fine adjust the table if the square still
does not line up correctly
The clamping nut beneath the table is to lock the grub
screw in position
Place the square on the table (D), up against the belt;
check that the table is perpendicular to the sanding belt.
If it requires adjustment loosen the lift and shift handle
(G), adjust until correct and re-tighten the handle (See figs
17-18).
NOTE: For fine adjustments adjust the
grub screw to the rear of the table,
when correct adjust the nut beneath
the table to clamp the grub screw in
position (See figs 19-20).


