background image

Operating Instructions

15

 Remove the 

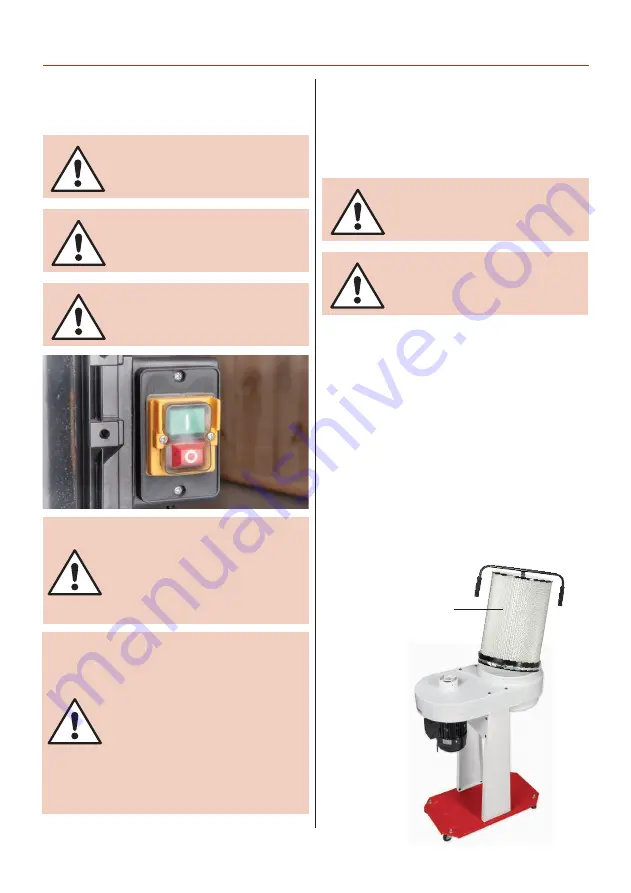
filter cartridge

Testing the Extractor

Reduced Suction Performance

Connect the extraction hose/s to the extractor’s inlet.

After a period of time dust, sawdust and shavings can
build up causing blockages and reduced suction 
performance. Carry out the following checks to keep
your extractor working at peak performance.

• Remove the micron filter bag and check for signs of 
build up of sawdust and clean with an ‘M’ class vacuum 
cleaner.  

• If you have the cartridge filter fitted, move the shaker 
paddle handle back and forth to remove any built up
dust and debris from inside the filter.

• Check the hose/s for blockages.

• Check the dust collecting bag and empty if full.

• After a period of time remove the cartridge filter if 
installed and using a ‘M’ class vacuum cleaner clean the 
interior and exterior of the filter.

IF THE EXTRACTOR FAILS TO 
START UP OR THERE ARE ANY 
OTHER STRANGE NOISES APART 
FROM VIBRATION SOUNDS, 
CONTACT THE “TECHNICAL SALES” 
FOR SUPPORT.

PHONE:  03332 406406
EMAIL: 

TECHNICALSUPPORT@AXMINSTERTOOLS.COM

ALWAYS WEAR A DUST MASK AND 
EYE PROTECTION.

DISCONNECT THE POWER SUPPLY 
FROM THE MAINS!

WAIT UNTIL IT’S UP TO FULL 
SPEED AND CHECK FOR SIGNS
OF VIBRATION, IF ALL IS WELL 
SWITCH OFF AND WAIT UNTIL 
THE EXTRACTOR HAS COME TO 
A COMPLETE STOP.

NOTE: ALWAYS TURN ON/OFF THE 
EXTRACTOR BY THE NVR CONTROL 
SWITCH NOT THE MAINS SWITCH!

CONNECT THE POWER SUPPLY 
TO THE MAINS AND SWITCH ON!

WARNING! MAKE SURE CHILDREN 
ARE KEPT AWAY FROM THE 
EXTRACTOR WHILE IN OPERATION.

NVR ON/OFF 

control switch

Summary of Contents for 107696

Page 1: ...AW82E 1 5HP Dust Extractor Code 107696 Original Instructions AT 10 02 2022 BOOK VERSION 3 ...

Page 2: ... Machinery Co Ltd at Yutai West Street Laizhou Shandong 261400 China and complies with the relevant essential health and safety requirements 2006 42 EC 2014 30EU 06 42 EC Annex I 05 2006 EN 62233 2008 declares that the machinery described This machine complies with the following directives EU Declaration of Conformity EN 60335 2 69 2012 EN 60335 1 2012 A11 Signed Andrew Parkhouse Operations Direct...

Page 3: ...nels C 1 Cross Member Panel D 1 Filter Bag Hanger Bar E 1 Hanger Mounting Bar F 1 30 Micron Filter Bag G 1 Dust Collecting Bag H 2 Filter and Bag Retaining Belts I 4 Castor Wheels J 12 Dome Head Hex Screws K 8 Nuts L 4 Domed Nuts M 12 Flat Washers N 4 Washers O 8 Spring Washers P 1 Hex Key Q B C D E F A G I H ...

Page 4: ...enable you to become familiar with terminology we will use in this manual Keep this Instruction Manual readily accessible for any others who may also be required to use the machine Optional Accessories Quantity Item Part 1 Axminster Craft Filter Cartridge R Code 105187 Air filter cartridge for the AW82E chip extractor Upgrades the performance of this extractor able to handle fine sawdust as well a...

Page 5: ... not use the machine if you are tired or distracted Do not use this machine within the designated safety areas of flammable liquid stores or in areas where there may be volatile gases Check cutters are correct type and size are undamaged and are kept clean and sharp this will maintain their operating performance and lessen the loading on the machine OBSERVE make sure you know what is happening aro...

Page 6: ...o a complete stop before putting your hands anywhere near to it If you are not using clear extraction hose periodically remove the hose to check that the inlet to the machine is not getting restricted The safety guard grill of the inlet duct can be particularly irksome in this way as long strand shavings etc can wrap around the grill fret KEEP the particle filter clean The machine relies on its ab...

Page 7: ...Assembly 7 1 4 J O M B 2 3 5 N L C Continues Over Mounting hose for upright support panels C ...

Page 8: ... holes for panels C Mounting holes for panels C C A L N P K D Place one dome head Hex screw K into one of the centre mounting hole from inside the extractor assembly A casting see step 10 Turn the extractor A over locate another four Hex screws K and screw them into the two threaded mounting holes on either side of the extractor see step 11 12 Mounting holes on both sides of extractor assembly ...

Page 9: ...d place safely aside see step 13 14 Turn the base assembly see step 6 over Line up the holes in the upright support panels C with the mounting holes on the extractor A Secure using the domed Hex screws K you removed earlier with four flat washers N and spring washers P see step 15 16 17 K K 11 K 15 C K N P Continues Over 16 17 ...

Page 10: ...unting the base assembly the opposite way round Lower the filter bag hanger bar E down into the mounting bar F see step 22 F E Mounting bar F A C Polystyrene Remove screws Hex K Screw the hanger mounting bar F into the extractor assembly A Tighten the nut to lock the mounting bar F in place ...

Page 11: ...Assembly 11 30 29 28 26 24 23 I I G 25 G Filter bag belt pocket 27 I H I ...

Page 12: ...ing belt I and remove the 30 micron filter bag G place to one side Remove the hanger bar and mounting bar E F and place safely aside Locate the filter cartridge R and lower the assembly down over the extractors cavity and secure using the retaining belt I Remove Loosen G I E F R ...

Page 13: ...Micron filter bag Filter bag hanger bar Hanger mounting bar Extractor assembly 100mm Extraction inlet Motor NVR ON OFF control switch Base Dust collecting bag Filter and bag retaining belts Castor wheel Upright suppot panel Extractor Set Up 1 ...

Page 14: ...Illustration and Parts Description 14 Extractor Set Up 2 Extractor Set Up 3 Extractor assembly with the inlet below Extractor assembly with optional filter catridge Inlet Filter cartridge Shaker paddle ...

Page 15: ...eck the dust collecting bag and empty if full After a period of time remove the cartridge filter if installed and using a M class vacuum cleaner clean the interior and exterior of the filter IFTHE EXTRACTOR FAILSTO START UP ORTHERE ARE ANY OTHER STRANGE NOISES APART FROMVIBRATION SOUNDS CONTACTTHE TECHNICAL SALES FOR SUPPORT PHONE 03332 406406 EMAIL TECHNICALSUPPORT AXMINSTERTOOLS COM ALWAYSWEAR A...

Page 16: ... cracks repair as necessary Check the dust collection bag for wear and tear especially around the neck of the retaining belt If wear or fraying is occurring replace the bag Check the motor for dust sawdust shavings etc build up If this has occurred clean with an M class vacuum cleaner Move the shaker paddle handle on top of the filter cartridge assembly if fitted back and forth to remove any built...

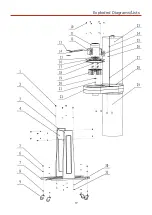
Page 17: ...Exploded Diagrams Lists 17 ...

Page 18: ... CASTER 4 10 HEX BOLT M8 x 12 12 11 MOTOR 1 12 SWITCH BOX 1 13 SCREW HEX M4 x 60 4 14 PLUG 1 15 GASKET 1 16 MOTOR PLATE 1 17 SEAL PAD FOR MOTOR 1 18 WASHER M8 4 19 TURBO FAN 1 20 RING 1 21 SCREW HEX M6 x 20 1 22 FAN HOUSING 1 23 FILTER BAG 1 24 UPPER BAG SUPPORT 1 25 EMERGENCY SWITCH 1 26 SCREW M4 x 12 2 27 COLLECTOR SUPPORT 1 28 BAG CLAMP 2 29 COLLECTOR BAG 1 30 SPRUNG WASHER 8 31 1 HEX BOLT M8 9...

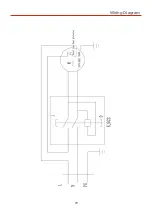
Page 19: ...Wiring Diagram 19 ...

Page 20: ...ears For more information visit axminstertools com 3years Axminster Tools Axminster Devon EX13 5PH axminstertools com The packaging is suitable for recycling Please dispose of it in a responsible manner Do not dispose of electric tools together with household waste material By law they must be collected and recycled separately EU Countries Only ...

Reviews: