background image

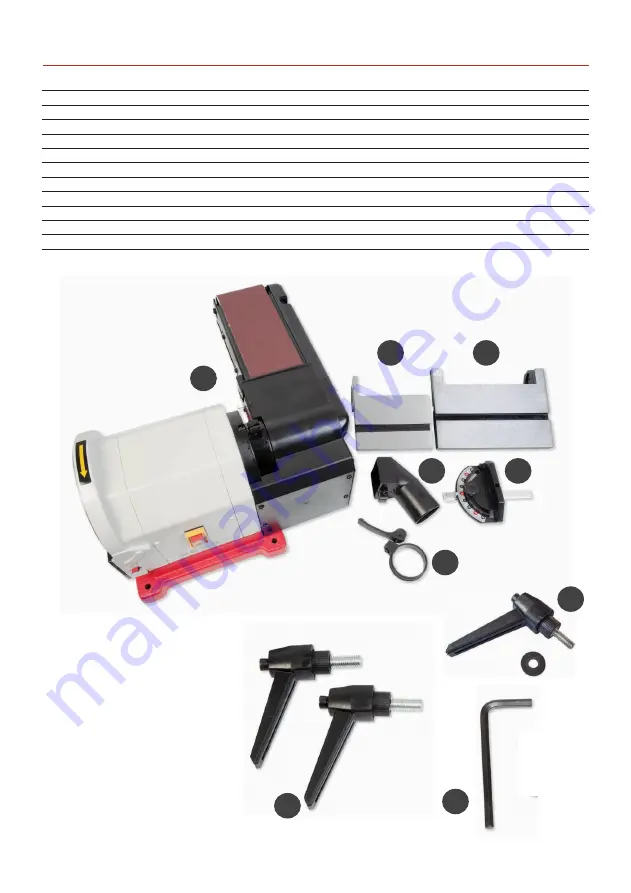
WHAT’S INCLUDED

3

Quantity 

Item  

Part 

Model Number


AW200BDS


1  

Belt & Disc Sander 

A


Linisher Belt Table 

B


Sanding Disc Table 

C


Dust Extraction Outlet 

D


Extraction Outlet Lever Clamp 

E


Mitre Fence 

F


Disc Table Lift & Shift Handles & Washers  

G


Lift & Shift Handle & Washer for Linisher Table 

H


Hex Key 

I 


Instruction Manual

A

B

C

D

F

E

G

H

I

NOTE: Please read the Instruction 
Manual prior to using your new 
machine; as well as the operating 
procedures for your new machine, 
there are numerous hints and tips 
to help you to use the machine 
safely and to maintain its
efficiency and prolong its life. 

Keep this Instruction Manual
readily accessible for any others 
who may also be required to use 
the machine.

Summary of Contents for Workshop AW200BDS

Page 1: ...AW200BDS Belt Disc Sander Code 107680 Original Instructions AT 22 04 2022 BOOK VERSION 06 ...

Page 2: ...Shandong China and complies with the relevant essential health and safety requirements 2006 42 EC 2014 30 EU EN 62841 1 2015 EN ISO 12100 2010 declares that the machinery described This machine complies with the following directives EU Declaration of Conformity EN 61000 3 3 2013 A1 EN IEC 61000 3 2 2019 EN 55014 2 2015 EN 55014 1 2017 A11 Signed Andrew Parkhouse Operations Director Date 16 07 2018...

Page 3: ...t Shift Handle Washer for Linisher Table H 1 Hex Key I 1 Instruction Manual A B C D F E G H I NOTE Please read the Instruction Manual prior to using your new machine as well as the operating procedures for your new machine there are numerous hints and tips to help you to use the machine safely and to maintain its efficiency and prolong its life Keep this Instruction Manual readily accessible for a...

Page 4: ...pin plug fitted with 10 amp fuse Inspect the cable and plug to ensure that neither are damaged Repair if necessary by a suitably qualified person Do not use when or where it is liable to get wet Workplace Do not use 230V a c powered tools anywhere within a site area that is flooded Keep machine clean Leave machine unplugged until work is about to commence Always disconnect by pulling on the plug b...

Page 5: ...ork piece to the belt disc so that the motion carries the work against the restraining surface i e the work stop or the table use the right hand side of the disc DO NOT press too heavily against the sanding surface all this will do is slow the sander down Remember sanders work by removing small particles of material quickly and heavy pressure works adversely to the cutting process Further it will ...

Page 6: ...ASSEMBLY 6 Take up the slack and press down the lever to lock in place Loosen the caphead bolt Tighten the caphead bolt Raise the linisher Extraction port I A 1 2 3 4 5 6 7 8 D I E ...

Page 7: ...ASSEMBLY 7 Continues Over 9 13 14 15 16 10 11 12 B H Machined slot Threaded hole Reset the pointer to ZERO Raised quadrant Raised quadrant Engineer s square B H C G ...

Page 8: ...ASSEMBLY 8 Raised quadrant 17 21 18 22 19 23 20 24 Machined slot Engineer s square Secure C G ...

Page 9: ...e mitre fence F is square to the linisher s belt and adjust if required 25 26 27 28 29 30 31 32 Reset the pointer to ZERO Adjust until square F Engineer s square Clamp the mitre fence in position Reset the pointer to ZERO ...

Page 10: ...able Linisher table lift shift handle Motor Linisher tilt clamping bolt Cast iron base Rubber foot NVR ON OFF control switch Sanding disc table T slot for mitre fence T slot for mitre fence Tilt quadrant lift shift clamping handle Mitre fence 63mm dust extraction outlet Rear view Sanding disc ...

Page 11: ...witch 63mm dust extraction outlet Linisher belt tracking control wheel Clamping handle A Linisher table scale pointer B Sanding disc table scale pointer Sanding disc table set at 90 degrees Linisher table set at 45 degrees Linisher table set at 90 degrees B A ...

Page 12: ... required DO NOT make large adjustments and remember the belt may take time to react to your alteration Little by little is a good maxim to observe when carrying out tracking operations 1 The tracking control works as follows 2 Using your hand roll the belt towards the drive drum check that the belt stays in the middle of the table if not adjust the track control slightly and move the belt again c...

Page 13: ...dy for use WARNING KEEPTOOLS AND EQUIPMENT OUT OF REACH OF YOUNG CHILDREN CONNECTTHE SANDERTOTHE MAINS SUPPLY ALWAYSWEAR EAR DEFENDERS EYE PROTECTION AND DUST MASK CONNECT A DUST EXTRACTION MACHINETOTHE SANDER MAKE SURETHE SANDER IS ON A FLAT LEVEL SURFACE NOTE GO ROUND AND MAKE SURE EVERYTHING IS SECURE FASTENED DOWN THAT ALLTOOLS ARE CLEARED AWAY FROMTHEWORK AREA ...

Page 14: ...of the disc allow to dry off and wipe over with a clean dry cloth Locate the sanding disc peel the cover from the adhesive surface and apply CAREFULLY to the disc plate Use a piece of cloth in your hand or wear a glove to firmly press the abrasive to the disc plate the application will be reinforced by a gentle sanding action across the face when you first use the new sanding disc Re assemble the ...

Page 15: ...side Loosen the two screws holding the rear guard Lift and remove the rear guard place to one side Release the belt tension by lifting up the tensioning lever Remove the lower guard and place to one side Remove the linisher table B assembly place safely aside 2 3 4 5 6 7 Continues Over 8 B ...

Page 16: ...of the sander 9 NOTE If you are using an old belt and the arrow markings have worn off check the direction of travel see diagram below Belt underlay Belt overlay Glue joint Remove the side extraction access panel and check for signs of build up of dust and debris NOTE Before sliding on the new belt check there is no dust or resin build up on the drums or at the edges of the linisher clean in and a...

Page 17: ...er guard front screw Replace the lower guard side screw 17 Replace the rear guard assembly 18 19 20 Replace the linisher table B assembly B Give the machine a quick burst check i e quick ON OFF to ensure everything is O K If everything is satisfactory continue with operation CLEAR ALLTOOLS AWAY FROM THEWORK AREA CONNECTTHE SANDERTOTHE MAINS SUPPLY ...

Page 18: ...and clean any dust or resin build up Inspect the sanding disc for signs of wear and tear and replace if necessarily Re assemble the sander ALWAYSWEAR EYE PROTECTION AND DUST MASK BEFORE CONTINUING Remove the linishers table assembly B remove all the guarding as explained on pages 15 17 Clean any dust or resin build up inspect the sanding belt for signs of wear and tear and replace if necessary Re ...

Page 19: ...EXPLODED DIAGRAMS LISTS 19 ...

Page 20: ...0 Tooth Lock Washer D5 2 31 Tension Level 1 32 Sleeve 1 33 Tension Handle 1 34 Pin 5 8 2 35 Pin 5 10 1 36 Phillips Screw M5 25 2 37 Belt Tracking Knob 1 38 Flat Washer D6 4 39 Rubber Washer 1 40 Adjust Spring 1 41 Belt Frame 1 42 Tension Spring 1 43 Sleeve 2 44 Spring Washer D12 2 45 Bearing 6001RZ 2 46 Idler Shaft 1 47 Idler Pulley 1 48 Belt Tension Assembly 1 49 Inner Hex Screw M6 12 8 50 Belt W...

Page 21: ...ex Screw M6 25 2 108 Capacitor Support 2 1 109 Capacitor 2 100μF250V 1 110 Disc Plate 1 111 Flat Washer D4 7 112 Inner Hex Screw M5 8 1 113 Phillips Screw M4 16 2 114 Phillips Screw 1 115 Mitre Gauge Pointer 1 116 I Type Hex Nut M8 3 117 Dust Box Cover 1 121 Scale Label Left 1 122 Scale Label Right 1 123 Rotation Label 2 124 Belt Tension Label 1 125 Inner Hex Wrench S 5 1 126 Scale Label 1 127 Spr...

Page 22: ...WIRING DIAGRAM 22 ...

Page 23: ...NOTES 23 ...

Page 24: ...ears For more information visit axminstertools com 3years Axminster Tools Axminster Devon EX13 5PH axminstertools com The packaging is suitable for recycling Please dispose of it in a responsible manner Do not dispose of electric tools together with household waste material By law they must be collected and recycled separately EU Countries Only ...

Reviews: