-17-
2-4. Installation of Optional Devices
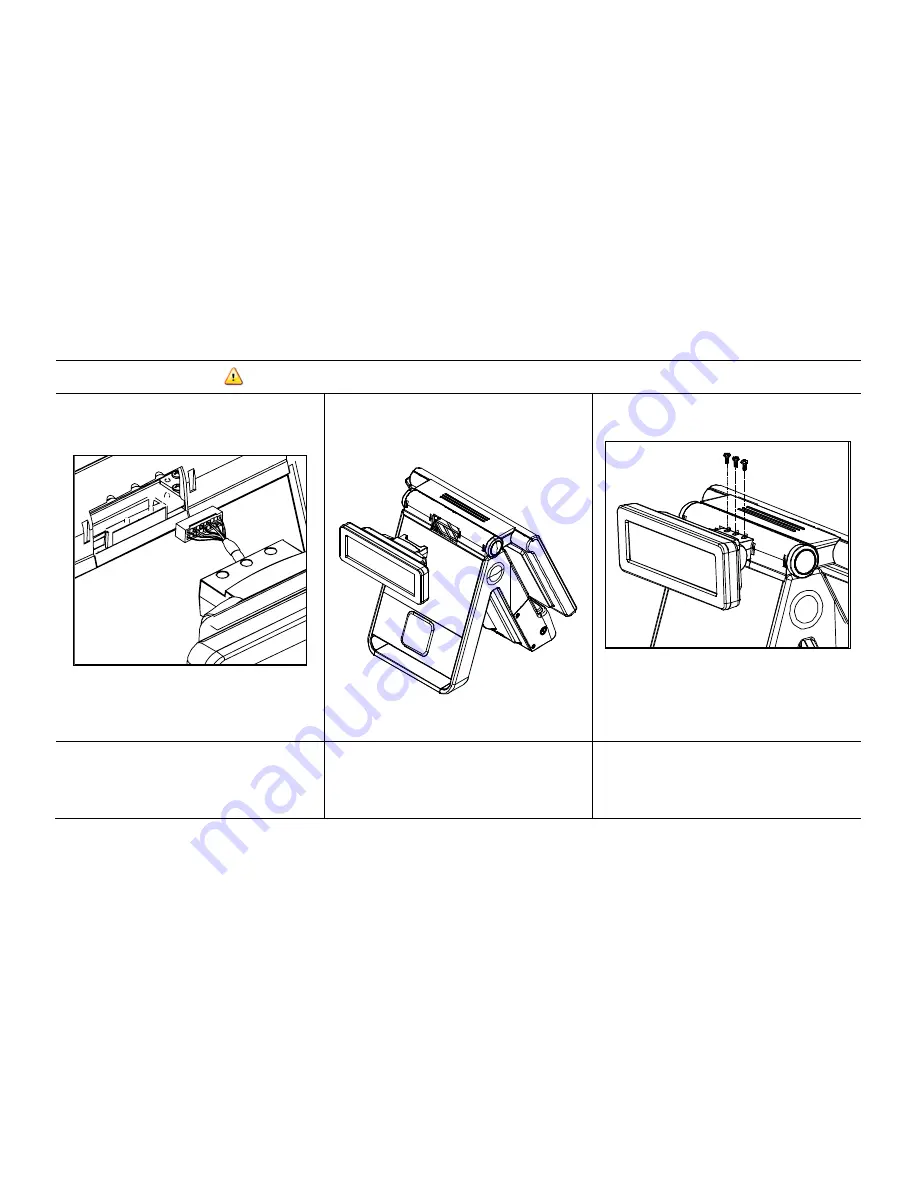
[CDP Installation]
Warning:
Completely remove power cable when opening main unit or installing optional devices.
1.
Connect CPD cable to main unit.
2.
Insert CDP into slot on main unit.
3.
Firmly attach using the 3 screws
provided.
CDP installation is successful if the default
text appears on CDP when powering on the
POS system.
Summary of Contents for POS 5000
Page 1: ...INDEX POS 5000 ...
Page 9: ... 9 Package Contents User manual Power cable Driver CD Roll paper IMPREX_P main unit ...
Page 10: ... 10 Optional Customer Display CDP ...
Page 11: ... 11 Optional 2nd Display 12inch LCD Monitor ...
Page 22: ... 22 Speaker Microphone Connection 1 Speaker connection 2 Microphone connection ...
Page 29: ... 29 Integrated Printer DIP Switch Remove cover to locate printer DIP switch ...
Page 42: ... 42 3 5 Advanced Chipset Features ...
Page 54: ... 54 3 11 Save Password Allows you to set a password for entering altering setup menu options ...
Page 61: ... 61 POS 5000 Chapter 5 Motherboard 5 1 Motherboard Layout ...
Page 62: ... 62 ...
Page 66: ... 66 5 4 Clearing CMOS 3 2 1 Protect CMOS 3 2 1 Clear CMOS ...
Page 82: ... 82 3 Remove hinge cover 4 Remove the 8 screws from beneath the cover as shown above ...
Page 88: ... 88 Printer Roller Bracket Replacement 1 Raise the main display unit 2 Open printer cover ...
Page 91: ... 91 3 Remove all 8 screws from the areas shown above Printer mechanism cover is now removed ...
Page 92: ... 92 4 Remove the 4 screws from the area marked above Printer mechanism is now removed ...


