background image

GB 

23 

03/2017 

Cleaning and maintenance   

Cleaning saw body   

Warning : unplug chain saw from power source before servicing, sever injury or death 

could occur from electrical shock or body contact with moving chain.   

Warning: cutting edges o chain are sharp, use protective gloves when handling chain.   
Warning: cleaning saw body. 

-


do not submerge saw in any liquids.   

-


Do not use products that contain ammonia, chlorine, or abrasives.   

-


Do not use chlorinated cleaning solvents, carbon tetrachloride, kerosene, or 
gasoline.  

 
Keep saw body clean, use a soft cloth dampened with a mild soap ad water mixture, wipe 
saw body to clean.   

   
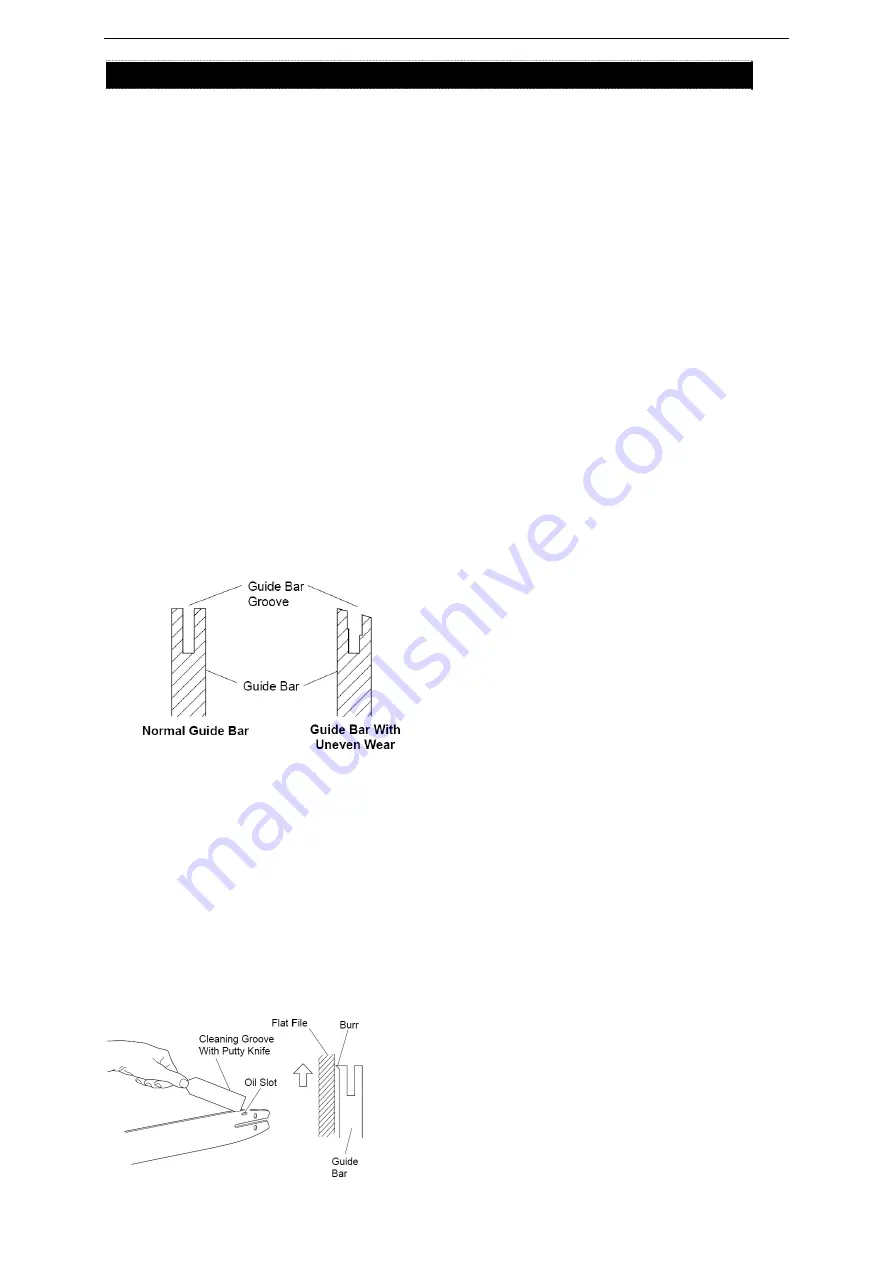
Care of guide bar (fig.24) 

Uneven bar wear causes most guide bar problems, incorrect sharpening of chain cutter 
and depth gauge settings often cause this, when bar wears unevenly, it widens guide bar 
groove, this causes chain clatter ad river popping. Saw will not cut straight, replaces 
guide bar if this occurs.   
Inspect guide bar before sharpening chain. A worn or damaged guide bar is unsafe. A 
worn or damaged guide bar will damage chain, it will also make cutting harder.   


Fig,24 


Normal guide bar maintenance(fig.25)


1.  remove guide bar from chain saw.   
2.  remove sawdust from guide bar groove periodically. Use putty knife or wire,   
3.  clean oil slots after each day of use.   
4.  remove burrs from sides of guide bar. Use flat file to make side edges square.   
   
Replace guide bar when   

-


bar is bent or cracked.   

-


Inside groove of bar is badly worn .   

 Fig.25 

Summary of Contents for BG PRO CS2400-16

Page 1: ...GB 1 03 2017 Original instructions INSTRUCTION MANUAL Electrical Chain saw YT4302 09 BG PRO CS2400 17 2400W...

Page 2: ...on dust mask and gloves when using the product Wear safety boots Do not expose to rain Remove plug from the mains immediately if the cable is damaged or cut Make sure the chain brake is disengaged Con...

Page 3: ...eference The term tool in the warnings refers to your mains operated corded tool or battery operated cordless tool 1 Work area safety a Keep work area clean and well lit Cluttered or dark areas invite...

Page 4: ...not use a tool while you are tired or under the influence of drugs alcohol or medication A moment of inattention while operating tools may result in serious personal injury b Use personal protective e...

Page 5: ...ore making any adjustments changing accessories or storing tools Such preventive safety measures reduce the risk of starting the tool accidentally d Store idle tools out of the reach of children and d...

Page 6: ...tion increases the risk of personal injury and should never be done Hold the tool by insulated gripping surfaces only because the saw chain may contact hidden wiring or its own cord Saw chains contact...

Page 7: ...or increase the chance for kickback Keep handles dry clean and free from oil and grease Greasy oily handles are slippery causing loss of control Cut wood only Do not use chain saw for purposes not in...

Page 8: ...etter control of the chain saw in unexpected situations Only use replacement bars and chains specified by the manufacturer Incorrect replacement bars and chains may cause chain breakage and or kickbac...

Page 9: ...the trigger completely to avoid brake lever touching torsion spring during use And do not work continuously for a long time to avoid overuse fatigue Important safety How to read symbols and colors Fi...

Page 10: ...n level given in this information sheet has been measured in accordance with a standardised test given in EN 60745 2 13 2009 A1 and may be used to compare one tool with another It may be used for a pr...

Page 11: ...l 3 tension adjustment hand wheel 4 front handle 5 brake guard 6 oil tank cap 7 retaining block 8 support plate 9 location pin 10 sprocket 11 oil bottle 12 saw chain 13 bar 14 bar cover 15 power cord...

Page 12: ...y The saw chain and bar are packed separately in the carton 1 Place the saw on a firm surface Fig 3 Fig 3 2 Remove sprocket cover by loose the hand wheel on sprocket cover Fig 4 Fig 4 3 Put the chain...

Page 13: ...ension section Fig 9 7 Tighten the hand wheel to make sure the chain bar with saw chain has been securely tightened WARNING Always carry out a test run before starting work and after every tool change...

Page 14: ...hain Over tensioning also reduce the amount of cuts you should get Oil filling Note the chain saw is shipped without oil in it the chain saw must never be used without oil or with an oil level that is...

Page 15: ...g the guide bar up and back towards the operator pinching the saw chain along the top of the guide bar may push the guide bar rapidly back towards the operator either of these reactions may cause you...

Page 16: ...provided on the housing of the chainsaw to assist in preventing the electrical connection between the extension cord and chainsaw plug being forced apart Note the support is for the extension cord an...

Page 17: ...ands until the chain is completely still Operating the electric chain saw Safe chainsaw operation While cutting always run the chainsaw motor at full revs this makes the job safer as these is less cha...

Page 18: ...r to make this cut Cut 1 3 through diameter of limb 2 move five to ten centimeters farther out on limb make second cut from above limb Continue cut until you cut limb off 3 make third cut as close to...

Page 19: ...ompany should be notified immediately The chain saw operator should keep on the uphill side of the terrain as the tree is likely to roll or slide downhill after it is felled An escape path should be p...

Page 20: ...h wood is left to act as a hinge The hinge wood keeps the tree from twisting and falling in the wrong direction Do not cut through the hinge As the felling gets close to the hinge the tree should begi...

Page 21: ...ure 20 it is cut from the top overbuck When the log is supported on one end as illustrated in Figure 21 cut 1 3 the diameter from the underside underbuck Then make the finished cut by overbucking to m...

Page 22: ...GB 22 03 2017 Fig 21 Log supported one end Fig 22 Log supported both ends Fig 23 Bucking a log...

Page 23: ...e bar fig 24 Uneven bar wear causes most guide bar problems incorrect sharpening of chain cutter and depth gauge settings often cause this when bar wears unevenly it widens guide bar groove this cause...

Page 24: ...file the exceeding part by means of a flat file to round off the depth delimiting device 7 ensure that the chain is replaced before stretching to exceed the maximum adjustment of the chain saw bar 8...

Page 25: ...is in conformity with the relevant Union harmonisation legislation 2006 42 EC Machinery 2014 30 EU Electro Magnetic Compatibility 2000 14 EC 2005 88 EC Noise outdoor 2011 65 EU ROHS 6 References to t...

Page 26: ...GB 26 03 2017 Parc de Tr ville 2 all e des Mousquetaires 91078 Bondoufle cedex France Signed for and on behalf of Place Alcanena date of issue 16 03 2016 Signee...

Reviews: