background image

34 

35

TECHNICAL SPECIFICATIONS

The heater is for outdoor use only.

To prevent a possible fire, do not block air intakes or exhaust in any manner.

Don’t touch the hot surfaces.

Do not use pesticide or other flammable spray around the product 

because it will damage the device and cause fire.

Do not insert or allow foreign objects to enter any ventilation or 

exhaust opening, as this may cause an electric shock, fire or 

damage to the appliance. 

Always ensure that hands are dry before operating or adjusting any 

switch on the product or touching the plug and socket-outlet. 

Do not leave this appliance unattended when it’s in use.

The most common cause of overheating is deposits of dust or fluff 

in the appliance. Ensure these deposits are removed regularly by 

disconnect the appliance and vacuum cleaning air vents and grilles. 

Do not place the heater on carpet, don’t place the cable under 

carpets. Arrange cord away from traffic areas so that it will not be 

tripped over. 

This unit has to be earthed while in use in order to protect the 

operator against electrical shocks.

Avoid body contact with earthed or grounded surfaces. There is an 

increased risk of electric shock if your body is earthed or grounded.
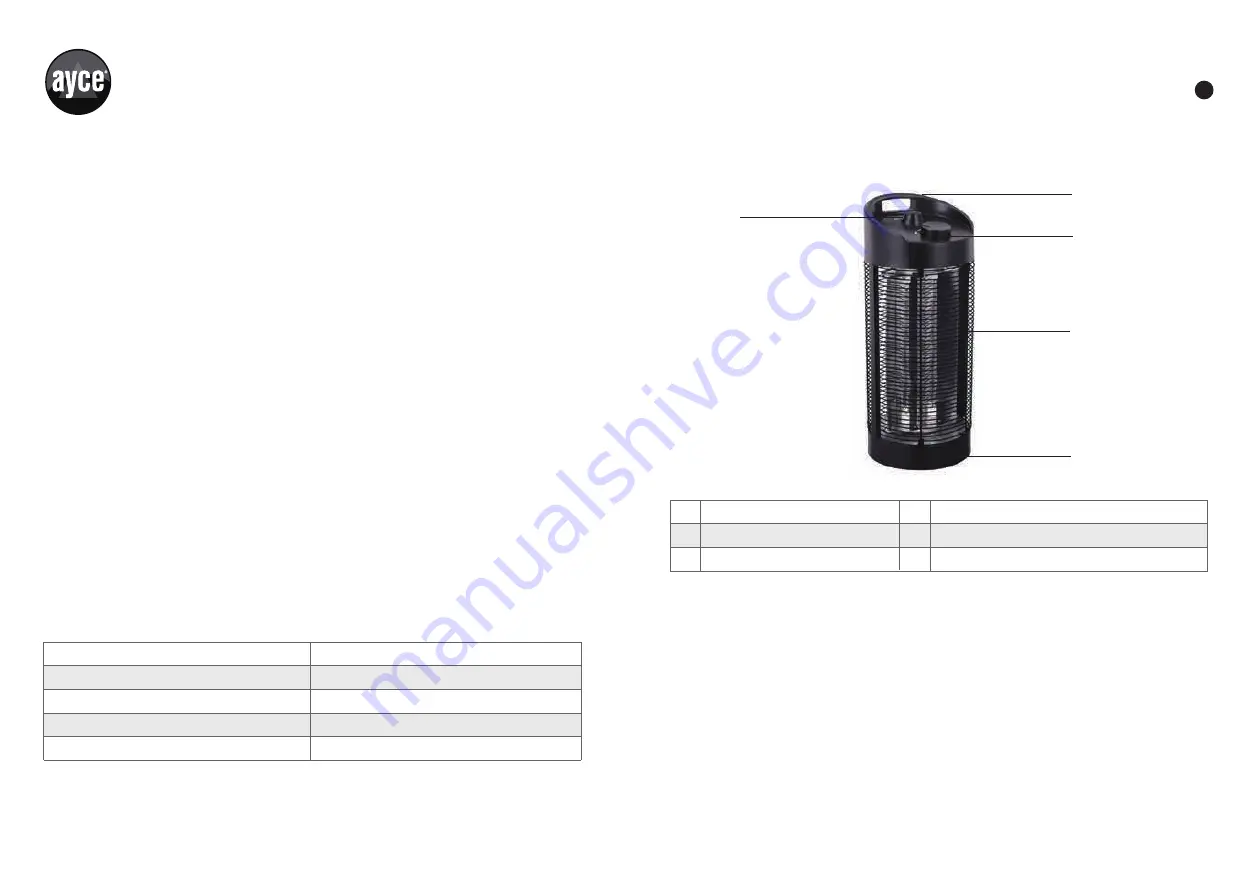
Model
Power
Rated Voltage
Protective Class
Protection Class

HA-55
1200W
220-240V~50-60Hz
Class I
IPX4

GB

PRODUCT DESCRIPTION

Control knob switch
Angle knob
Handle

1
2
5

3
4

Cover
Base

INSTALLATION METHOD

1. Take the appliance out of the package.
2. Check that the appliance shows no signs of damage before using.

OPERATION

Note! 

Since the appliance and its heating elements are slightly greased when delivered, 

there might be a slight development of smoke and odor the first time it is used. This is 
harmless and stops after a short a while. Be sure to provide for sufficient ventilation 
during such time.

Warning! 

Ensure that there is sufficient distance from the wall, fixtures or other appli-

ances. The distance must be at least 1 m to exclude the risk of fire.

5

1

3

2

4

Summary of Contents for HA-55 MARSEILLE

Page 1: ...ATORE PER TERRAZZA HA 55 MARSEILLE ELECTRIC PATIO HEATER HA 55 MARSEILLE V190225 GEBRAUCHSANWEISUNG I MANUEL D UTILISATION I MANUALE D ISTRUZIONI I ORIGINAL INSTRUCTIONS CH Import Distribution exklusi...

Page 2: ...cht mit dem Produkt spielen Reinigung und Benutzerwartung d rfen nicht durch Kinder ohne Beaufsichti gung durchgef hrt werden Kinder unter 3 Jahren d rfen sich dem Produkt nicht n hern wenn sie nicht...

Page 3: ...mit der auf dem Typenschild des Produktes vermerkten Spannung bereinstimmt Stellen Sie das Produkt und das Kabel nicht in die N he von W rmequellen Achten Sie darauf dass das Produkt oder das Kabel n...

Page 4: ...hwenkmodi 120 und 360 Um die Schwen kfunktion zu verwenden drehen Sie den Winkeldrehknopf nach links 120 oder nach rechts 360 Zum Ausschalten der Heizung drehen Sie den Bedienknopf in die Position OFF...

Page 5: ...n GARANTIEURKUNDE Bitte schicken Sie folgende Dokumente bei der R ckgabe Ihres Produktes zur Reparatur mit 1 Kassenzettel Kaufnachweis 2 Diese Garantieurkunde mit Ihrem Namen Ihrer Adresse und Ihren K...

Page 6: ...20 21 22 23 24 25 26 27 28 29 30 31 32 33 34 TEILEBEZEICHNUNG Distanzst ck A Leuchtenabdeckung Reflektorhalterung Reflektorplatte Hintere Platte Aluminium Druckgussstange A Aluminium Druckgussstange...

Page 7: ...et l entretien par l utilisateur ne doivent pas tre effectu s par des enfants sans surveillance Les enfants de moins de 3 ans doivent tre tenus l cart moins d tre surveill s en continu Les enfants g...

Page 8: ...de pesticides ni d autres pulv risateurs inflam mables autour du produit cela pourrait endommager l appareil ou causer un incendie Ne pas ins rer ou permettre des objets trangers de p n trer dans tout...

Page 9: ...200 W Le bouton d angle d oscillation fig 2 commande deux modes d oscillation 120 et 360 Lorsque la fonction d oscillation est en marche tournez le bouton d angle vers la gauche pour une oscillation 1...

Page 10: ...pareils Go On d fectueux peuvent tre rapport s dans tous les magasins jumbo A l expiration de la p riode de garantie les produits seront repris dans tous les magasins Jumbo pour contr le CH Import Dis...

Page 11: ...20 21 22 23 24 25 26 27 28 29 30 31 32 33 34 D NOMINATION Cale A Couvercle de la lampe Support du r flecteur Plaque du r flecteur Plaque arri re Barre en aluminium coul A Barre en aluminium coul B Cou...

Page 12: ...correlati I bambini non devono giocare con l apparecchio Le operazioni di pulizia e di manuten zione non devono essere effettuate dai bambini senza sorvegli anza I bambini di et inferiore a 3 anni non...

Page 13: ...he l interruttore sia in posizione OFF prima di collegare l apparecchio a una presa di corrente Per scollegare l apparecchio spegnerlo off quindi staccare la spina Non tirare il cavo per non danneggia...

Page 14: ...illazione 600W o oscillazione 1200W In figura 2 illustrata la manopola dell angolazione con due possibilit di regolazione 120 e 360 Per utilizzare la funzione di oscillazione occorre ruotare la manopo...

Page 15: ...zia gli apparecchi difettosi possono essere restituiti presso qualsiasi punto vendita jumbo Dopo la scadenza del periodo di garanzia i prodotti ayce vengono accettati presso tutte le filiali jumbo aff...

Page 16: ...9 20 21 22 23 24 25 26 27 28 29 30 31 32 33 34 DESCRIZIONE Spessore A Copertura lampada Staffa riflettore Piastra riflettente Piastra posteriore Barra in alluminio pressofuso A Barra in alluminio pres...

Page 17: ...given where children and vulnerable people are present The heater must not be located immediately below a socket outlet In order to avoid overheating do not cover the heater Do not use this heater in...

Page 18: ...ts Arrange cord away from traffic areas so that it will not be tripped over This unit has to be earthed while in use in order to protect the operator against electrical shocks Avoid body contact with...

Page 19: ...lways disconnect the appliance and let it cool down completely before carrying out any maintenance Use a vacuum cleaner to remove dust on inlet and outlet surfaces Clean the outside of the unit with a...

Page 20: ...Y CERTIFICATE Please include the following when returning your product for repair 1 The receipt proof of purchase description completed overleaf 2 This warranty certificate you re your name address co...

Page 21: ...13 14 15 16 17 18 19 20 21 22 23 24 25 26 27 28 29 30 31 32 33 34 Description Shim A Lamp cover Reflector bracket Reflector plate Rear plate Die cast aluminum bar A Die cast aluminum bar B Net cover A...

Reviews: