background image

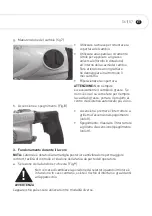
d.  calibro di profondità (Fig.4)

Fig. 4

•   Per cambiare la posizione del 

profondimetro, ruotare la relativa 

manopola in senso antiorario fino ad 

allentarlo a sufficienza da poterlo far 

scorrere all'interno del foro.

•   Impostare la profondità, controllando 

la profondità con un righello d’acciaio 

per la misurazione più accurata e 

quindi ruotare la manopola in senso 

orario per stringere il misuratore di 

profondità nella posizione desiderata.

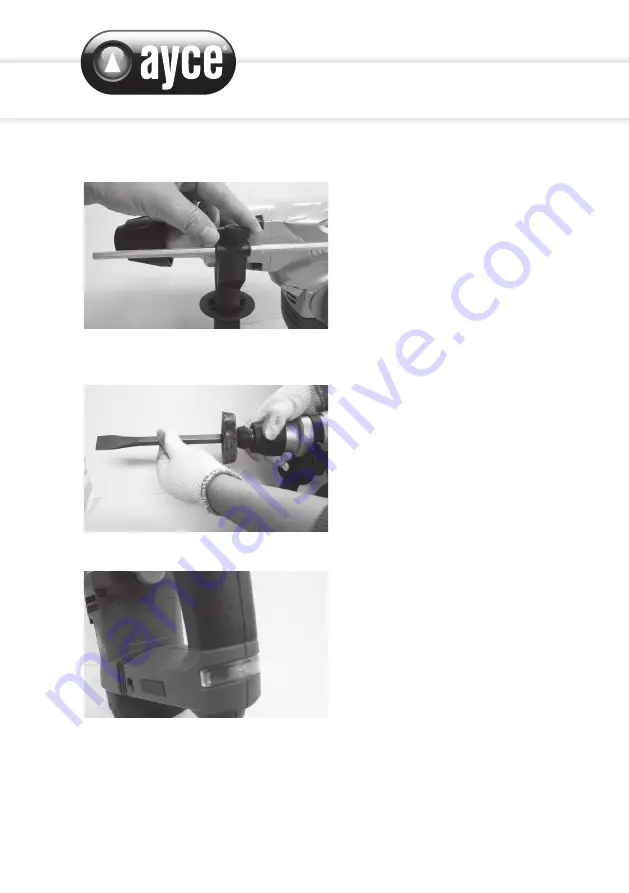
e.  Uso della calotta antipolvere (Fig.5)

Fig.5

•   La calotta antipolvere può essere 

utilizzata come ulteriore protezione 

contro la polvere e i detriti che 

entrano nel mandrino.

•   Mettere la calotta sopra il gambo 

della punta o dello scalpello e farla 

scorrere in avanti fino a quando 

risulta appoggiata contro la spalla 

della punta. Inserire la punta nel 

mandrino come al solito.

f.  Indicatore di accensione (fig.6)

Fig.6

•   L'attrezzo è dotato di una spia che 

indica quando l'apparecchio è acceso 

(indicatore di accensione). La spia è 

sempre accesa quando l'apparecchio 

è collegato ad una sorgente di 

potenza.

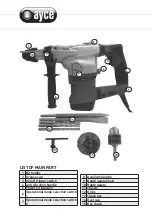
Summary of Contents for Z1C-DW-32M3

Page 1: ...ORIGINALBETRIEBSANLEITUNG TRADUCTION DE LA NOTICE ORIGINALE TRADUZIONE DELLE ISTRUZIONI ORIGINALI ORIGINAL INSTRUCTION MANUAL 1250W BOHRHAMMER 1250W MARTELLO PNEUMATICO 1250W MARTEAU PERFORATEUR 1250W...

Page 2: ...lter 2 Fettkappe 3 An Aus Kippschalter 4 Anti Vibration Griff 5 Power on Anzeige 6 Betriebsmodus Wahlschalter 1 7 Betriebsmodus Wahlschalter 2 8 Zusatzgriff 9 Tiefenmesser Knopf 10 Tiefenanschlag 11 M...

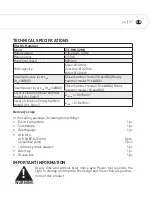
Page 3: ...nswert Meissel hammer Modell a K 1 5 m s2 ah Cheq 10 515m s2 Schwingungsemissionswert Bohrha mmer Modell a K 1 5 m s2 ah HD 21 069m s2 Lieferumfang Verpackungsinhalt ElektrischerBohr Hammer 1 Stk Seit...

Page 4: ...eitssch den durch Staub zu vermeiden 5 Halten Sie die Verl ngerungsschnur immer vom Arbeitsbereich fern 6 Drehbohrh mmer Werkzeuge und Zubeh rteile d rfen nur zweckbestimmt verwendet werden 7 Halten S...

Page 5: ...nen c Halten Sie Kinder und Zuschauer beim Einsatz von Elektroger ten auf Abstand Ablenkungen k nnen dazu f hren dass Sie die Kontrolle ber das Ger t verlieren 2 Elektrische Sicherheit a Der Netzsteck...

Page 6: ...Staubmaske rutschfeste Sicherheitsschuhe Schutzhelm oder Geh rschutz verringert die Verletzungsgefahr c Vermeiden Sie eine unbeabsichtigte Inbetriebnahme Vergewissern Sie sich dass der Schalter auf A...

Page 7: ...gsanleitung nicht kennen Elektrowerkzeuge stellen wenn sie von unerfahrenen Personen bedient werden eine Gefahrenquelle dar e Warten Sie Elektrowerkzeuge sorgf ltig Vergewissern Sie sich dass die bewe...

Page 8: ...ezieht sich auf die Hauptanwendungszwecke des Ger ts Wird das Ger t jedoch f r andere Anwendungen mit anderem Zubeh r oder schlecht gewartet verwendet kann die Schwingungsemission abweichen Dies kann...

Page 9: ...besteht Unfallgefahr f r Sie oder andere Personen Um das Risiko von Verletzungen Brand oder Tod durch elektrischen Schlag einzuschr nken befolgen Sie stets die angegebenen Empfehlungen Vor dem Einsat...

Page 10: ...1250 W Nennleistung 13mm 13 mm max Bohrdurchmesser in Metall 230 240 V 50Hz 230 240 V 50 Hz Nennspannung 32mm 32 mm max Bohrdurchmesser in Beton min 1 800 800 min Leerlaufdrehzahl 40mm 40 mm Bohrkapaz...

Page 11: ...en Sie s mtliches Verpackungsmaterial und die losen Teile vom Ger t Pr fen Sie das Zubeh r vor der Benutzung Es muss zu der Maschine passen und f r Ihre Zwecke geeignet sein a Anbringen der Bohraufs t...

Page 12: ...schette zur ck entfernen den Aufsatz und lassen die Verschlussmanschette los b Einsetzen des Bohrfutters Abb 2 Abb 2 Mit dem Bohrfutter k nnen normale Bohraufs tze nicht SDS Bohraufs tze mit dem Werkz...

Page 13: ...ition des Tiefenanschlags zu ndern drehen Sie den Knauf am Tiefenanschlag gegen den Uhrzeigersinn bis der Tiefenanschlag locker genug ist um ihn im Loch hin und her zu schieben Stellen Sie die Tiefe d...

Page 14: ...ches Werkzeug um Mehrzweckfett im Lieferumfang in den Hohlraum des Getriebes einzubringen Achten Sie darauf die Mechanik nicht in irgendeiner Weise zu verkratzen oder zu besch digen Bringen Sie die Ab...

Page 15: ...den Betriebsw hlschalter 2 in die in Abb c dargestellte Position W hlen Sie diese Position f r Bohrungen in Holz Kunststoff und Metall kann in Verbindung mit dem Bohrfutter verwendet werden BOHRHAMMER...

Page 16: ...Bohrhammer Arbeiten Bohrmodus Meissel Betrieb Abb a Abb c Abb b Abb a Abb c Abb d...

Page 17: ...Sie saubere T cher zur Entfernung von Schmutz Kohlestaub und anderen Verunreinigungen AUFBEWAHRUNG Bewahren Sie die Maschine die Bedienungsanleitung und gegebenenfalls das Zubeh r in der Originalverp...

Page 18: ...t dem Kaufdatum g ltig Bewahren Sie Ihre Kaufquittung als Beweis f r das Kaufdatum sicher auf Die Garantiezeit kann nur f r die Dauer von erforderlichen Reparaturen verl ngert werden W hrend der Garan...

Page 19: ...if gen Ja Nein Das Ger t wurde in dem folgenden Jumbo Filiale gekauft Aufgetretene M ngel bitte auflisten Bitte beschreiben Sie das Problem oder die Betriebsst rung Ihres Ger tes so genau wie m glich...

Page 20: ......

Page 21: ...DE 20 21 DE TECHNISCHE ZEICHNUNG...

Page 22: ...ungsring 12 97 Untere Abdeckung 12 Fettabdichtung 55 Nadellager HK1210 98 Blechschraube 13 grosse Unterlegs cheibe 56 Sicherungsring 52 99 Lager 6001 14 Lager 61907 57 Kupplung 100 Rotor 15 Stahlkugel...

Page 23: ...erriegelungsplatte 121 Klemme 36 Stift B4 40 mm 79 O Ring 122 Spannstifte 37 Schmierdeckelknauf 80 Schaltergriff 123 Augenschraube 38 O Ring 81 rechter Griff 124 Schraube des Kunst stoffdeckels 39 Kur...

Page 24: ...teur marche arr t G chette 4 Poign e anti vibration 5 Voyant d alimentation 6 S lecteur de mode de fonctionnement 1 7 S lecteur de mode de fonctionnement 2 8 Poign e auxiliaire 9 Bouton de jauge de pr...

Page 25: ...r 102 66 dB A Niveau des vibrations mod le marteau burin K 1 5m s2 ah Cheq 10 515m s2 Niveau des vibrations mod le de marteau perforateur K 1 5m s2 ah HD 21 069m s2 Contenu de l emballage L emballage...

Page 26: ...risque de subir un choc lectrique 4 Portez un masque antipoussi res car les poussi res peuvent nuire la sant 5 Veillez toujours ce que la rallonge lectrique reste loign e de la zone de travail 6 Le ma...

Page 27: ...e contr le de l outil 2 S curit lectrique a Il faut que les fiches de l outil lectrique soient adapt es au socle Ne jamais modifier la fiche de quelque fa on que ce soit Ne pas utiliser d adaptateurs...

Page 28: ...d Retirer toute cl de r glage avant de mettre l outil en marche Une cl laiss e fix e sur une partie tournante de l outil peut donner lieu des blessures de personnes e Ne pas se pr cipiter Garder une p...

Page 29: ...conform ment ces instructions en tenant compte des conditions de travail et du travail r aliser L utilisation de l outil pour des op rations diff rentes de celles pr vues pourrait donner lieu des situ...

Page 30: ...st teint ou en fonctionnement mais pas vraiment utilis Ceci peut r duire consid rablement la sollicitation vibratoire pendant toute la dur e du travail D terminez des mesures de protection suppl menta...

Page 31: ...utrui Pour limiter les risques de blessures d incendies ou d lectrocutions appliquez toujours les recommandations indiqu es Avant toute utilisation reportez vous au paragraphe correspondant dans le pr...

Page 32: ...0 W Puissance de sortie nominale 13mm 13 mm Capacit de per age de l acier 230 240 V 50Hz 230 240 V 50 Hz Tension nominale 32mm 32 mm Capacit de per age du b ton min 1 800 800 min R gime vide 40mm 40 m...

Page 33: ...tilisation que vous en ferez a Assembler un embout Fig 1 AVERTISSEMENT Portez toujours des gants protecteurs pour manipuler et changer les forets et les burins car ils peuvent tre tr s coupants Fig 1...

Page 34: ...le mandrin cl ins rez la cl de mandrin dans l un des trous du mandrin puis tournez la dans le sens antihoraire pour ouvrir le mandrin Ins rez un embout dans le mandrin et tournez la cl de mandrin dans...

Page 35: ...la droite pour serrer la jauge de profondeur dans la position souhait e e Utiliser le capuchon antipoussi res Fig 5 Fig 5 L utilisation du capuchon antipoussi res permet de mieux prot ger le mandrin...

Page 36: ...ise sous tension Appuyez sur l interrupteur g chette marche arr t Mise hors tension Rel chez l interrupteur g chette marche arr t 3 Utilisation REMARQUE L outil est quip d une poign e arri re antivibr...

Page 37: ...Fig a puis tournez s lecteur de mode 2 sur Fig c S lectionnez ce mode pour le per age de la brique du b ton et de la ma onnerie NE DOIT PAS tre utilis avec le mandrin MODE MARTEAU BURINEUR Tournez le...

Page 38: ...ez des chiffons propres pour enlever la salet les poussi res de carbone etc STOCKAGE Rangez la machine les instructions d utilisation et les accessoires dans leur emballage d origine De cette mani re...

Page 39: ...e CINQ ANS compter du jour de son achat Conservez votre re u d achat dans un endroit s r car il prouve la date d achat La p riode de garantie ne peut tre prolong e que de la dur e de r paration requis...

Page 40: ...Non Achet dans un magasin Jumbo Quel probl me est survenu veuillez expliquer D crivez le probl me ou le dysfonctionnement de votre appareil aussi pr cis ment que possible Cela nous permet de traiter...

Page 41: ...40 41 FR...

Page 42: ...VUE CLAT E...

Page 43: ...rique 53 Rondelle 96 Plaque signal tique 11 Circlip 35 mm 54 Circlip 12 97 Protection inf rieure 12 Retenue de graisse 55 Palier aiguilles HK1210 98 Vis d assemblage 13 Grosse rondelle 56 Circlip 52 9...

Page 44: ...orgne 34 Palier huileux 77 Rondelle 4 120 Rev tement 35 Bouchon de fen tre de graissage 78 Plaque de verrouil lage 121 Fixation 36 Goupille B4 x 40 mm 79 Joint torique 122 Goupilles fendues ressort 37...

Page 45: ...gnimento 4 Maniglia anti vibrazioni 5 Indicatore di accensione 6 Operativo interruttore di selezione della modalit 1 7 Operativo interruttore di selezione della modalit 2 8 Manico ausiliario 9 Manopol...

Page 46: ...vello di vibrazioni scalpello modello di martello K 1 5m s2 ah Cheq 10 515m s2 Livello di vibrazioni modello di martello perforatore K 1 5m s2 ah HD 21 069m s2 Contenuto della confezione La confezione...

Page 47: ...olvere la polvere prodotta durante il lavoro pu causare gravi danni alla salute 5 Tenere sempre il cavo della prolunga lontano dall area di lavoro 6 Utilizzare il martello rotante gli strumenti e gli...

Page 48: ...za elettrica a La spina dell apparecchio elettrico deve essere adeguata alla presa in cui verr inserita Non intervenire mai sulla spina Non utilizzare mai adattatori con apparecchi elettrici messi a t...

Page 49: ...posizione di marcia d Togliere le chiavi di serraggio prima di mettere in funzione l apparecchio Una chiave di serraggio che rimane inserita in un elemento mobile dell apparecchio pu provocare gravi...

Page 50: ...e controllo sull apparecchio g Durante l utilizzo dell apparecchio degli accessori delle punte ecc attenersi alle presenti norme di sicurezza tenendo conto delle particolarit dell apparecchio dello sp...

Page 51: ...o oppure acceso ma non utilizzato effettivamente Questo pu ridurre chiaramente la sollecitazione da vibrazioni per l intero periodo operativo Adottare misure di sicurezza supplementari per la protezio...

Page 52: ...stessi o per altre persone Per limitare i rischi di infortuni incendi o scosse elettriche attenersi sempre alle raccomandazioni riportate Prima dell uso consultare la corrispondente sezione del presen...

Page 53: ...13mm 13 mm Capacit di trapanatura nell acciaio 230 240 V 50Hz 230 240 V 50 Hz Tensione nominale 32mm 32 mm Capacit di trapanatura nel cemento min 1 800 800 min Velocit a vuoto 40mm 40 mm Capacit di tr...

Page 54: ...ri Devono essere adatti alla macchina e allo scopo per cui essa viene utilizzata a Installazione della punta Fig 1 AVVERTENZA Indossare sempre guanti di protezione resistenti quando si maneggiano o si...

Page 55: ...sciare il manicotto di chiusura Per utilizzare il mandrino con chiave inserire la chiave del mandrino in uno dei fori e ruotarla in senso antiorario per aprire il mandrino Inserire la punta nel mandri...

Page 56: ...posizione desiderata e Uso della calotta antipolvere Fig 5 Fig 5 La calotta antipolvere pu essere utilizzata come ulteriore protezione contro la polvere e i detriti che entrano nel mandrino Mettere l...

Page 57: ...assistenza autorizzato pi vicino h Accensione e spegnimento Fig 8 Fig 8 Accensione premere l interruttore a grilletto d accensione spegnimento on off Spegnimento rilasciare l interruttore a grilletto...

Page 58: ...e l interruttore di selezione della modalit 2 nella direzione illustrata in fig c Selezionare questa modalit per forare mattoni cemento e prodotti di muratura NON si pu utilizzare con il mandrino a ch...

Page 59: ...lizzare un panno pulito per rimuovere lo sporco la polvere di carbone ecc CONSERVAZIONE Conservare la macchina le istruzioni d uso e laddove necessario gli accessori nell imballaggio originale In tal...

Page 60: ...to Lo scontrino costituisce la prova della data d acquisto e deve essere quindi conservato in un luogo sicuro Il periodo di garanzia pu essere esteso solo per la durata delle eventuali riparazioni nec...

Page 61: ...eif gen Ja Nein Das Ger t wurde in dem folgenden Jumbo Filiale gekauft Aufgetretene M ngel bitte auflisten Bitte beschreiben Sie das Problem oder die Betriebsst rung Ihres Ger tes so genau wie m glich...

Page 62: ......

Page 63: ...IT 62 63 SCHEMI TECNICI...

Page 64: ...llo elastico 35 mm 54 Anello elastico 12 97 Coperchio inferiore 12 Guarnizione grasso 55 Cuscinetto ad aghi HK1210 98 Vite a tappo ST4 16 mm 13 Rondella grande 56 Anello elastico 52 99 Cuscinetto 6001...

Page 65: ...ieco M6 34 Cuscinetto impregnato in olio 77 Rondella 4 120 Copertura 35 Tappo finestrella grasso 78 Piastra di bloccag gio 121 Staffa 36 Perno B4 40 mm 79 O ring 122 Perni intagliati 37 Manopola coper...

Page 66: ...4 Anti vibration handle 5 Power on indicator 6 Operational mode selection switch 1 7 Operational mode selection switch 2 2 1 3 4 5 7 6 8 9 10 11 12 13 14 15 8 Auxiliary handle 9 Depth gauge knob 10 De...

Page 67: ...odel 102 66dB A Level of vibration chisel hammer model K 1 5m s2 ah Cheq 10 515m s2 Level of vibration rotary hammer model K 1 5m s2 ah HD 21 069m s2 Delivery scope In the selling package including be...

Page 68: ...hock 4 Wear dust mask dust powder can cause personal injury 5 Always keep the extension cable well away from the workplace 6 Rotary hammer tools and accessories shall only be used in the way as stated...

Page 69: ...d grounded power tools Unmodified plugs and matching outlets will reduce risk of electric shock b Avoid body contact with earthed or grounded surfaces such as pipes radiators ranges and refrigerators...

Page 70: ...extraction and collection facilities ensure these are connected and properly used Use of these devices can reduce dust related hazards 4 Power tool use and care a Do not force the power tool Use the c...

Page 71: ...in accordance with a standardized test given in EN 60745 1 and may be used to compare one tool with another It may be used for a preliminary assessment of exposure The declared vibration emission leve...

Page 72: ...t to yourself or others To limit the risks of injury fire or electrocution always follow the recommendations indicated Before any use refer to the corresponding section in this user manual These symbo...

Page 73: ...n its use 1250W 1250 W rated power 13mm 13 mm drill capacity in metal 230 240 V 50Hz 230 240 V 50 Hz Rated voltage 32mm 32 mm drill capacity in concrete min 1 800 800 min Rotational speed 40mm 40 mm d...

Page 74: ...the bit Fig 1 WARNING Always wear sturdy gloves when handling or changing drill and chisel bits as they can be very sharp Fig 1 The drill features the SDS plus system which enables easy and safe bit r...

Page 75: ...s and rotate it anticlockwise to open the chuck Insert the bit into the chuck and rotate the chuck key clockwise to tighten it WARNING The key chuck is only to be used when drilling in wood and metal...

Page 76: ...on against dust and debris entering the chuck Place the cap over the shank of the bit or chisels and slide it forward until it rests against the shoulder of the bit Insert the bit or chisel into the c...

Page 77: ...Fig 9 WARNING Do not attempt to change the position of the selectors when the motor is running Doing this will cause serious damage to the tool and possible injury to the operator Fig 9 It is possibl...

Page 78: ...turn mode selector switch 2 to the direction Fig d Select this mode for light chiseling of brick concrete and masonry products must NOT be used with the key chuck Hammer drilling Mode Drilling Mode C...

Page 79: ...nd may be damaged by their use Use clean cloths to remove dirt carbon dust etc STORING Store the machine operating instructions and where necessary the accessories in the original packaging In this wa...

Page 80: ...ep your purchase receipt safe as proof of the date of purchase The guarantee period can only be extended for the duration of any repair required During the warranty period defective devices can be ret...

Page 81: ...also attach a copy of the sales receipt Yes No Purchased at Jumbo store Which error occurred please specify Please describe the problem or malfunction of your device as accurately as possible This al...

Page 82: ......

Page 83: ...DE 82 83 GB TECHNICAL DRAWING...

Page 84: ...tch 100 Rotor 15 Steel ball 7 94 mm 58 Disc spring 101 Bearing 608 16 Cylinder 59 Washer 102 Knob 17 Flat pin 3 18 mm 60 Bearing 627 103 Circlip 15 18 Rubber ring 61 Sealing strips 104 Locking button...

Page 85: ...80 Switch handle 123 Eyelet bolt 38 O Ring 81 Right handle 124 Plastic cap bolt 39 Crankshaft case 82 Tap bolt ST4 2 19 mm 125 Depth gauge 40 Flat pin 10 mm 83 Bolt M6 50 mm 126 Handle clamp 41 Anti...

Page 86: ......

Page 87: ......

Page 88: ...CH Import Distribution exklusiv durch Jumbo Markt AG 8305 Dietlikon WWW AYCE CH...

Reviews: