background image

150-VF20-002(A).doc 

10 

3.6 

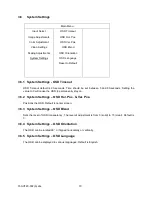
System Settings 


Main Menu 

Input Select 

OSD Timeout 


Image Adjustments 

OSD Hor. Pos. 


Color Adjustment 

OSD Ver. Pos 


Video Settings 

OSD Blend 


Scaling Adjustments 

OSD Orientation 


System Settings 

OSD Language 


Reset to Default 


3.6.1  System Settings - OSD Timeout 

 
OSD Timeout default is 30-seconds. Time should be set between 5 and 60-seconds. Setting the 
value to 0 will cause the OSD to permanently stay on. 
 

3.6.2  System Settings – OSD Hor. Pos. & Ver. Pos. 

 
Positions the OSD. Default is center screen. 
 

3.6.3  System Settings – OSD Blend 

 
Sets the level of OSD transparency. The level of adjustment is from 0 (solid) to 15 (clear). Default is 
3. 
 

3.6.4  System Settings – OSD Orientation 

 
The OSD can be rotated 90

°

, or flipped horizontally or vertically.  


3.6.5  System Settings – OSD Language 

 
The OSD can be displayed in various languages. Default is English. 

Summary of Contents for VFP20 series

Page 1: ...User s Guide Model VFP20 Ver 2 20 1 INCH AMLCD FLAT PANEL COLOR MONITOR Document No 150 VF20 002 Rev A June 2009...

Page 2: ...ns of functions not implemented at time of distribution unless prior contractual arrangements have been made Aydin Displays reserves the right to modify or revise the content of this manual It is furt...

Page 3: ...vide reasonable protection against harmful interference in a residential installation This equipment generates uses and can radiate radio frequency energy and if not installed and used in strict accor...

Page 4: ...E PERSONNEL CAUTION RISK OF ELECTRIC SHOCK DO NOT OPEN CAUTION TO REDUCE THE RISK OF ELECTRIC SHOCK DO NOT REMOVE COVER OR BACK NO USER SERVICEABLE PARTS INSIDE REFER SERVICING TO QUALIFIED SERVICE PE...

Page 5: ...eces or objects of any kind to fall into the display through the ventilation holes The inside of the fluorescent tube located within the LCD monitor contains mercury Please follow the bylaws or rules...

Page 6: ...able Mounting hardware if applicable Product CD containing This User s Guide Warranty Guide Touch Accessories if applicable Please check the carton and its content for damage that may have occurred du...

Page 7: ...P 6 3 2 IMAGE ADJUSTMENTS 6 3 3 COLOR ADJUSTMENT 7 3 3 1 Color Adjustment Advanced 7 3 4 VIDEO SETTINGS 8 3 4 1 Video Settings Decoder Settings 8 3 5 SCALING ADJUSTMENTS 9 3 5 1 Scaling Adjustments Sc...

Page 8: ...P modes are provided 2 Specifications 2 1 LCD Brightness 75 fl typical 60 fl minimum Contrast Ratio 800 1 typical 400 1 minimum Dot Pitch 0 255 mm Display Resolution 1600 x 1200 Active Display Area Ho...

Page 9: ...oltage 8 18 VDC Input Power 60 W 2 2 2 DVI Connector Single Link DVI D Bandwidth Supports up to 160 Mhz operation 2 2 3 Analog R G B Connector HD15 female Standard VGA pin out Bandwidth Supports up to...

Page 10: ...selection and press SELECT to access the adjustment or function With the EXIT button you can exit the current function and go back to the previous menu point 3 1 Main Menu The OSD always starts with t...

Page 11: ...puts Component Color Adjustment PIP Mode DVI Video Settings S Video Scaling Adjustments Composite Video System Settings 3 1 2 Input Select Scan Inputs When Scan Inputs is on the Main Display will be t...

Page 12: ...el Small Scaling Adjustments PIP hor Position Medium System Settings PIP ver Position Large Swap Main PIP Side by Side 3 1 4 Input Select PIP Channel Any input not selected for the Main Picture can be...

Page 13: ...Adjusts horizontal position of PIP 3 1 7 Input Select Swap Main PIP Each time Swap Main PIP is selected the input signals for the Main and PIP are switched 3 2 Image Adjustments The adjustments provid...

Page 14: ...s be left at factory default Auto Color Adjust is pattern sensitive and may not give consistent results Main Menu Input Select Brightness Image Adjustments Contrast Color Adjustment Saturation Video S...

Page 15: ...essing Image Adjustments Sharpness Color Adjustment Film Mode Video Settings Noise Reduction Scaling Adjustments Mpeg Processing System Settings Decoder Settings 3 4 1 Video Settings Decoder Settings...

Page 16: ...ure Flip Color Adjustment Video Settings Zoom Scaling Adjustments Hor Pan System Settings Ver Pan 3 5 1 Scaling Adjustments Scaling Mode The Scaling Modes are Expand Stretch Aspect and 1 1 Expand is t...

Page 17: ...uld be set between 5 and 60 seconds Setting the value to 0 will cause the OSD to permanently stay on 3 6 2 System Settings OSD Hor Pos Ver Pos Positions the OSD Default is center screen 3 6 3 System S...

Page 18: ...ts either in x 1 in or 5 x 20 mm fuses CAUTION Double Pole Neutral Fusing The recommended fuse for the AC Input version is Description Fuse Glass 3AG Slo Blo 2A 250V Manufacturer s P N LITTLEFUSE FSCM...

Page 19: ...wly purchased quality AMLCD display is integrated with one of the following Touch Systems Before installing a new driver please determine which of these technologies is installed and remove any old dr...

Page 20: ...he input is not supported Invalid Mode will be displayed The factory can add special modes if required The following modes have been tested 720 x 400 70 Hz 640 x 350 70 Hz 640 x 400 70 Hz 640 x 480 60...

Page 21: ...pin out Supports NTSC PAL or SECAM Environmental Operating Temperature 0 C to 50 C Storage Temperature 20 C to 70 C Operating Humidity Non condensing 10 to 90 Storage Humidity Non condensing 10 to 90...

Page 22: ...150 VF20 002 A doc 15 7 Outline Drawings...

Page 23: ...150 VF20 002 A doc 16...

Page 24: ...150 VF20 002 A doc 17...

Reviews: