background image

8

ASSEMBLY INSTRUCTIONS

3

4

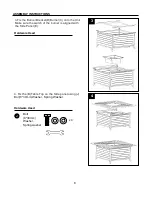
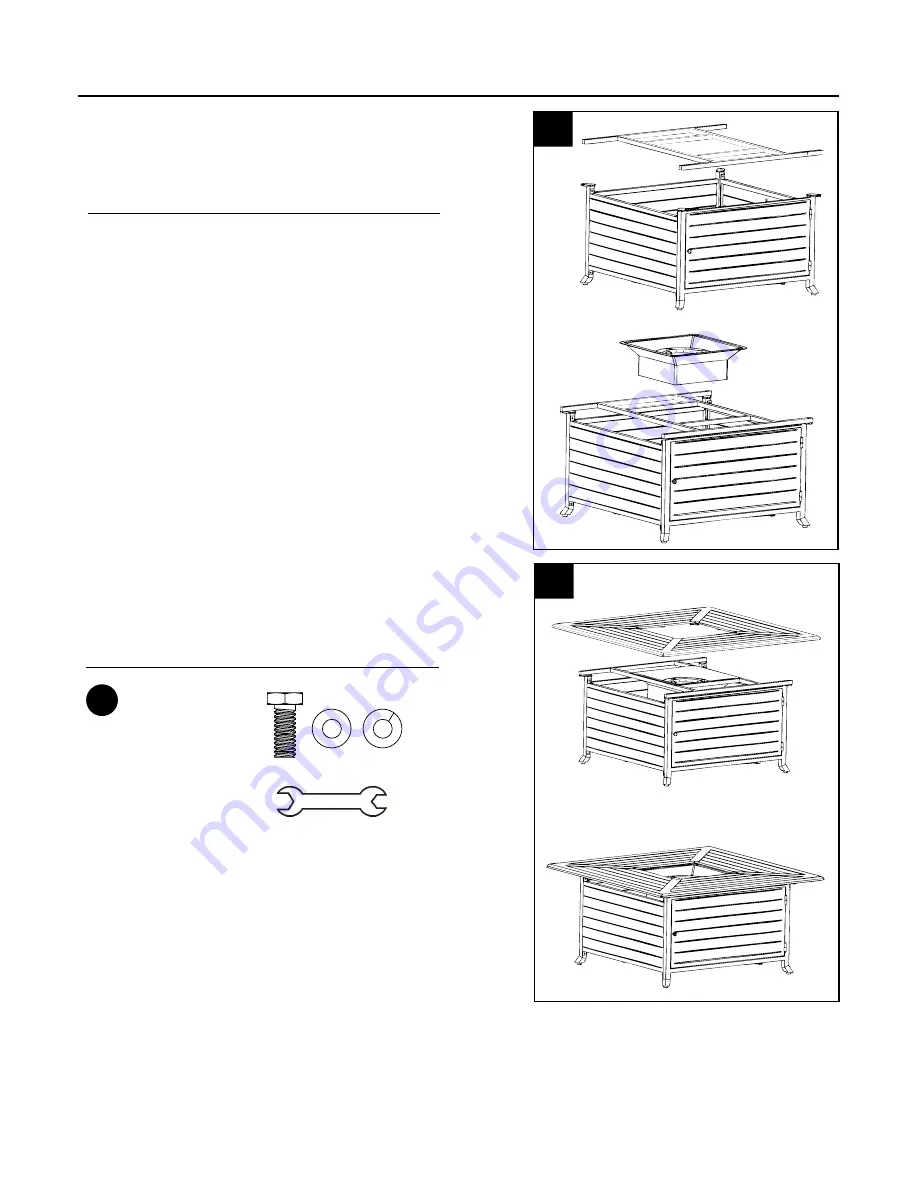
3.Fix the Burner Brecket(D)Burner(C) onto the Unit,

Make sure the switch of the burner is aligned with 

the Side Panel(E)

.

4. Fix the (B)Table Top on the Side panel,using (J)

Bolt(8*38mm)

Washer,  Spring Washer

.

Hardware Used

x 4

Hardware Used

J

Bolt

(8*38mm)

Washer,  

Spring washer

I

Summary of Contents for F-1108-FPT

Page 1: ...ANS Z21 97 2010 Outdoor Decorative Gas Appliances CGA CR 97 003 Outdoor Gas Fireplaces 1 US R C R R...

Page 2: ...SCRIPTION QUANTITY A Removeable Burner Cover 1 B Table Top 1 C Burner 1 D Burner Bracket 1 E Side Panel 1 E1 Side Panel 1 F Side Panel 1 G Gas Tank Bracket side 1 H Gas Tank Support bottom 1 I Door fr...

Page 3: ...en any mechanical or propane fueled equipment is involved These precautions are necessary when using storing and servicing Using this equipment with the respect and caution demanded will reduce the po...

Page 4: ...nd heat producing products for specific uses Your local authorities can advise you about these If no local codes exist follow National Fuel Gas Code ANSI Z223 1 In Canada installation must conform to...

Page 5: ...ay from these surfaces to avoid burning skin or igniting clothing Carefully supervise young children when in the vicinity of the fire pit Do not hang clothing or any other flammable materials from the...

Page 6: ...passages are clear 16 Children and adults should be alerted to the hazards of high surface temperatures and should stay away to avoid burns or clothing ignition 17 Young children should be carefully...

Page 7: ...he side of E Side panel with a hole should be on the bottom to place The G gas Tank Bracket side 2 Use K Bolt 6 18 to connect and fix the G Gas Tank Bracket and H Gas Tank Support onto the unit Refer...

Page 8: ...cket D Burner C onto the Unit Make sure the switch of the burner is aligned with the Side Panel E 4 Fix the B Table Top on the Side panel using J Bolt 8 38mm Washer Spring Washer Hardware Used x 4 Har...

Page 9: ...tored outdoors in a well ventilated area out of the reach of children A disconnected cylinder must have dust caps tightly installed and must not be stored in a building garage or any other enclosed ar...

Page 10: ...he cylinder valve Never connect an unregulated propane cylinder to the heater Attach regulator to cylinder Complete attachment Install cylinder Do not store a spare LP gas cylinder under or near this...

Page 11: ...f bubbles continue appearing the hose should be returned to the place of purchase 3 If leak is at regulator cylinder valve connection disconnect reconnect and perform another leak check If you continu...

Page 12: ...d areas should be leak tested If the hose leaks it must be replaced prior to operation Only use the replacement hose assembly specified by manufacturer The burner must be replaced prior to the applian...

Page 13: ...will be hot after use Handle with extreme care CARE AND MAINTENANCE WARNING FOR YOUR SAFETY Do NOT touch or move fire pit for at least 45 minutes after use Reflector is hot to the touch Allow reflect...

Page 14: ...ose out of pathways where people may trip over it or in areas where the hose may be subject to accidental damage Storage Between uses Turn Control Knob OFF Disconnect LP source Store fire pit upright...

Page 15: ...ssure is low Control knob fully ON Dirt or film on reflector and burner screen Blockage in burner Remove blockage and clean burner inside and outside Check burner and orifices for blockage Clean refle...

Page 16: ...and are not covered by this warranty The owner assumes all other risks arising out from the use or misuse of the product The warranty will be void if the product damage or failure is deemed by the Com...

Reviews: