background image

 
CAUTION 

●    DO NOT operate the heater in an explosive environment. Keep this   

appliance away from areas where you have stored gas, or other vapors and 
flammable liquids. 


●  Before use, verify that no parts are damaged, inspect gas hose. 


●  Never modify, this appliance in any way, or it will void the warranty. 


●  Never use the heater without the reflector shield . 


●  Respect minimum clearance from combustibles as seen on page 6. 


●  Always place heater on a leveled, stable and hard surface. 


●  Only use this heater outdoors. 


●  Never clean with abrasive, corrosive or flammable cleaners. 


●  Do not paint the heater or any of its parts. 


●  When fully assembled proceed to a leak test, and every time you 

       disconnect the hose, before lighting up the heater. 
    

●  A leak test must be performed before operating the appliance.   

       To leak test, use a 50/50 mix of each water and soap in a spray bottle. 
    

●  NEVER LEAK TEST with an open flame or while smoking. 


●  The gas cylinder must be closed at all times when not using the heater. 


●  Children and adults should be made aware of hot surfaces on the heater. 


●  Clothing and other accessories or object are not to be hung on the heater, 

       laid on or near it to dry. 
    

●  Do not obstruct the ventilation opening (hand hole) on cylinder cover. 


●  Installation, maintenance and repair of this heater should always be performed 

       by a qualified gas technician.
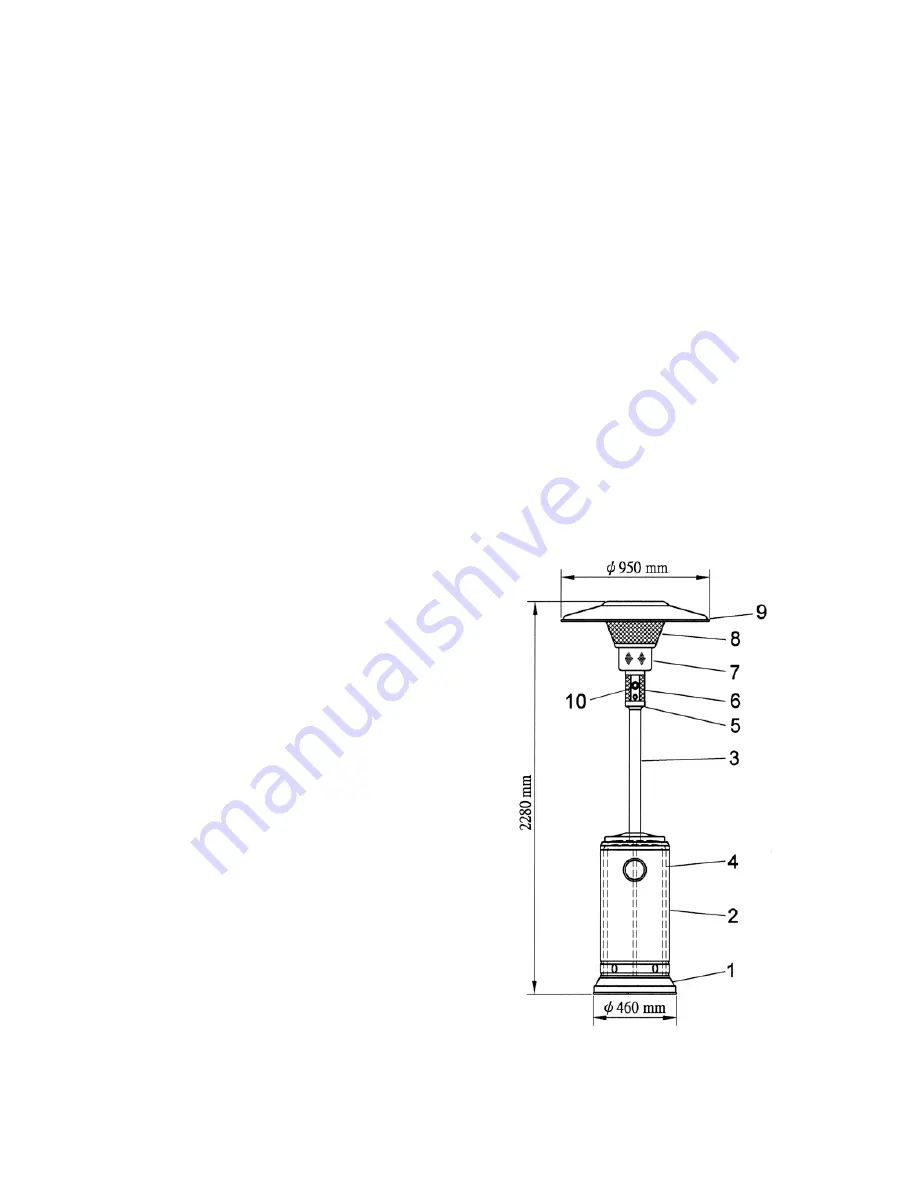


PARTS LIST 


      1  Base 

2  Cylinder cover 
3  Ventilation opening 
4  Post 
5  Gas control 
6  Burner assembly 
7  Flame screen 
8  Reflector 


TOOLS AND EQUIPMENT REQUIRED 


10 and 13mm wrench,                           
Philips screwdriver, medium blade 
Leak test solution: MIX 50/50 water and soap 
1 Propane cylinder (not supplied), with QCC 1 valve 


- 2 - 

Summary of Contents for HLB-2400 SERIES

Page 1: ...Choosing a location for the heater 5 Operation 5 Storage and maintenance 6 Trouble Shooting Guide 7 Carefully read the owners manual and all safety information before assembling and operating the heat...

Page 2: ...eed to a leak test with a soapy water solution 50 part soap 50 part water d If bubbles are detected retighten connections If no leaks are detected open gas valve at cylinder and verify if you smell ga...

Page 3: ...er A leak test must be performed before operating the appliance To leak test use a 50 50 mix of each water and soap in a spray bottle NEVER LEAK TEST with an open flame or while smoking The gas cylind...

Page 4: ...ing the 3 bolts M8 x 15 B C Fasten post to the vertical supports Slide cylinder cover on post with 6 bolts M6 X 35 and 6 nuts M6 D Slide hose through bottom of post and connect to burner head Then att...

Page 5: ...t the heater is assembled for your safety you must perform a leak test of all connections and hoses Mix in a spray bottle equal parts of water and soap 1 Ensure that the heater gas control knob is ful...

Page 6: ...S FROM COMBUSTIBLES Respect clearances as shown Sides of reflector 24 inches Above reflector 18 inches OPERATION TO LIGHT UP 1 Open valve at gas tank 2 From OFF position depress knob turn 90 counter c...

Page 7: ...little popping sounds while operating This sound is normal when turning off the heater PRECAUTIONS Verify periodically for leaks in the system or immediately when you smell gas In case a leak is detec...

Page 8: ...ise direction Refill LPG tank Clean Spider web or other blockage or replace orifice Check all fittings Replace thermocouple Turn tank off Wait 5 minutes Check fuel line connections Reinsert regulator...

Reviews: