background image

www.aztectent.com

General Fabric Care & Maintenance

The vinyl fabric developed for this tent system requires specifi c attention during installation, cleaning, and storage to maintain its 
maximum life span. Please follow the following care and maintenance guidelines provided for this product.

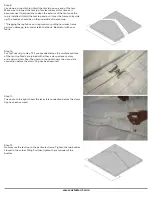
GROUND CLOTHS: The usage of ground covering material under the tent during installation and dismantle will protect the tent fabric 
from soiling and from minor surface abrasions. A ground cloth can also help keep the tent top dry if the ground surface ( i.e. dirt, grass, 
etc.) is wet during the installation or dismantle.

MILDEW TREATMENT: The fabric is pretreated with mildew inhibitors that help prevent the growth and spreading of mildew and 
fungus. Although treated, proper care should be given to prevent potential growth. If you see mildew wipe it away immediately with a 
clean towel and diluted soap solution. Never fold your fabric for storage if the fabric is even slightly wet. Mold/Mildew spores in the air 
and on the ground will come in contact with the fabric while installed. To grow, all the mildew needs is moisture and some source of 
food (often found in dirt that might be on the tent). Your best bet is to keep your fabric clean and dry to prevent mildew growth.

FABRIC CLEANING: The best way to clean the vinyl tent fabric is with a soft towel or soft bristled brush immersed in a diluted solution 
of warm water and our tent cleaning solution. A diluted and mixed solution of a tablespoon of traditional dish soap with a gallon of 
warm water will also work, but extra caution should be placed on insuring that this cleaning solution is thoroughly rinsed from the 
fabric especially with clear vinyls (See special notes on working with clear vinyls). 

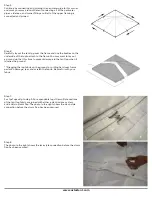
You will need a large, smooth, fl at space slightly larger than the section of fabric.  This space should be covered with a ground 
protecting layer to avoid  damaging the tent membrane when moving in the washing area.  Small impediments, sharp objects and 
rough surfaces all have the potential to damage the membrane you are trying to clean. 

Follow the instructions for the proper dilution ratio of your cleaning product.  Apply the diluted solution directly to the fabric using 
1) a towel immersed in the solution, or 2) a spray bottle or larger pressurized spraying apparatus to evenly cover the fabric with the 
solution. Let this sit on the fabric for about one minute to allow the mixture to penetrate the fabric. Using a soft towel or soft bristled 
polypropylene brush (some can be mounted to a long handle to allow you to stand while working), gently work the cleaner into 
the fabric using only mild pressure. While harder bristled brushes can work, they will end up microscopically scratching the fabric, 
potentially permanently damaging the fabric and making it harder to clean the next time.  The process of hand cleaning the fabric will 
allow you to apply only enough diluted solution to get the fabric clean. This will help limit the amount of water placed on the fabric to 
expedite drying time. Never allow the tent cleaner to dry on the fabric. For this reason, larger tents might be better to clean in sections. 
Once the cleaning is complete be sure to rinse away any cleaning solution completely from the tent membrane. 

Full immersion of the fabric in water is not recommended. The use of commercial front loading or top loading washing machines is 
not recommended and will void the warranty of the fabric.  These machines cause an excessive amount of stress to the fabric and can 
force water into the fabric causing increased occurrences of mildew growth and shorten the life of the fabric. As with any cleaning, the 
fabric should be hung to dry completely before folding and storage. Cleaners that include chlorine bleach, and/or any petroleum based 
solvents will degrade the fabric, discolor the fabric and shorten its life span.

If you have a diffi cult stain that cannot be removed with traditional cleaning, please consult with your sales person before trying any 
other chemicals that might end up damaging the material further. Do not use other chemicals or cleaners unless instructed by your 
sales professional. 

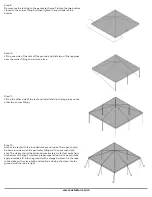
FABRIC DRYING: The best way to dry the vinyl tent fabric is to hang-dry in a low humidity environment. Circulating air around 
the surface of the hanging fabric with the use of fans will also speed the drying process and improve drying time in more humid 
environments. Please also assure that subassemblies and other components within the tent system are dry before folding. These 
subassemblies can be reinforcements, lace lines, webbing, rope, thread, and/or any other part that is permanently affi xed to the main 
tent membrane. The use of commercial drying equipment and any drying using heat will void the warranty of the fabric. DO NOT 
STORE YOUR FABRIC WET. Fabric folded and stored wet will mildew.

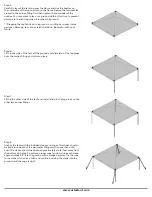
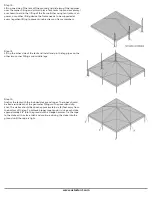
TENSIONING: Do not over tension your tent fabric during installation, use, or removal. Over tensioning can cause permanent damage 
to the tent membrane. The most obvious sign of over tensioning would be stress wrinkles at the tension points. Be sure to confi rm that 
your frame/pole components match the tent design. In cases where the ground is not level, over tensioning is possible by trying to 
force the tent to dimension. 

STORAGE RECOMMENDATIONS: The fabric for the tent system shall be stored dry in a cool, dry place in the protective storage 
bags included with your purchase. Other types of bags are acceptable as long as they can protect the fabric from the environmental 
elements of the storage area. 

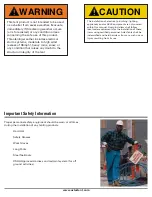
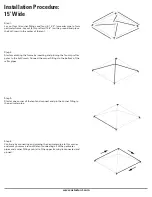
INSPECTION: Prior to each use, each component of the tent system needs to be thoroughly inspected to assure its structural stability 
has not been compromised. Fabric components that are ripped, torn, frayed, or damaged shall be immediately replaced and not used. 
Structural components of the fabric membrane are the most critical including but not limited to the main fabric membrane, structural 
reinforcements and webbing, web termination plates/rings/fasteners, and connection points from fabric panel to fabric panel or 
connection points between the fabric panel and the hardware support system.

Summary of Contents for STANDARD FRAME

Page 1: ...STANDARD FRAME PRODUCT MANUAL If YOU can IMAGINE it WE can BUILD it...

Page 2: ...e tent The installation of electrical plumbing lighting appliances and or HVAC equipment are not covered within this manual Users Installers shall follow local code requirements for the installation o...

Page 3: ...e 4 General Hardware Care Maintenance 5 Fabric Flame Retardant Information 5 Anchoring 5 Pre Installation Guidelines 6 General Installation Guidelines 6 Post Installation Guidelines Maintenance 6 Safe...

Page 4: ...amount of water placed on the fabric to expedite drying time Never allow the tent cleaner to dry on the fabric For this reason larger tents might be better to clean in sections Once the cleaning is co...

Page 5: ...e bent cracked frayed or damaged shall be immediately replaced and not used Speci c attention should be paid toward any devices used for anchoring including ratchets ropes cables and web straps Fabric...

Page 6: ...stretch mast base settling changes to design geometry etc Changes to the design geometry of the tent and consequently the structural performance characteristics of the tent can occur while the tent i...

Page 7: ...he same procedures outlined but in the reverse order Once unassembled each component of the system should be inspected for any signs of visual damage by the installer All damaged materials should be m...

Page 8: ...stallation tool Utility Knife General installation tool Tape Measure General installation tool Marking Paint Chalk Used to mark anchoring locations and tent boundaries Optional Items Accessories Avail...

Page 9: ...of the tent Step 2 Start assembling the frame by inserting and pinning the four hip rafter poles to the 4pt Crown Connect the corner ttings to the bottom of the rafter pipes Step 3 Start at one corne...

Page 10: ...he leg pipes over the corner tting and pin into place Step 7 Lift up the other side of the tent and install and pin the leg pipes on the other two corner ttings Step 8 Anchor the tent with the include...

Page 11: ...e frame by inserting and pinning the four hip rafter poles to the 4pt Crown Connect the corner ttings to the bottom of the rafter pipes Step 3 Start at one corner of the tent and connect and pin the c...

Page 12: ...bric Step 6 Lift up one side of the tent off the ground and slide two of the leg pipes over the corner tting and pin into place Step 7 Lift up the other side of the tent and install and pin the leg pi...

Page 13: ...nd and place the 8pt Crown in the center of the tent Step 2 Start assembling the frame by inserting and pinning the four hip rafter poles to the 8pt Crown Connect the corner ttings to the bottom of th...

Page 14: ...out a ground cloth at this time to prevent damage to the tent top when it touches the ground Dragging the top fabric on the ground or pulling hard over frame parts can damage tear and scratch the fab...

Page 15: ...f the tent and install and pin the leg pipes on the other two corner ttings Step 12 Anchor the tent with the included stakes and ropes The ropes should be tied around each of the perimeter ttings with...

Page 16: ...ncluded diagram Lay out the corner ttings special side tee ttings and crown tting on the ground Step 2 Connect and pin the four 4 21 10 hip rafter poles to the 8pt crown Step 3 Connect and pin the fou...

Page 17: ...ross the tent The cable should be looped over the perimeter arm of the tting and will keep the tent from bowing outward past the 30 width Step 8 Start at one corner of the tent and begin to connect an...

Page 18: ...ling hard over frame parts can damage tear and scratch the fabric Be careful with your fabric Step 10 For 1pcTops skip to step 12 For expandable tops the multiple sections of the tent top fabric are j...

Page 19: ...Step 14 Lift up the other side of the tent and install and pin the leg pipes on the other two corner ttings and middle legs Step 15 Anchor the tent with the included stakes and ropes The ropes should...

Page 20: ...t building the frame by connecting and pinning the four 4 21 10 rafter pipes to the 8pt Crown tting Step 3 Starting from the crown and working down connect and pin the 14 4 hip rafters to the Crown No...

Page 21: ...rm of the tting and will keep the tent from bowing outward past the 40 width Step 7 Lay down a drop cloth to unfold the tent top on one end of the tent Make sure to inspect the tent top for cleanlines...

Page 22: ...1 Lift up one side of the tent off the ground and slide two of the leg pipes over the corner tting and pin into place Tent Jacks optional accessory are shown to aid in the lifting of the frame Either...

Page 23: ...ngs with an overhand slip knot The stakes should be driven approximately six 6 feet away from the bottom of the leg To achieve proper rope tension drive each stake approximately 38 into the ground wit...

Page 24: ...www aztectent com K cad files Frame Tents DIAGRAMS 10x 10x10 dwg 2 28 2007 9 59 16 AM pdfFactory pc3...

Page 25: ...www aztectent com K cad files Frame Tents DIAGRAMS 10x 10x20 dwg 2 28 2007 10 07 28 AM pdfFactory pc3...

Page 26: ...www aztectent com K cad files Frame Tents DIAGRAMS 15x 15x15 dwg 4 2 2007 5 43 29 PM pdfFactory pc3...

Page 27: ...www aztectent com...

Page 28: ...www aztectent com K cad files Frame Tents DIAGRAMS 20x 20x20 dwg 2 14 2007 3 45 09 PM pdfFactory pc3...

Page 29: ...www aztectent com K cad files Frame Tents DIAGRAMS 20x 20x30 dwg 2 14 2007 3 50 25 PM pdfFactory pc3...

Page 30: ...www aztectent com K cad files Frame Tents DIAGRAMS 30x 30x30 dwg 2 9 2007 9 12 23 AM pdfFactory pc3...

Page 31: ...www aztectent com K cad files Frame Tents DIAGRAMS 30x 30x40 dwg 2 14 2007 5 51 58 PM pdfFactory pc3...

Page 32: ...www aztectent com K cad files Frame Tents DIAGRAMS 30x 30x60 15 dwg 2 15 2007 5 06 02 PM pdfFactory pc3...

Page 33: ...www aztectent com K cad files Frame Tents DIAGRAMS 30x 30x80 dwg 2 16 2007 1 55 26 PM pdfFactory pc3...

Page 34: ...www aztectent com K cad files Frame Tents DIAGRAMS 40x 40x40 dwg 7 13 2006 3 57 50 PM pdfFactory pc3...

Page 35: ...www aztectent com K cad files Frame Tents DIAGRAMS 40x 40x60 dwg 2 16 2007 5 45 38 PM pdfFactory pc3...

Page 36: ...www aztectent com K cad files Frame Tents DIAGRAMS 40x 40x80 dwg 2 22 2007 1 38 56 PM pdfFactory pc3...

Page 37: ...www aztectent com K cad files Frame Tents DIAGRAMS 40x 40x100 dwg 2 22 2007 3 00 26 PM pdfFactory pc3...

Page 38: ...Right Gable Corner Left Gable Crown 3pt Gable Crown 4pt 2 Slide Fitting Add Leg Qwik Corner 3 Way Crown 4 Way Crown 6 Way Crown 8 Way Crown Hip Intermediate 40x Hip Slide Intermediate 30x Rafter Slid...

Page 39: ...adapin Assembly Pin Jumbo Pin 2 Adjustable Qwik Baseplate Standard Baseplate Standard Baseplate 2 Adjustable Qwik Footplate 1 2 Polopro x 18 Rope 2 Slide Bally Corner Fitting 2 RoundTubing Extrusion S...

Page 40: ...t the loads below The below chart lists the required resistance loads that must be supported by the anchoring system to meet the engineering loads speci ed under the code A Factor of Safety of 2 0 tim...

Page 41: ...CTUAL LOAD VALUE Standard Frame Load Summary 30 Width UPLIFT SHEAR BEARING LOAD OUT OF PLANE SHEAR IN PLANE SHEAR TENSION UPLIFT SAMPLE ACTUAL LOAD VALUE MINIMUM DESIGN LOAD FOR ANCHORING SYSTEM MINIM...

Page 42: ...299F00110 Z299F00120 Z299F00130 Z299F00140 Z299F00145 Z299F00150 Z299F00160 Z299F00170 Z299F00180 Z299F00190 Z299F00195 Z299F00200 Z299F00220 1 10 x 2 Pipe 2 8 x 2 Pipe 3 4 2 Pipe 3 10 2 Pipe 4 4 2 Pi...

Page 43: ......

Reviews: