background image

User Manual 

Page 10


of 40 

Getting Started 

Setting up the device is easy. The flowchart below provides an outline of the 

steps needed in order to complete the installation. Brief descriptions appear 

beside  each  step.  Detailed  instructions  are  provided  in  the  subsequent 

pages. 


You may now access the internet.  

You may need to check some settings or 
disable 

some 

applications 

before 

proceeding with the inst

a

llation. 

Connect  the  telephone  cables,  Ethernet 
cables, and power adapter. 
 

You  may  configure  your  router’s  wireless 
settings and other router features through 
the Web User Interface.  
 

Plan your Network 

Remove/Disable 

Conflicts 

Set up the  

Router 

Web User Interface 

Ready to Use 

You  may  refer  to  the  diagram  provided 
in  this  user  manual  for  the  suggested 
network setup. 

Summary of Contents for DSL5068EN(1T1R)

Page 1: ...DSL5068EN 1T1R ADSL2 150MBPS WIRELESS N MODEM ROUTER V1 0 ...

Page 2: ...User Manual Page 2 of 40 ...

Page 3: ...R A PARTICULAR PURPOSE OR ANY WARRANTIES ARISING FROM COURSE OF DEALING COURSE OF PERFORMANCE OR USAGE OF TRADE IN NO EVENT WILL THE SELLERS BE LIABLE FOR DAMAGES OR LOSS INCLUDING BUT NOT LIMITED TO DIRECT INDIRECT SPECIAL WILLFUL PUNITIVE INCIDENTAL EXEMPLARY OR CONSEQUENTIAL DAMAGES DAMAGES FOR LOSS OF BUSINESS PROFITS OR DAMAGES FOR LOSS OF BUSINESS OF ANY CUSTOMER OR ANY THIRD PARTY ARISING O...

Page 4: ...ing TCP IP Settings 14 Configuring Internet Properties 14 Removing Temporary Internet Files 15 Setup the Device 16 The Web User Interface GUI 18 Accessing the Web User Interface 18 Web User Interface Modes 19 Switching Modes 19 Logging In to the Web User Interface 20 Connecting to the Internet 20 Basic Mode 21 Basic Home 22 Basic Status 24 Basic Wireless 27 Advanced Mode 31 Advanced Mode Router Fe...

Page 5: ...02 11n wireless standard the Aztech DSL5068EN 1T1R is capable of up to 150Mbps wireless transfer speeds to constantly ensure that your customers are equipped with the much needed wireless transfer speeds that would fit their internet activities such as web surfing social networking and even audio video streaming In addition the DSL5068EN 1T1R uses a 1T1R MIMO Multiple In Multiple Out Technology su...

Page 6: ...ztech DSL5068EN 1T1R has a TR069 support specifically made for remote management remote configuration and zero touch set up that allows efficiency and cost saving on customer support and logistics Accompanied by its own intuitively designed OS independent web user interface customers will be able to set up the device easily and even manage the device s overall features without any difficulty In ad...

Page 7: ...ser Ethernet network adapter An active DSL Internet account Package Contents Please check the package contents listed below For any missing items please contact your dealer immediately Product contents vary for different models DSL5068EN 1T1R Ethernet Cable Telephone Cable DSL Microfilter 12V 1A DC Power Adapter Easy Start Guide User Manual ...

Page 8: ...nected to the corresponding USB port ON A USB device is connected to the corresponding USB port WIRELESS OFF Steady green Blinking green Wireless interface disabled Wireless Interface enabled Transmitting Receiving data WPS OFF WPS disabled completed authentication Blinking green WPS authentication in progress DSL Blinking green Steady green Establishing or No DSL signal DSL signal is established ...

Page 9: ...5 DSL PORT Connecting the modem to an ADSL line RJ11 BUTTON PORT DESCRIPTION USB PORT For connecting USB devices such as USB external hard drives WPS BUTTON Press for two 2 seconds to initiate Wireless Protected Setup WPS with WPS capable clients ON OFF Power ON OFF button RESET BUTTON Press for 5 seconds to perform device reboot Press for 10 seconds to restart the device to its factory defaults ...

Page 10: ...now access the internet You may need to check some settings or disable some applications before proceeding with the installation Connect the telephone cables Ethernet cables and power adapter You may configure your router s wireless settings and other router features through the Web User Interface Plan your Network Remove Disable Conflicts Set up the Router Web User Interface Ready to Use You may ...

Page 11: ...incoming and outgoing bandwidth of your subscription B Virtual LED Status For instances wherein you wish to view the LED status of your modem the Web GUI has virtual LED indicators which show the light status of the LEDs on your device C PPP Account Lock Locks in the PPP username and password entered once Globe network detects an active account This feature helps to prevent tampering of the creden...

Page 12: ...llustration below is an example of a network diagram Each port in the router can be used for different connections For example Ethernet 1 connect to a Desktop PC Wireless connect a wireless laptop to the built in wireless access point To create a network diagram For wireless devices identify the wireless devices you want to include in the network For wired devices identify which modem port you wan...

Page 13: ... Temporary Internet files Internet Sharing Proxy and Security Applications Internet sharing proxy software and firewall applications may interfere with the modem installation These should be removed or disabled before starting the installation If you have any of the following or similar applications installed on your computer remove or disable them according to the manufacturer s instructions Inte...

Page 14: ...et Protocol TCP IP and then click Properties The Internet Protocol TCP IP dialog box would appear 5 Select Obtain an IP address automatically 6 Click the OK button to close the Internet Protocol TCP IP dialog box 7 Click the OK button to close the Local Area Connection Properties dialog box Configuring Internet Properties To set the Internet Properties 1 Select Start Run This opens the Run dialog ...

Page 15: ...remove footprints left by the Web pages you visited To remove temporary Internet files 1 Select Start Run to open the Run dialog box 2 Enter control and then click the OK button to open the Control Panel 3 Double click Internet Options 4 On the Internet Options window in the Temporary Internet Files pane click Delete Cookies 5 Click Delete Files 6 Click OK to close Internet Properties ...

Page 16: ...ne end of the Ethernet cable from the modem s Ethernet port and plug the other end into the Ethernet port of your computer If you have another device you need to connect through wire into the modem use another piece of Ethernet cable Plug one end of the Ethernet cable from the computer s Ethernet port and then plug the other end into an available Ethernet port in the modem 2 Plug one end of the te...

Page 17: ... Telephone Service POTS splitter separates the two signals and eliminates the noise To setup a telephone on the POTS Splitter DSL Microfilter a Locate the phone jack in your house b Insert the POTS Splitter into the phone jack c Plug one end of the telephone cable from the POTS Splitter s TEL port and then plug the other end into the telephone 3 Connect the power adapter from the modem s 12V 1 0A ...

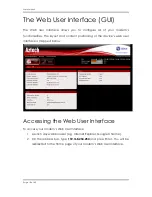
Page 18: ...ut and content positioning of the device s web user interface is mapped below Accessing the Web User Interface To access your modem s Web User Interface 1 Launch any web browser e g Internet Explorer Google Chrome 2 On the address bar type 192 168 254 254 and press Enter You will be redirected to the Home page of your modem s Web User Interface ...

Page 19: ...Mode is only capable of providing system ADSL WAN information summary and other router oriented statuses which would be useful in knowing the device s current state s information The Advanced Mode is only capable of providing access to network diagnostic tools such as ping and traceroute Switching Modes You can switch modes by clicking on the Basic Mode or Advanced Mode button located on the upper...

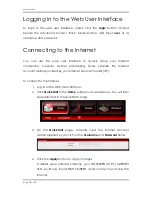
Page 20: ...ndly prepare the internet account details provided by your Internet Service Provider ISP To connect to the Internet 1 Log in to the Web User Interface 2 Click Quickstart in the Home submenu as seen below You will then be redirected to the Quickstart page 3 On the Quickstart page correctly input the internet account details supplied by your ISP on the Username and Password fields 4 Click the Apply ...

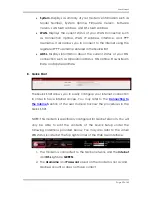
Page 21: ...em information and its current configuration It allows you to view various modem information quickly configure modem settings to have access to the Internet and also configure your modem s wireless settings The Basic Mode contains the following menus Home Status Wireless ...

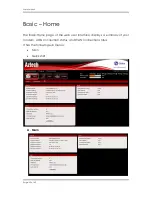
Page 22: ...ual Page 22 of 40 Basic Home The Basic Home page of the web user interface displays a summary of your modem ADSL connection status and WAN connection status It has the following sub menus Main Quickstart A Main ...

Page 23: ...ownstream Rate and Upstream Rate B Quick Start The Quick Start allows you to easily configure your internet connection in order to have internet access You may refer to the Connecting to the Internet section of the user manual to know the procedures in the Quick Start NOTE This modem is specifically configured for Globe Telecom You will only be able to edit the contents of the Quick Setup under th...

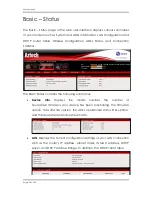
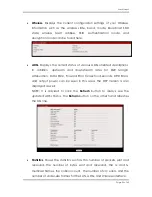
Page 24: ... Basic Status contains the following sub menus Device Info Displays the model number the number of hours days mins secs your device has been functioning the firmware version the software version the ADSL operational status DSL uptime and the downstream and upstream rate LAN Displays the current configuration settings of your LAN connection such as the router s IP address subnet mask its MAC Addres...

Page 25: ... Margin Attenuation Data Rate Forward Error Correction Seconds CRC Errors and output power can be seen in this area The DSP Version is also displayed as well NOTE It is advised to click the Refresh button to always see the updated ADSL Status The Retrain button on the other hand refreshes the DSL line Statistics Shows the statistics such as the number of packets sent and received the number of byt...

Page 26: ...User Manual Page 26 of 40 System Log Allows you to view the system log of your router Simply click the refresh button to refresh the current activity log of your router ...

Page 27: ...sic Wireless page of the web user interface allows users to configure the modem s wireless settings wireless security and access control The Wireless page contains the following sub menus Wireless Settings Security Access Control A Wireless Settings ...

Page 28: ... the wireless mode of your modem By default this is set to 802 11b g n It is suggested to leave it as it is in order for your modem to support various devices that have different modes Channel Allows you to change the current country selected and the channel as well NOTE It is strongly advised to leave the current settings as is By default the Country is selected as Philippines and the channel is ...

Page 29: ...SSID input box also reflects the SSID input box under Wireless Settings menu Security Mode Allows you to change the default wireless security set on your device By default the security mode is set to WPA PSK WPA2 PSK Encryption Allows you to change the encryption used by your modem By default the encryption mode is set to TKIP AES Pre Shared Key Allows you to set change the wireless password set o...

Page 30: ...ol Allows you to Allow or Deny devices wireless access to your modem Simply tick the WLAN MAC Filter checkbox input the MAC address of the devices and select Allow or Deny on the ACL Mode selection list Click the Apply button to apply changes ...

Page 31: ...ode button located at the upper left corner of your screen Other modem features may easily be accessed and configured in this mode The Advanced Mode contains the following menus Router Features Diagnostics NOTE Without logging in to the Web User interface the Advanced mode would only contain Network Tools ping and traceroute ...

Page 32: ...ious advanced modem oriented features of your modem The Advanced Mode Router Features is also the default page of the Advanced Mode page The Advanced Mode Router Features page contains the following sub menus Port Forwarding Port Triggering DDNS Static Route IP QoS Port Mapping Bandwidth Limit Bandwidth Limit Rules ...

Page 33: ...ng traffic from the Internet to a specific computer in your local network Port Triggering Through port triggering incoming connection to a specified port could be redirected to the PC that initiated the request DDNS Allows you to set a static host name with a Dynamic IP address ...

Page 34: ...ine networking service and protocol priority Port Mapping Allows ATM PVCs to be permanently routed to a physical interface on the device Bandwidth Limit Allows you to control the amount of bandwidth for both Egress outgoing and Ingress incoming data To configure bandwidth limit it is important to enable the Bandwidth Limit function first by ticking the Bandwidth Limit checkbox ...

Page 35: ... the amount of bandwidth per IP for both Egress outgoing and Ingress incoming data The Bandwidth Limit tab must be enabled first before you can configure the fields below All IPs which are not defined by a rule will follow the limit in the Bandwidth Limit tab ...

Page 36: ...tains the following submenus Connectivity ADSL Plotting Connectivity Allows you to access the network tools that your modem has This includes the Ping and the Traceroute function o Ping Allows you to check the destination IP address that you want to reach A feedback would show displaying how long it took the destination IP address to respond and receive a reply o Traceroute Allows you to see the p...

Page 37: ...f 40 ADSL Plotting Is dependent on your DSL connection and will only be populated by your ISP Once you have successfully connected to your provider s network HEX information of your network setup will be shown in this area ...

Page 38: ...068EN 1T1R s USB port 2 On your desktop laptop connected wired or wirelessly to the DSL5068EN 1T1R open windows explorer this can be accessed using the keyboard shortcut windows e NOTE The device wherein you want to access a connected external storage MUST be connected wired or wirelessly to your DSL5068EN 1T1R 3 On your Windows Explorer s Address bar type in 192 168 254 254 a then press Enter You...

Page 39: ...g on the surface it lands on the modem can get its casing damaged or its internal components dislodged affecting its functionality 6 Clean the modem s casing with a soft damp cloth and remove dust that may cover the modem casing s ventilation regularly 7 Turn off the modem and disconnect the power adapter from the power outlet if it will be unattended for a long time Safety Precautions Do not open...

Page 40: ...User Manual Page 40 of 40 Copyright 2015 Aztech Technologies Pte Ltd CRN 199800635M All rights reserved ...

Reviews: