4
7
IMPORTANT :
Do not use other adapters without authorization from the manufacturer.
E
N
G
L
IS
H
IMPORTANT :
After battery replacement, all user settings will revert back to the factory
settings.
Please carefully follow the instructions below to ensure proper function of
the device.
WARNING :
There is a danger of explosion if the battery is incorrectly replaced.
Trained service personnel should replace only with the same or
equivalent battery type as recommended by the manufacturer.
IMPORTANT :
Prior to using a new battery, please charge for a minimum of 4 hours to
ensure maximum battery life.
Battery Installation / Replacement
Fiber-Optic Probe Installation / Replacement
1.
Insert the fiber-optic probe into the handpiece until the base of the probe
is completely matched to the handpiece and listen for a “click” that signifies
the probe has been securely fastened.
2.
Place the protection shield on the front end of the handpiece, and the orange
anti-glare cone or tube onto the tip of the fiber-optic probe and adjust its
position according to the dentist's preference.
3.
To remove, simply pull the fiber-optic probe outwards to remove it from the
handpiece.
IMPORTANT :
Don’t use excessive force when installing the above parts to avoid
possible breakage or damage.
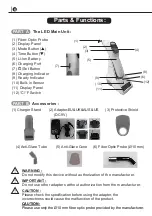
PARTS & FUNCTIONS
WARNING :
Do not modify this device without authorization of the manufacturer.
CAUTION
Please check the specification before using the adapter, the incorrectness
could cause the malfunction of the product.
:
(2) Adapter (
V)
DC 9
(1) Fiber-Optic Probe
(2) Display Panel
(3) Mode Button (
▲
)
(4) Time Button (
▼
)
(5) Li-Ion Battery
(6) Charging Port
(7)
/
Set Button
(8) Charging Indicator
(9) Ready Indicator
(10) Built-in Sensor
(11) Display Panel
(12) °C/°F Switch
PART A
The LED
:
Main Unit
PART B
Accessories :
(1) Charger Stand
(3)
(2)
(1)
(4)
(5)
(6)
(8)
(9)
(10)
(11)
(12)
(3)
Protective Shield
(5) Fiber Optic Probe(Ø10
→
Ø8 mm)
(4) Anti
-
Glare Tube & Cone
(7)
Installation
:

