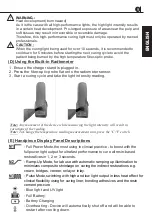
(D) Using the Built-in Radiometer
: Full Power Mode
: Ramp-Up Mode
: Pulse Mode
8
7
E
N
G
L
IS
H
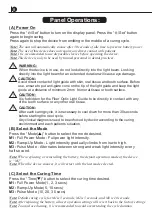
Press the “ /Set” button to turn on the display panel. Press the “ /Set” button
again to begin curing.
Press again to stop the device from emitting in the middle of a curing cycle.
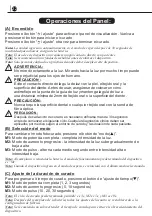
(A) Power On
Press the “Mode(
▲
” button to select the mode desired.
M1:
Full Power Mode - Full power light intensity.
M2:
Ramp-Up Mode - Light intensity gradually climbs from low to high.
M3:
Pulse Mode - Alternates between strong and weak light intensity every
half second.
)
(B) Select the Mode
Press the “Time(
▼
button to select the curing time desired.
M1:
Full Power Mode(1, 2, 3 secs)
M2:
Ramp-Up Mode(5, 10 secs)
M3:
Pulse Mode (10, 20, 30 secs)
)”
(C) Select the Curing Time
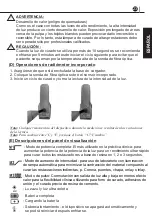
: Blue light and UV light
: Full Battery
: Battery Charging
: Overheating - Device will automatically shut off and will be able to
restart after cooling down.
WARNING :
When the device is in use, do not look directly into the light beam. Looking
directly into the light beam for an extended duration will cause eye damage.
Note:
The unit will automatically snooze after 30 seconds of idle time to preserve battery power.
Note:
The use of this device does not require any direct contact with patients
.
Note:
It is recommended to use disposable sleeves before operating the device.
Note:
This device is only to be used by trained personnel in dental practices.
Note:
When replacing or reinstalling the battery, the default operation mode of the device
is “M1”.
Note:
When the device snoozes, it will restart with the last mode selected.
Note:
Default curing cycle for M1
is 3
seconds, M2
is 5
seconds, and M3
is 10
seconds.
Note:
After replacing the battery, all user operation settings will revert back to the factory settings.
Note:
To avoid overheating, it is recommended to avoid overextending the cycle duration.
CAUTION :
Avoid direct contact of light guide with skin, oral tissue and tooth surface. Before
use, ensure to put anti-glare cone on the tip of the light guide and keep the light
guide at a distance of minimum 2mm from oral tissue or tooth surface.
CAUTI
O
N :
It is forbidden for the Fiber Optic Light Guide to be directly in contact with any
of the teeth surface or any other oral tissue.
CAUTION :
After each curing cycle, it is necessary to cool down for more than 30 seconds
before starting the next cycle.
Any clinical diagnosis need to be enforced by doctor according to the curing
environment and each patients’ situation.
WARNING :
Heat development (burn hazard)
As it is the case with all high-performance lights, the high light intensity results
in a certain heat development. Pro-longed exposure of areas near the pulp and
soft tissues may result in irreversible or reversible damage.
Therefore, this high-performance curing light must only be operated by trained
professionals.
CAUTION :
When the curing light being used for over 10 seconds, it is recommended to
cool down for 5 minutes before starting the next curing cycle to avoid the
patient being burned by the high temperature fiber-optic probe.
(E) Handpiece Display Panel Descriptions
1. Ensure the charger stand is plugged in.
2. Press the fiber-optic probe flat onto the radiometer sensor.
3. Start a curing cycle and take the light intensity reading.
Note:
Any movement of the device while measuring the light intensity will result in
variations of the reading.
Note:
To Change the temperature reading measurement unit, press the °C/°F switch.
UV
Panel Operations
:

