background image

5 Bediening

Gebruikershandleiding BA ULTIMATE POWER + / BA ULTIMATE

34

64 01 553 D3551

.

201.03.03

.

19

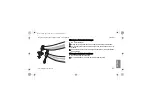
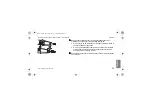
De stift verwijderen
1. Schroef het meegeleverde gereedschap (A) in.
2. Open het spansysteem.
3. Trek de stift eruit.

A

6401553.book  Seite 34  Montag, 13. Juni 2016  4:39 16

Summary of Contents for BA ULTIMATE POWER+ Series

Page 1: ...ë L bëé çä L fí äá åç L kÉÇÉêä åÇë _ OMM L _ QM L _ SM L _ OUM _ ORM L _ QR L _ SR léÉê íáåÖ fåëíêìÅíáçåë dÉÄê ìÅÜë åïÉáëìåÖ kçíáÅÉ ÇÛìíáäáë íáçå fåëíêìÅÅáçåÉë ÇÉ ìëç fëíêìòáçåá ÇDìëç dÉÄêìáâÉêëÜ åÇäÉáÇáåÖ 6401553_Titel fm Seite 1 Mittwoch 25 Mai 2016 11 02 11 ...

Page 2: ...6401553_Titel fm Seite 2 Mittwoch 25 Mai 2016 11 02 11 ...

Page 3: ..._ riqfj qb mltbo H L _ riqfj qb båÖäáëÜ léÉê íáåÖ fåëíêìÅíáçåë _ OMM L _ QM L _ SM L _ OUM _ ORM L _ QR L _ SR Operating Instructions 6401553 book Seite 1 Montag 13 Juni 2016 4 27 16 ...

Page 4: ...ntents 1 Before you begin 5 1 1 Structure of the document 6 1 2 Service life 9 2 Safety information 11 3 Technical description 13 3 1 Task 13 3 2 Functionality 13 3 3 BA ULTIMATE POWER design 14 3 4 BA ULTIMATE design 16 3 5 Technical data 17 3 6 Production data 22 6401553 book Seite 2 Montag 13 Juni 2016 4 27 16 ...

Page 5: ...ger breaks in use 24 4 2 Prior to starting the work day 24 4 3 Before each patient 24 5 Operation 26 5 1 Replacing the instrument 27 5 2 Inserting and removing burr instruments 28 5 3 Adjusting the cooling spray 35 6 Follow up 36 6 1 After each treatment session 36 6 2 At the end of the work day 37 6401553 book Seite 3 Montag 13 Juni 2016 4 27 16 ...

Page 6: ...ing 38 7 1 Conduct pre disinfection 38 7 2 Automated cleaning and disinfecting 39 7 3 Manual cleaning and disinfection 40 7 4 Manual maintenance 43 7 5 Sterilizing 46 8 Maintenance 49 8 1 Maintenance of cooling spray nozzles 50 8 2 Testing the FG clamping system 51 6401553 book Seite 4 Montag 13 Juni 2016 4 27 16 ...

Page 7: ...TE POWER BA ULTIMATE 2 Only use BA ULTIMATE POWER BA ULTIMATE for the applications described in the operating instructions 3 Observe the applicable hygiene standards occupational safety regulations and accident prevention measures for BA ULTIMATE POWER BA ULTIMATE Intended Use Straight and contra angle handpieces Holding and driving burr instruments _ rotary or oscillatory processing BA ULTIMATE P...

Page 8: ... and green contra angle handpieces Endodontics _ without special contra angle handpiece Endodontics blue and green contra angle handpieces Implantology and surgery _ blue green Implantology surgery processing of bones blue and green contra angle handpieces Prosthetics _ Handpiece blue and green contra angle handpieces Prosthetics handpiece blue and green contra angle handpieces Contraindications n...

Page 9: ...anger leading to death or serious injury if not avoided WARNING indicates a danger that may lead to death or serious injury if not avoided CAUTION indicates a danger that may lead to injury if not avoided Instructions for use To prevent material damage and additional expenses please observe all instructions for use Instructions for use are labeled as follows NOTICE indicates measures for the preve...

Page 10: ...02 IMPORTANT indicates information on the avoidance of additional expenses and other important information Tip indicates information for facilitating work 1 1 2 Formats and symbols The formats and symbols used in this document have the following meaning 6401553 book Seite 8 Montag 13 Juni 2016 4 27 16 ...

Page 11: ...equisite 1 First action step 2 Second action step or Alternative action Result Individual action step Requests you to do something Use of formats and symbols 8 Identifies a reference to another text passage and specifies its page number List Identifies a list 6401553 book Seite 9 Montag 13 Juni 2016 4 27 16 ...

Page 12: ...arts have a typical service life of 5 years Moving parts have a typical service life of 3 years No warranty claim can be inferred here as wear may occur earlier or later than indicated above depending on use frequency of sterilization and frequency of maintenance FG Friction grip burr instrument CA Contra angle handpiece burr instrument HP Straight handpiece burr instrument 6401553 book Seite 10 M...

Page 13: ... Cross contamination and spread of infections Preventing the spread of infections and cross contamination Sterilization Prevent the spread of infections and cross contamination between patients users and third parties Sterilize equipment after each patient Take the appropriate hygiene measures e g wear protective gloves Emitted cooling air Emitted cooling air The cooling air emitted by the couplin...

Page 14: ... not repair the instrument yourself Repair _ BA The BA instrument is the result of a precise development and must not be disassembled by third parties In the case of service or repair work please send the instrument in an assembled state to B A International Ltd or to a service center approved by B A International Accessories _ not approved by Sirona Spare and accessory parts Use only original par...

Page 15: ...al description 3 1 Task Instrument The instrument transmits the driving power and speed of the electric motor or air motor to the preparation tool 3 2 Functionality Instrument The transmission ratio of the instrument distorts the operating speed of the preparation tool 6401553 book Seite 13 Montag 13 Juni 2016 4 27 16 ...

Page 16: ... 01 553 D3551 201 03 03 02 3 3 BA ULTIMATE POWER design Contra angle handpiece G F D C B A E A Instrument head B Push button C Cooling spray outlet D Opening of chuck system E Light aperture F Color coding for gear ratio G ISO slider 6401553 book Seite 14 Montag 13 Juni 2016 4 27 16 ...

Page 17: ...TE 3 Technical description 64 01 553 D3551 201 03 03 02 15 Straight handpiece D E C B A A Opening for the clamping system B Cooling spray outlet C Light aperture D Center part of handpiece E ISO slider 6401553 book Seite 15 Montag 13 Juni 2016 4 27 16 ...

Page 18: ...LTIMATE design G F D C B A E A Instrument head B Pushbutton C Cooling spray aperture D Opening of chuck system E Light aperture only in the case of BA 250LT BA 45LS BA 65LS F Color coding for transmission ratio G ISO slider only in the case of BA 250LT BA 45LS BA 65LS 6401553 book Seite 16 Montag 13 Juni 2016 4 27 16 ...

Page 19: ...MATE POWER BA 200LTS BA 40LSS BA 60LSS BA 280LSS Gear ratio 1 5 1 1 6 1 1 1 Color coding for gear ratio Red Blau Green Blue Maximum motor speed in rpm 40000 40000 40000 40000 Maximum operating speed in rpm 200000 40000 6700 40000 Clamping system FG CA CA HP CA Internal cooling media x x x x Back suction stop x x x x 6401553 book Seite 17 Montag 13 Juni 2016 4 27 16 ...

Page 20: ...X INTRAmatic LUX BA 200LTS BA 40LSS BA 60LSS BA 280LSS BA 250LT BA 250T BA 45 LS BA 45S BA 65LS BA 65S Gear ratio 1 5 1 5 1 1 1 1 6 1 6 1 Color coding for gear ratio Red Red Blue Blue Green Green Maximum motor speed in rpm 40000 40000 40000 40000 40000 40000 Maximum operating speed in rpm 170000 170000 40000 40000 6700 6700 Clamping system FG FG CA CA CA CA 6401553 book Seite 18 Montag 13 Juni 201...

Page 21: ... media x x x x x x Back suction stop x x x x x x Light function x x x Instrument coupling INTRAmati c LUX INTRAmati c INTRAmati c LUX INTRAmati c INTRAmati c LUX INTRAmati c BA 250LT BA 250T BA 45 LS BA 45S BA 65LS BA 65S FG CA HP Shank diameter in mm 1 59 1 60 2 334 2 35 2 334 2 35 Maximum total length in mm 25 34 50 6401553 book Seite 19 Montag 13 Juni 2016 4 27 16 ...

Page 22: ... 201 03 03 02 Treatment center _ Instrument Treatment center Maximum working diameter in mm 2 1 Standard ISO 1797 1 ISO 2157 ISO 1797 1 ISO 1797 1 FG CA HP BA ULTIMATE POWER BA ULTIMATE Spray air pressure in bar 2 7 Spray water pressure in bar 2 0 6401553 book Seite 20 Montag 13 Juni 2016 4 27 16 ...

Page 23: ... POWER BA ULTIMATE 3 Technical description 64 01 553 D3551 201 03 03 02 21 Maximum water temperature in C 40 Recommended water content in spray in ml min 50 BA ULTIMATE POWER BA ULTIMATE 6401553 book Seite 21 Montag 13 Juni 2016 4 27 16 ...

Page 24: ...Operating Instructions BA ULTIMATE POWER BA ULTIMATE 22 64 01 553 D3551 201 03 03 02 InMetro 3 6 Production data HSI Code _ BANiTi HSI HIBC code H658 M 675LN 1 S 07 00001 A B C 6401553 book Seite 22 Montag 13 Juni 2016 4 27 16 ...

Page 25: ...WER BA ULTIMATE 3 Technical description 64 01 553 D3551 201 03 03 02 23 A Product label code in this case 675LN 1 B Year of manufacture in this case 2007 C Serial number in this case 00001 6401553 book Seite 23 Montag 13 Juni 2016 4 27 16 ...

Page 26: ...n and maintain the instrument after longer breaks in use 4 2 Prior to starting the work day Purge the water and air channels for 30 seconds 4 3 Before each patient Preparation _ Instrument 1 Purge the water and air channels for 30 seconds 2 CAUTION Keep the motor running Insert the instrument 27 3 Insert the burr instrument 28 4 Set a sufficient amount of cooling water 50 ml min 35 6401553 book Se...

Page 27: ...Check the nozzles for blockages and lime deposits for example and clean the nozzles if necessary 50 Overheating at the preparation site CAUTION Insufficient cooling leads to overheating of the preparation site and damage to the tooth substance Ensure that the water content is 50ml min 6401553 book Seite 25 Montag 13 Juni 2016 4 27 16 ...

Page 28: ...moved burr instrument can come loose from the head or break off Risk of injury Therefore the instrument must only be used when the burr instrument is securely clamped at least 10 mm deep Only operate when the clamping system is closed CAUTION The handpiece must only be operated with the clamping system closed Overheating at the preparation site CAUTION Insufficient cooling leads to overheating of ...

Page 29: ... Always operate the contra angle handpieces with cooling spray when marked red Observing manufacturer documentation IMPORTANT For application details and operating data of the different preparation tools please refer to the information provided by the manufacturer 5 1 Replacing the instrument Motor at standstill CAUTION The instrument should only be fitted or removed when the motor is at standstil...

Page 30: ...O slider clicks into place Remove Product name _ Remove Removing the BA ULTIMATE POWER BA ULTIMATE The motor is at a standstill Detach the instrument Do not pull on the supply hose while doing this 5 2 Inserting and removing burr instruments Free movement of the pushbutton IMPORTANT Check the push button to make sure it moves freely Use only undamaged burrs NOTICE Use only burrs and diamond polish...

Page 31: ...moved burr instrument can come loose from the head or break off Risk of injury Therefore the instrument must only be used when the burr instrument is securely clamped at least 10 mm deep Only operate when the clamping system is closed CAUTION The handpiece must only be operated with the clamping system closed 6401553 book Seite 29 Montag 13 Juni 2016 4 27 16 ...

Page 32: ...ument The motor is at a standstill 1 Press the button and slide the burr instrument in until it reaches the stop 2 Pull on the burr instrument to check that it is firmly attached Removing the friction grip burr instrument The burr instrument must not be moving Press the button and remove the burr instrument 6401553 book Seite 30 Montag 13 Juni 2016 4 27 16 ...

Page 33: ...andpiece bur The motor is at a standstill 1 Insert the bur without pushing the button 2 Turn the bur back and forth gently until it snaps into place 3 Pull and turn the bur to check that it is firmly in place Removing the contra angle handpiece bur The bur must not be moving Press the button and remove the bur 6401553 book Seite 31 Montag 13 Juni 2016 4 27 16 ...

Page 34: ...the center part of the handpiece in the direction of the arrow A up to the stop 2 When using the contra angle handpiece burr instrument C insert the pin B into the handpiece with the slotted end first The pin compensates for the difference in length between straight and contra angle handpiece burr instruments 3 Insert the burr instrument as far as it will go B C A 6401553 book Seite 32 Montag 13 J...

Page 35: ... direction D up to the stop When the two marks E are located opposite each other the burr instrument is clamped When using handpiece burr instruments with detached shaft ensure that the detached shaft is not lying against the chuck opening F 5 Then pull and turn the burr instrument to check that it is firmly seated E F D 6401553 book Seite 33 Montag 13 Juni 2016 4 27 16 ...

Page 36: ...g Instructions BA ULTIMATE POWER BA ULTIMATE 34 64 01 553 D3551 201 03 03 02 Removing the pin 1 Screw in the supplied tool A 2 Open the clamping system 3 Pull out the pin A 6401553 book Seite 34 Montag 13 Juni 2016 4 27 16 ...

Page 37: ...ment 50 ml min Adjust the flow rate of the cooling water using the control ring A 50 ml min Tip You can measure the amount of cooling water with a measuring cup and watch Max water flow Water flow rate general I The maximum water flow is set when the two marks are located opposite one another A 6401553 book Seite 35 Montag 13 Juni 2016 4 27 16 ...

Page 38: ...nstruments _ burr instrument The burr instrument must not be moving Wear appropriate protective clothing 1 Purge the water and air channels on the treatment center for 30 seconds 2 Remove the burr instrument with tweezers 3 Pre disinfect directly at the treatment center 38 4 Detach the instrument from the motor 5 Transport the instrument to the hygiene room in a suitable transport container 640155...

Page 39: ...egulations are followed 7 Apply spray to the instrument 43 8 Sterilize the instrument and accessories 46 6 2 At the end of the work day Instrument Apply spray to the instrument 43 Remove the motor at night NOTICE Do not leave any instruments on the motor overnight in order to prevent oil from leaking into the electric motor Never lubricate the electric motor 6401553 book Seite 37 Montag 13 Juni 20...

Page 40: ... be approved in your country and have proven bactericidal fungicidal and virucidal properties Only use disinfectants with no protein fixing properties 1 Spray the surface with disinfectant 2 Wipe the disinfectant off with a cloth For further conditioning the instrument should be dry and free of residue Please observe the manufacturer s instructions for using instrument disinfectants 6401553 book S...

Page 41: ...by its manufacturer for the cleaning and disinfection of dental instruments and comply with EN ISO 15883 1 e g 95 C 203 F and 10 min holding time For further details refer to the operating instructions supplied with the unit Check _ product name BA ULTIMATE POWER BA ULTIMATE is conditioned with a cleaning and disinfection device 1 Check whether BA ULTIMATE POWER BA ULTIMATE is clean after conditio...

Page 42: ...sh button chuck manually 45 6 Pack BA ULTIMATE POWER BA ULTIMATE in packaging material suitable for sterilization and storage e g paper plastic composite packaging 7 Conduct sterilization 47 7 3 Manual cleaning and disinfection Manual conditioning is possible in exceptional cases IMPORTANT Manual conditioning is possible in exceptional cases if the national regional regulations are followed The na...

Page 43: ...imate spray NOTICE Using sprays from other manufacturers can reduce the product s service life Only use BA Ultimate Spray Use soft brush IMPORTANT Use a soft clean and disinfected brush for cleaning Procedure _ Instrument with integrated spray Wear appropriate protective clothing All disinfectants must be approved in your country and have proven bactericidal fungicidal and virucidal properties Onl...

Page 44: ...ve channels with spray 3 Clean and disinfect spray channels with suitable agents and adapters according to manufacturer s instructions e g with WL Clean made by ALPRO 4 Blow spray channels with suitable adapters out with 2 5 3 bar until no more moisture displaces but at least 10 seconds You can use e g WL dry made by ALPRO 5 Conduct thermal disinfection or unwrapped steam sterilization 6 Maintain ...

Page 45: ...rage e g paper plastic composite packaging 9 Sterilize the adapter 47 7 4 Manual maintenance 7 4 1 Maintenance of mechanical parts Intervals Daily at noon and in the evening At least every noon and evening Prior to each sterilization after every thermal disinfection After every thermal disinfection without integrated maintenance 6401553 book Seite 43 Montag 13 Juni 2016 4 27 16 ...

Page 46: ...ng sprays from other manufacturers can reduce the product s service life Only use BA Ultimate Spray Process Maintenance _ Instrument The spray adapter is disinfected The O ring on the spray adapter is intact 1 Fit the spray adapter onto the nozzle of the spray can A B C ULTIMATE SPRAY BA A Spray adapter B O ring for spray adapter BA Ultimate Spray 6401553 book Seite 44 Montag 13 Juni 2016 4 27 16 ...

Page 47: ... Wipe any spray that comes out with a disinfection cloth 5 Repeat the process until the spray is clear 7 4 2 Care of the push button chuck BA To remove deposits and ensure proper functioning of the clamping system the pushbutton chuck must be maintained with BA Ultimate Spray Interval Interval At least once a week Required accessories BA Ultimate Spray BA Ultimate Spray ULTIMATE SPRAY BA 6401553 b...

Page 48: ...lstück The instrument is clean and disinfected 1 Press the contra angle handpiece head with the chuck firmly against the spray can nozzle 2 Spray the chuck for 1 2 seconds IMPORTANT Hold the spray can upright 3 Wipe any spray that comes out with a disinfection cloth ULTIMATE SPRAY BA 6401553 book Seite 46 Montag 13 Juni 2016 4 27 16 ...

Page 49: ...nce is complete The instrument can be sterilized in packaging suitable for sterilization and storage paper plastic composite packaging according to ISO 11607 Sterilize the instrument in the steam sterilizer with saturated water vapor Unit pressure in bar and psi ww 134 C 274 F Overpressure 2 04 bar 29 59 psi Temperature 134 C 274 F Holding time 3 min 6401553 book Seite 47 Montag 13 Juni 2016 4 27 ...

Page 50: ...40 C 284 F even during the drying phase After sterilizing heading After sterilizing Subsequent steps_instruments 1 Remove the instrument from the steam sterilizer immediately CAUTION The instrument is hot Risk of burns NOTICE Do not attempt to accelerate the cooling process by immersing the instrument in cold water This can damage your instrument 2 Store all instruments so that they are protected ...

Page 51: ...s must be replaced depending on their degree of wear Tool holding system For safety and technical reasons check the clamping system of the contra angle and straight handpiece burr instruments on an annual basis Friction grip Check the clamping system of friction grip burr instruments on a monthly basis 51 6401553 book Seite 49 Montag 13 Juni 2016 4 27 16 ...

Page 52: ...ap water If your tap water is very hard lime deposits may constrict or completely block the cooling spray nozzles Cleaning the nozzle _ Instrument 1 Carefully clean the nozzle openings by regularly running a disinfected cleaning wire through them 2 Let the instrument run briefly with cooling spray 6401553 book Seite 50 Montag 13 Juni 2016 4 27 16 ...

Page 53: ...WER BA ULTIMATE 8 Maintenance 64 01 553 D3551 201 03 03 02 51 8 2 Testing the FG clamping system Interval Test the FG clamping system at least once a month Required accessories Chuck tester 6401553 book Seite 51 Montag 13 Juni 2016 4 27 16 ...

Page 54: ...ring appears withdrawal force 22 N Does the chuck tester slide out of the chuck before the marking ring appears CAUTION The chuck is defective and the secure fit of the burr instrument is not guaranteed This may cause injury Workshop _ BA 1 Do not use the product 2 Have the clamping system replaced by a workshop authorized by B A International Tip Record the time and result of the check for your o...

Page 55: ..._ riqfj qb mltbo H L _ riqfj qb aÉìíëÅÜ dÉÄê ìÅÜë åïÉáëìåÖ _ OMM L _ QM L _ SM L _ OUM _ ORM L _ QR L _ SR Gebrauchsanweisung 6401553 book Seite 1 Montag 13 Juni 2016 4 25 16 ...

Page 56: ...is 1 Bevor Sie beginnen 5 1 1 Aufbau der Unterlage 7 1 2 Lebensdauer 10 2 Sicherheitshinweise 11 3 Technische Beschreibung 13 3 1 Aufgabe 13 3 2 Funktionsweise 13 3 3 Aufbau BA ULTIMATE POWER 14 3 4 Aufbau BA ULTIMATE 16 3 5 Technische Daten 17 3 6 Produktionsdaten 23 6401553 book Seite 2 Montag 13 Juni 2016 4 25 16 ...

Page 57: ...e und längere Nutzungspausen 24 4 2 Vor Beginn eines Arbeitstags 24 4 3 Vor jedem Patienten 24 5 Bedienung 26 5 1 Instrument wechseln 28 5 2 Bohrinstrumente einsetzen und entfernen 29 5 3 Kühlspray einstellen 34 6 Nachbereitung 35 6 1 Nach jeder Behandlung 35 6 2 Am Ende des Arbeitstages 36 6401553 book Seite 3 Montag 13 Juni 2016 4 25 16 ...

Page 58: ...ufbereitung 37 7 1 Vordesinfektion durchführen 37 7 2 Maschinell reinigen und desinfizieren 38 7 3 Manuell reinigen und desinfizieren 39 7 4 Manuell pflegen 42 7 5 Sterilisieren 46 8 Wartung 48 8 1 Spraydüsenöffnung pflegen 49 8 2 FG Spannsystem prüfen 50 6401553 book Seite 4 Montag 13 Juni 2016 4 25 16 ...

Page 59: ...Sie BA ULTIMATE POWER BA ULTIMATE nur für Anwendungen die in der Gebrauchsanweisung beschrieben sind 3 Beachten Sie die für BA ULTIMATE POWER BA ULTIMATE geltenden Hygienevorschriften Arbeitsschutzbestimmungen und Unfallverhütungsmaßnahmen Bestimmungsgemäßer Gebrauch Hand und Winkelstücke Bohrinstrument halten und antreiben _ rotierende oder oszillierende Bearbeitung BA ULTIMATE POWER BA ULTIMATE ...

Page 60: ...INE Prophylaxe blaue und grüne Winkelstücke Endodontologie _ ohne Sonderwinkelstück Endodontologie blaue und grüne Winkelstücke Implantologie und Chirurgie _ blau grün Implantologie Chirurgie Bearbeitung von Knochen blaue und grüne Winkelstücke Prothetik _ Handstück blau und grün Winkelstücke Prothetik Handstück blaue und grüne Winkelstücke Kontraindikation _ keine Gegenanzeichen Kontraindikatione...

Page 61: ...net GEFAHR kennzeichnet eine Gefahr die zu Tod oder schwerer Verletzung führt wenn die Gefahr nicht vermieden wird WARNUNG kennzeichnet eine Gefahr die zu Tod oder schwerer Verletzung führen kann wenn die Gefahr nicht vermieden wird VORSICHT kennzeichnet eine Gefahr die zu Verletzungen führen kann wenn die Gefahr nicht vermieden wird Anwendungshinweise Beachten Sie Anwendungshinweise zur Vermeidun...

Page 62: ...nnzeichnet Maßnahmen zur Vermeidung von Sachschäden WICHTIG kennzeichnet wichtige Informationen und Informationen zur Vermeidung von Mehraufwand Tipp kennzeichnet Informationen zur Arbeitserleichterung 1 1 2 Formatierungen und Zeichen Die in diesem Dokument verwendeten Formatierungen und Zeichen haben folgende Bedeutung 6401553 book Seite 8 Montag 13 Juni 2016 4 25 16 ...

Page 63: ... Zweiter Handlungsschritt oder Alternative Handlung Ergebnis Einzelner Handlungsschritt Fordert Sie auf eine Tätigkeit auszuführen Verwendung von Formatierung und Zeichen 8 Kennzeichnet einen Bezug zu einer anderen Textstelle und gibt deren Seitenzahl an Aufzählung Kennzeichnet eine Aufzählung 6401553 book Seite 9 Montag 13 Juni 2016 4 25 16 ...

Page 64: ... nicht bewegte Bauteile eine typische Lebensdauer von 5 Jahren bewegte Bauteile eine typische Lebensdauer von 3 Jahren Hieraus entsteht kein Garantieanspruch da Verschleiß je nach Nutzung Sterilisations und Pflegehäufigkeit auch früher oder später als in oben genannten Zeiten auftreten kann FG Friction Grip Bohrinstrument WB Winkelstück Bohrinstrument HB Handstück Bohrinstrument 6401553 book Seite...

Page 65: ...h Bewahren Sie die Gebrauchsanweisung zum Nachschlagen griffbereit auf Kreuzkontamination und Infektionsübertragung Vorbeugen von Infektionsübertragungen und Kreuzkontaminationen Sterilisation durchführen Beugen Sie Infektionsübertragungen und Kreuzkontaminationen zwischen Patienten Anwendern und Dritten vor Führen Sie nach jedem Patienten eine Sterilisation durch Ergreifen Sie geeignete Hygienema...

Page 66: ...nmittelbar ein Beschädigte Instrumente können Verletzungen verursachen Benachrichtigen Sie das Dentaldepot oder den Hersteller Reparatur _ Instrument Reparatur Reparieren Sie das Instrument nicht selbst Reparatur _ BA Das BA Instrument ist das Ergebnis einer präzisen Entwicklung und darf nicht von Dritten zerlegt werden Senden Sie das unzerlegte Instrument zum Service oder zur Reparatur entweder a...

Page 67: ...Beschreibung 3 1 Aufgabe Instrument Das Instrument überträgt die Antriebsleistung und Drehzahl des Elektro oder Luftmotors auf das Präparationswerkzeug 3 2 Funktionsweise Instrument Die Übersetzung des Instruments beeinflusst die Arbeitsdrehzahl des Präparationswerkzeugs 6401553 book Seite 13 Montag 13 Juni 2016 4 25 16 ...

Page 68: ... 553 D3551 201 03 03 01 3 3 Aufbau BA ULTIMATE POWER Winkelstück G F D C B A E A Instrumentenkopf B Druckknopf C Kühlsprayaustritt D Öffnung des Spannzangensystems E Lichtaustritt F Farbliche Kennzeichnung für Übersetzung G ISO Slider 6401553 book Seite 14 Montag 13 Juni 2016 4 25 16 ...

Page 69: ...BA ULTIMATE 3 Technische Beschreibung 64 01 553 D3551 201 03 03 01 15 Handstück D E C B A A Öffnung des Spannsystems B Kühlsprayaustritt C Lichtaustritt D Handstück Mittelteil E ISO Slider 6401553 book Seite 15 Montag 13 Juni 2016 4 25 16 ...

Page 70: ...3 4 Aufbau BA ULTIMATE G F D C B A E A Instrumentenkopf B Druckknopf C Kühlsprayaustritt D Öffnung des Spannzangensystems E Lichtaustritt nur bei BA 250LT BA 45LS BA 65LS F Farbliche Kennzeichnung für Übersetzung G ISO Slider nur bei BA 250LT BA 45LS BA 65LS 6401553 book Seite 16 Montag 13 Juni 2016 4 25 16 ...

Page 71: ...WER BA 200LTS BA 40LSS BA 60LSS BA 280LSS Übersetzung 1 5 1 1 6 1 1 1 Farbliche Kennzeichnung für Übersetzung rot blau grün blau Maximale Motordrehzahl in min 1 40000 40000 40000 40000 Maximale Arbeitsdrehzahl in min 1 200000 40000 6700 40000 Spannsystem FG WB WB HB WB Innengeführte Kühlmedien x x x x Rücksaugstopp x x x x 6401553 book Seite 17 Montag 13 Juni 2016 4 25 16 ...

Page 72: ...ULTIMATE POWER BA ULTIMATE 18 64 01 553 D3551 201 03 03 01 Lichtfunktion x x x x Instrumentenkupplung INTRAmatic LUX INTRAmatic LUX INTRAmatic LUX INTRAmatic LUX BA 200LTS BA 40LSS BA 60LSS BA 280LSS 6401553 book Seite 18 Montag 13 Juni 2016 4 25 16 ...

Page 73: ... 65S Übersetzung 1 5 1 5 1 1 1 1 6 1 6 1 Farbliche Kennzeichnung für Übersetzung rot rot blau blau grün grün Maximale Motordrehzahl in min 1 40000 40000 40000 40000 40000 40000 Maximale Arbeitsdrehzahl in min 1 170000 170000 40000 40000 6700 6700 Spannsystem FG FG WB WB WB WB Innengeführte Kühlmedien x x x x x x 6401553 book Seite 19 Montag 13 Juni 2016 4 25 16 ...

Page 74: ...3 D3551 201 03 03 01 Bohrinstrumente FG WB HB Rücksaugstopp x x x x x x Lichtfunktion x x x Instrumentenkupplung INTRAmatic LUX INTRAmatic INTRAmatic LUX INTRAmatic INTRAmatic LUX INTRAmatic BA 250LT BA 250T BA 45 LS BA 45S BA 65LS BA 65S 6401553 book Seite 20 Montag 13 Juni 2016 4 25 16 ...

Page 75: ...553 D3551 201 03 03 01 21 Bohrinstrumente FG WB HB Schaftdurchmesser in mm 1 590 1 600 2 334 2 350 2 334 2 350 Maximale Gesamtlänge in mm 25 34 50 Maximaler Arbeitsdurchmesser in mm 2 1 Norm ISO 1797 1 ISO 2157 ISO 1797 1 ISO 1797 1 6401553 book Seite 21 Montag 13 Juni 2016 4 25 16 ...

Page 76: ...3 D3551 201 03 03 01 Behandlungseinheit _ Instrument Behandlungseinheit BA ULTIMATE POWER BA ULTIMATE Druck Sprayluft in bar 2 7 Druck Spraywasser in bar 2 0 Maximale Wassertemperatur in C 40 Empfohlener Wasseranteil im Spray in ml min 50 6401553 book Seite 22 Montag 13 Juni 2016 4 25 16 ...

Page 77: ...reibung 64 01 553 D3551 201 03 03 01 23 3 6 Produktionsdaten HSI Code _ BANiTi HSI HIBC Code H658 M 675LN 1 S 07 00001 A B C A Code der Produktbezeichnung hier 675LN 1 B Herstelljahr hier 2007 C Seriennummer hier 00001 6401553 book Seite 23 Montag 13 Juni 2016 4 25 16 ...

Page 78: ...der Inbetriebnahme Reinigen und pflegen Sie das Instrument nach längerer Nutzungspause 4 2 Vor Beginn eines Arbeitstags Spülen Sie die Wasser und Luftwege 30 Sekunden lang 4 3 Vor jedem Patienten Vorbreitung _ Instrument 1 Spülen Sie die Wasser und Luftwege 30 Sekunden lang 2 VORSICHT Halten Sie den Motor an Stecken Sie das Instrument auf 28 3 Setzen Sie das Bohrinstrument ein 29 6401553 book Seit...

Page 79: ...rtes Wasser 50µm 6 Prüfen Sie die Düsen auf Verstopfung und Ablagerungen von z B Kalk und reinigen Sie die Düsen bei Bedarf 49 Überhitzung der Präparationsstelle VORSICHT Mangelhafte Kühlung führt zur Überhitzung der Präparationsstelle und zur Substanzschädigung am Zahn Stellen Sie sicher dass der Wasseranteil 50ml min beträgt 6401553 book Seite 25 Montag 13 Juni 2016 4 25 16 ...

Page 80: ...e herausgezogenes Bohrinstrument kann sich aus dem Kopf lösen oder abbrechen Es besteht Verletzungsgefahr Benutzen Sie das Instrument daher nur wenn das Bohrinstrument mindestens 10mm tief und fest eingespannt ist Nur bei geschlossenem Spannsystem betreiben VORSICHT Betreiben Sie das Handstück nur bei geschlossenem Spannsystem Überhitzung der Präparationsstelle VORSICHT Mangelhafte Kühlung führt z...

Page 81: ...t dem Winkelstück zurück Dabei wird der Druckknopf betätigt und es besteht Verbrennungsgefahr für die Mundschleimhaut rote Winkelstück VORSICHT Rot markierte Winkelstücke immer mit Kühlspray betreiben Herstellerangaben beachten WICHTIG Entnehmen Sie die Anwendung und die Betriebsdaten der verschiedenen Präparationswerkzeuge den Angaben des Herstellers 6401553 book Seite 27 Montag 13 Juni 2016 4 25...

Page 82: ...erwenden Aufstecken_Produktname Produktname aufstecken BA ULTIMATE POWER BA ULTIMATE aufstecken Der Motor steht still 1 Stecken Sie das Instrument bis zum Einrasten auf 2 Wenn Sie einen Motor mit einer Lichtnut A verwenden verdrehen Sie das Instrument bis der ISOslider einrastet Entfernen Produktname _ Entfernen BA ULTIMATE POWER BA ULTIMATE entfernen Der Motor steht still Ziehen Sie das Instrumen...

Page 83: ...gt sind Verwenden Sie saubere Bohrer und Diamantschleifer um Schmutz im Spannsystem zu vermeiden Bohrereinspannung _ Instrument VORSICHT Ein loses oder teilweise herausgezogenes Bohrinstrument kann sich aus dem Kopf lösen oder abbrechen Es besteht Verletzungsgefahr Benutzen Sie das Instrument daher nur wenn das Bohrinstrument mindestens 10mm tief und fest eingespannt ist Nur bei geschlossenem Span...

Page 84: ... Der Motor steht still 1 Drücken Sie den Druckknopf und schieben Sie das Bohrinstrument bis zum Anschlag ein 2 Prüfen Sie durch Ziehen am Bohrinstrument dessen festen Sitz Friction Grip Bohrinstrument entfernen Das Bohrinstrument steht still Drücken Sie den Druckknopf und ziehen Sie das Bohrinstrument heraus 6401553 book Seite 30 Montag 13 Juni 2016 4 25 16 ...

Page 85: ... Sie das Bohrinstrument ein ohne den Druckknopf zu betätigen 2 Rasten Sie das Bohrinstrument unter leichtem Hin und Herdrehen ein 3 Prüfen Sie durch Ziehen und Drehen am Bohrinstrument dessen festen Sitz Winkelstück Bohrinstrument entfernen Das Bohrinstrument steht still Drücken Sie den Druckknopf und ziehen Sie das Bohrinstrument heraus 6401553 book Seite 31 Montag 13 Juni 2016 4 25 16 ...

Page 86: ...das Handstück Mittelteil in Pfeilrichtung A bis zum Anschlag 2 Wenn Sie ein Winkelstück Bohrinstrument C verwenden setzen Sie den Stift B mit dem geschlitzten Ende voran in das Handstück ein Der Stift gleicht die Längendifferenz zwischen Handstück und Winkelstück Bohrinstrument aus 3 Führen Sie das Bohrinstrument bis zum Anschlag ein B C A 6401553 book Seite 32 Montag 13 Juni 2016 4 25 16 ...

Page 87: ... ist das Bohrinstrument gespannt Wenn Sie Handstück Bohrinstrumente mit abgesetztem Schaft verwenden achten Sie darauf dass der abgesetzte Schaft nicht an der Öffnung für die Spannzange anliegt F 5 Prüfen Sie durch Ziehen und Drehen am Bohrinstrument dessen festen Sitz Stift entfernen 1 Schrauben Sie das mitgelieferte Werkzeug A ein 2 Öffnen Sie das Spannsystem 3 Ziehen Sie den Stift heraus E F D ...

Page 88: ... min Stellen Sie den Durchfluss des Kühlwassers mit dem Regelring A ein 50 ml min Tipp Sie können die Kühlwassermenge mit Messbecher und Uhr messen max Wasserdurchfluss Wasserdurchfluss allgemein I Der maximale Wasserdurchfluss ist eingestellt wenn sich die beiden Markierungen gegenüberstehen A 6401553 book Seite 34 Montag 13 Juni 2016 4 25 16 ...

Page 89: ...te _ Bohrinstrument Das Bohrinstrument steht still Tragen Sie geeignete Schutzkleidung 1 Spülen Sie direkt an der Behandlungseinheit die Wasser und Luftwege 30 Sekunden lang 2 Entfernen Sie das Bohrinstrument mit einer Pinzette 3 Führen Sie direkt an der Behandlungseinheit eine Vordesinfektion durch 37 4 Ziehen Sie das Instrument vom Motor ab 5 Transportieren Sie das Instrument in einem geeigneten...

Page 90: ... nationalen lokalen Anforderungen möglich sein 7 Pflegen Sie das Instrument mit Spray 42 8 Sterilisieren Sie das Instrument und die Zubehörteile 46 6 2 Am Ende des Arbeitstages Instrument Pflegen Sie das Instrument mit Spray 42 nachts Motor abnehmen ACHTUNG Lassen Sie nachts kein Instrument auf dem Motor damit kein Öl in den Elektromotor läuft Ölen Sie niemals den Elektromotor 6401553 book Seite 3...

Page 91: ...slich bakterizide fungizide und viruzide Eigenschaften haben Verwenden Sie nur Desinfektionsmittel die keine proteinfixierende Wirkung besitzen 1 Sprühen Sie die Oberfläche mit Desinfektionsmittel ein 2 Wischen Sie das Desinfektionsmittel mit einem Tuch ab Das Instrument ist zur weiteren Aufbereitung frei von jeglichen Rückständen und trocken Beachten Sie die Angaben des Herstellers zur Anwendung ...

Page 92: ...ie Reinigung und Desinfektion von zahnärztlichen Instrumenten freigegeben sein und der EN ISO 15883 1 entsprechen z B 95 C 203 F und 10min Haltezeit Die Anwendung entnehmen Sie der Gebrauchsanweisung des Geräts Kontrolle _ Produktname BA ULTIMATE POWER BA ULTIMATE ist mit einem Reinigungs und Desinfektionsgerät aufbereitet 1 Prüfen Sie bei guter Beleuchtung min 500 Lux und Farbwiedergabeindex min ...

Page 93: ... Spannzange manuell 44 6 Verpacken Sie BA ULTIMATE POWER BA ULTIMATE in einer für Sterilisation und Lagerung geeigneten Verpackung z B Papier Laminat Verpackung 7 Führen Sie eine Sterilisation durch 46 7 3 Manuell reinigen und desinfizieren Manuelle Reinigung im Ausnahmefall möglich WICHTIG Eine manuelle Aufbereitung kann im Ausnahmefall unter Beachtung der jeweiligen nationalen lokalenAnforderung...

Page 94: ...anderer Hersteller kann die Lebensdauer des Produkts einschränken Verwenden Sie ausschließlich BA Ultimate Spray weiche Bürste verwenden WICHTIG Benutzen Sie für die Reinigung eine weiche saubere und desinfizierte Bürste Vorgehensweise _ Instrument mit integriertem Spray Tragen Sie geeignete Schutzkleidung Alle desinfizierenden Mittel müssen in Ihrem Land zugelassen sein und nachweislich bakterizi...

Page 95: ...en 2 Spülen Sie die Getriebekanäle mit Spray 3 Reinigen Sie die Spraykanäle mit entsprechendem Adapter und einem geeigneten Mittel nach Herstellerangaben z B WL Clean von ALPRO 4 Blasen Sie die Spraykanäle mit entsprechendem Adapter mit 2 5 3 bar aus bis keine Feuchtigkeit mehr austritt mindestens aber 10 Sekunden Sie können z B WL dry von ALPRO verwenden 5 Führen Sie eine thermische Desinfektion ...

Page 96: ...rilisation und Lagerung geeigneten Verpackung z B Papier Laminat Verpackung 9 Führen Sie eine Sterilisation durch 46 7 4 Manuell pflegen 7 4 1 Mechanik pflegen Intervalle jeden Mittag und Abend mindestens jeden Mittag und Abend vor jeder Sterilisation nach jeder thermischen Desinfetion nach jeder thermischen Desinfektion ohne integrierte Pflege 6401553 book Seite 42 Montag 13 Juni 2016 4 25 16 ...

Page 97: ...rays anderer Hersteller kann die Lebensdauer des Produkts einschränken Verwenden Sie ausschließlich BA Ultimate Spray Vorgehensweise Pflege _ Instrument Der Sprayaufsatz ist desinfiziert Der O Ring am Sprayaufsatz ist intakt 1 Stecken Sie den Sprayaufsatz auf die Düse der Spraydose A B C ULTIMATE SPRAY BA A Sprayaufsatz B O Ring für Sprayaufsatz C BA Ultimate Spray 6401553 book Seite 43 Montag 13 ...

Page 98: ...n Sie austretendes Spray mit einem Desinfektionstuch auf 5 Wiederholen Sie den Vorgang bis das austretende Spray klar ist 7 4 2 Druckknopf Spannzange pflegen BA Die Pflege der Druckknopf Spannzange mit BA Ultimate Spray beseitigt Ablagerungen im Spannsystem und erhält somit die Funktionsfähigkeit Interval Intervall mindestens einmal wöchentlich Erforderliches Zubehör BA Ultimate Spray BA Ultimate ...

Page 99: ...strument ist gereinigt und desinfiziert 1 Setzen Sie den Winkelstückkopf mit der Spannzange fest an die Düse der Spraydose an 2 Sprühen Sie die Spannzange 1 2 Sekunden durch WICHTIG Halten Sie die Spraydose senkrecht 3 Nehmen Sie austretendes Spray mit einem Desinfektionstuch ab ULTIMATE SPRAY BA 6401553 book Seite 45 Montag 13 Juni 2016 4 25 16 ...

Page 100: ... Laminat Verpackung gemäß ISO 11607 Sterilisieren Sie das Instrument im Dampfsterilisator mit gesättigtem Wasserdampf Einheit Druck in bar und psi ww ohne DAC PROFESSIONAL_Instrument Zugelassen sind Dampfsterilisatoren die entweder der EN 13060 Klasse B entsprechen oder der EN 13060 Klasse S entsprechen und zusätzlich für die Sterilisation von Hand Winkelstücken geeignet sind 134 C 274 F Überdruck...

Page 101: ...tte _ Insturmente 1 Entnehmen Sie das Instrument sofort aus dem Dampfsterilisator VORSICHT Das Instrument ist heiß Es besteht Verbrennungsgefahr ACHTUNG Beschleunigen Sie nicht das Abkühlen durch Eintauchen des Instrumentes in kaltes Wasser Dies beschädigt Ihr Instrument 2 Bewahren Sie alle Instrumente kontaminationsgeschützt auf 3 Sterilisieren Sie nach Ablauf der Aufbewahrungsdauer erneut 640155...

Page 102: ... z B O Ringe je nach Verschleiß wie beschrieben Werkzeughaltesystem Überprüfen Sie das Spannsystem von Winkelstück Bohrinstrumenten und Handstück Bohrinstrumenten aus sicherheitstechnischen Gründen jährlich Friction Grip Überprüfen Sie das Spannsystem von Friction Grip Bohrinstrumenten monatlich 50 6401553 book Seite 48 Montag 13 Juni 2016 4 25 16 ...

Page 103: ...swasser Bei kalkhaltigem Leitungswasser können sich die Kühlspraydüsen durch Kalkablagerung verengen oder zusetzen Düse reinigen _ Instrument 1 Durchstoßen Sie die Düsenöffnungen regelmäßig vorsichtig mit dem desinfizierten Reinigungsdraht 2 Lassen Sie das Instrument kurz mit Kühlspray laufen 6401553 book Seite 49 Montag 13 Juni 2016 4 25 16 ...

Page 104: ...al monatlich Erforderliches Zubehör Spannzangenprüfvorrichtung Vorgehensweise Das Verfalldatum der Spannzangenprüfvorrichtung A ist nicht überschritten 1 Setzen Sie die Spannzangenprüfvorrichtung in das FG Spannsystem ein 29 2 Ziehen Sie an der Spannzangenprüfvorrichtung bis der Markierungsring erscheint Auszugskraft 22 N 6401553 book Seite 50 Montag 13 Juni 2016 4 25 16 ...

Page 105: ...nge ist defekt und der feste Sitz des Bohrinstruments kann nicht gewährleistet werden Es besteht Verletzungsgefahr Werkstatt _ BA 1 Stellen Sie die Nutzung des Produkts ein 2 Lassen Sie das Spannsystem in einer von B A International autorisierten Werkstatt tauschen Tipp Dokumentieren Sie den Zeitpunkt und das Ergebnis der Überprüfung zur eigenen Kontrolle 6401553 book Seite 51 Montag 13 Juni 2016 ...

Page 106: ...8 Wartung Gebrauchsanweisung BA ULTIMATE POWER BA ULTIMATE 52 64 01 553 D3551 201 03 03 01 6401553 book Seite 52 Montag 13 Juni 2016 4 25 16 ...

Page 107: ..._ riqfj qb mltbo H L _ riqfj qb cê å áë kçíáÅÉ ÇDìíáäáë íáçå _ OMM L _ QM L _ SM L _ OUM _ ORM L _ QR L _ SR Notice d utilisation 6401553 book Seite 1 Montag 13 Juni 2016 4 30 16 ...

Page 108: ...r 5 1 1 Structure du document 7 1 2 Durée de vie 10 2 Consignes de sécurité 11 3 Description technique 13 3 1 Tâche 13 3 2 Principe de fonctionnement 13 3 3 Constitution de BA ULTIMATE POWER 14 3 4 Constitution de BA ULTIMATE 16 3 5 Caractéristiques techniques 17 3 6 Données de production 23 6401553 book Seite 2 Montag 13 Juni 2016 4 30 16 ...

Page 109: ...n prolongées 25 4 2 Avant de commencer la journée de travail 25 4 3 Avant chaque patient 25 5 Manipulation 27 5 1 Remplacement de l instrument 28 5 2 Fixer et retirer les fraises 29 5 3 Réglage du spray de refroidissement 36 6 Traitement ultérieur 37 6 1 Après chaque traitement 37 6 2 À la fin de la journée de travail 38 6401553 book Seite 3 Montag 13 Juni 2016 4 30 16 ...

Page 110: ... 7 1 Procéder à une pré désinfection 39 7 2 Nettoyage et désinfection en machine 40 7 3 Nettoyer et désinfecter manuellement 41 7 4 Entretien manuel 44 7 5 Stérilisation 47 8 Maintenance 50 8 1 Entretenir l ouverture de spray 51 8 2 Contrôler le système de serrage FG 52 6401553 book Seite 4 Montag 13 Juni 2016 4 30 16 ...

Page 111: ...WER BA ULTIMATE uniquement pour les applications décrites dans la notice d utilisation 3 Observez les prescriptions d hygiène les dispositions en matière de sécurité au travail et les mesures de prévention des accidents applicables lors de l utilisation de BA ULTIMATE POWER BA ULTIMATE Utilisation conforme à la destination prévue Pièces à main et contre angles Support et commande d instruments de ...

Page 112: ...hylaxie_T2 LINE Prophylaxie contre angles bleus et verts Endodontologie _ sans contre angle spécial Endodontologie contre angles bleus et verts Implantologie et chirurgie _ bleu vert Implantologie chirurgie traitement des os contre angles bleus et verts Prothétique _ pièce à main contre angles bleus et verts Prothétique pièce à main contre angles bleus et verts Contre indication _ aucune Contre in...

Page 113: ...ssures graves si rien n est fait pour éviter ce danger AVERTISSEMENT indique un danger pouvant entraîner la mort ou des blessures graves si rien n est fait pour éviter ce danger ATTENTION indique un danger pouvant entraîner des blessures si rien n est fait pour éviter ce danger Indications relatives à l utilisation Observez les indications relatives à l utilisation afin d éviter les dommages matér...

Page 114: ...ages matériels IMPORTANT indique des informations importantes et des informations pour la prévention de travail supplémentaire Astuce indique des informations visant à faciliter le travail 1 1 2 Mises en page et symboles Signification des mises en page et des symboles utilisés dans le présent document 6401553 book Seite 8 Montag 13 Juni 2016 4 30 16 ...

Page 115: ...éaliser 2 Deuxième étape à réaliser ou Tâche alternative Résultat Étape individuelle à réaliser Vous invite à exécuter une tâche Utilisation de la mise en page et des symboles 8 Indique une référence à un autre emplacement de texte et indique le numéro de page Enumération Indique une énumération 6401553 book Seite 9 Montag 13 Juni 2016 4 30 16 ...

Page 116: ...ues présentent une longévité typique de 5 ans les composants dynamiques présentent une longévité typique de 3 ans Ces indications ne comportent toutefois aucune obligation de garantie car l usure peut apparaître avant ou après les délais nommés en fonction de l utilisation et de la fréquence de stérilisation et d entretien FG Fraise Friction Grip CA Fraise pour contre angle HP Fraise pour pièce à ...

Page 117: ... à portée de main pour pouvoir la consulter en cas de besoin Contamination croisée et transmission d infections Prévention de transmissions d infections et de contaminations croisées Procéder à la stérilisation Évitez les transmissions d infections et les contaminations croisées entre les patients les praticiens et les tiers procédez à une stérilisation après chaque utilisation sur un patient Pren...

Page 118: ...els ou de dommages Les instruments endommagés peuvent provoquer des blessures Informez le dépôt dentaire ou le fabricant Réparation _ Instrument Réparation Ne réparez pas vous même l instrument Réparation _ BA L instrument BA est le fruit d un développement de précision et ne doit pas être démonté par des tiers Envoyez l instrument non démonté pour maintenance ou réparation à B A International Ltd...

Page 119: ...che Instrument L instrument transmet la puissance d entraînement et la vitesse de rotation du moteur électrique ou pneumatique à l outil de préparation 3 2 Principe de fonctionnement Instrument La démultiplication de l instrument influe sur la vitesse de travail de l outil de préparation 6401553 book Seite 13 Montag 13 Juni 2016 4 30 16 ...

Page 120: ...Constitution de BA ULTIMATE POWER Contre angle G F D C B A E A Tête de l instrument B Bouton poussoir C Sortie de spray de refroidissement D Ouverture du système de pince de serrage E Sortie de l éclairage F Marquage de couleur de la démultiplication G Slider ISO 6401553 book Seite 14 Montag 13 Juni 2016 4 30 16 ...

Page 121: ...ion technique 64 01 553 D3551 201 03 03 03 15 Pièce à main D E C B A A Ouverture du système de serrage B Sortie de spray de refroidissement C Sortie de l éclairage D Partie centrale de la pièce à main E Slider ISO 6401553 book Seite 15 Montag 13 Juni 2016 4 30 16 ...

Page 122: ...E G F D C B A E A Tête de l instrument B Poussoir C Sortie de spray de refroidissement D Ouverture du système de pince de serrage E Sortie de lumière uniquement pour BA 250LT BA 45LS BA 65LS F Marquage de couleur de la démultiplication G Slider ISO uniquement pour BA 250LT BA 45LS BA 65LS 6401553 book Seite 16 Montag 13 Juni 2016 4 30 16 ...

Page 123: ...BA ULTIMATE POWER BA 200LTS BA 40LSS BA 60LSS BA 280LSS Démultiplication 1 5 1 1 6 1 1 1 Marquage de couleur de la démultiplication rouge bleu vert bleu Vitesse de rotation maximale du moteur en tr min 40000 40000 40000 40000 Vitesse de travail maximale en tr min 200000 40000 6700 40000 Système de serrage FG CA CA HP CA 6401553 book Seite 17 Montag 13 Juni 2016 4 30 16 ...

Page 124: ...D3551 201 03 03 03 Fluides de refroidissement intégrés x x x x Arrêt de réaspiration x x x x Fonction d éclairage x x x x Raccord d instrument INTRAmatic LUX INTRAmatic LUX INTRAmatic LUX INTRAmatic LUX BA 200LTS BA 40LSS BA 60LSS BA 280LSS 6401553 book Seite 18 Montag 13 Juni 2016 4 30 16 ...

Page 125: ...6 1 Marquage de couleur de la démultiplication rouge rouge bleu bleu vert vert Vitesse de rotation maximale du moteur en tr min 40000 40000 40000 40000 40000 40000 Vitesse de travail maximale en tr min 170000 170000 40000 40000 6700 6700 Système de serrage FG FG CA CA CA CA Fluides de refroidissement intégrés x x x x x x Arrêt de réaspiration x x x x x x 6401553 book Seite 19 Montag 13 Juni 2016 4...

Page 126: ... dynamiques Fonction d éclairage x x x Raccord d instrument INTRAmati c LUX INTRAmati c INTRAmati c LUX INTRAmati c INTRAmati c LUX INTRAmati c BA 250LT BA 250T BA 45 LS BA 45S BA 65LS BA 65S FG CA HP Diamètre de la tige en mm 1 590 1 600 2 334 2 350 2 334 2 350 Longueur totale maximale en mm 25 34 50 6401553 book Seite 20 Montag 13 Juni 2016 4 30 16 ...

Page 127: ...03 21 Unité de traitement _ Instrument Poste de traitement Diamètre de travail maximal en mm 2 1 Norme ISO 1797 1 ISO 2157 ISO 1797 1 ISO 1797 1 FG CA HP BA ULTIMATE POWER BA ULTIMATE Pression d air de spray en bar 2 7 Pression d eau de spray en bar 2 0 6401553 book Seite 21 Montag 13 Juni 2016 4 30 16 ...

Page 128: ...sation BA ULTIMATE POWER BA ULTIMATE 22 64 01 553 D3551 201 03 03 03 Température d eau maximale en C 40 Proportion d eau recommandée dans le spray en ml min 50 BA ULTIMATE POWER BA ULTIMATE 6401553 book Seite 22 Montag 13 Juni 2016 4 30 16 ...

Page 129: ...TIMATE POWER BA ULTIMATE 3 Description technique 64 01 553 D3551 201 03 03 03 23 InMetro 3 6 Données de production HSI Code _ BANiTi Code HSI HIBC H658 M 675LN 1 S 07 00001 A B C 6401553 book Seite 23 Montag 13 Juni 2016 4 30 16 ...

Page 130: ...nique Notice d utilisation BA ULTIMATE POWER BA ULTIMATE 24 64 01 553 D3551 201 03 03 03 A Code produit ici 675LN 1 B Année de fabrication ici 2007 C N de série ici 00001 6401553 book Seite 24 Montag 13 Juni 2016 4 30 16 ...

Page 131: ... mise en service Nettoyez et entretenez l instrument après des pauses d utilisation prolongées 4 2 Avant de commencer la journée de travail Rincez les conduits d eau et d air pendant 30 secondes 4 3 Avant chaque patient Préparation _ Instrument 1 Rincez les conduits d eau et d air pendant 30 secondes 2 ATTENTION Arrêtez le moteur Emmanchez l instrument 28 3 Mettez la fraise en place 29 6401553 boo...

Page 132: ...ifiez que les buses ne sont pas obstruées et qu elles ne présentent pas de dépôts par ex de calcaire et nettoyez les buses si nécessaire 51 Surchauffe du site de préparation ATTENTION Un refroidissement insuffisant conduit à un échauffement excessif au niveau du site de préparation et à des lésions du tissu dentaire Assurez vous que la proportion d eau est 50ml min 6401553 book Seite 26 Montag 13 ...

Page 133: ...rtie extraite peut se détacher de la tête ou se casser Cela entraîne un risque de blessures Il convient donc d utiliser l instrument uniquement si la fraise est enfoncée d au moins 10 mm et solidement serrée Fonctionnement uniquement autorisé lorsque le système de serrage est fermé ATTENTION La pièce à main doit uniquement être utilisée avec le système de serrage fermé Surchauffe du site de prépar...

Page 134: ...ge en rouge doivent être uniquement utilisés avec du spray de refroidissement Observer les indications du fabricant IMPORTANT Pour l utilisation et les caractéristiques des différents outils de préparation reportez vous aux indications du fabricant 5 1 Remplacement de l instrument Moteur à l arrêt ATTENTION L instrument doit uniquement être fixé ou retiré lorsque le moteur est à l arrêt Les instru...

Page 135: ... s enclenche Retrait Nom du produit _ Retirer Retirer BA ULTIMATE POWER BA ULTIMATE Le moteur est à l arrêt Retirez l instrument Ne jamais tirer sur le cordon d alimentation 5 2 Fixer et retirer les fraises Mobilité du bouton poussoir IMPORTANT contrôlez la mobilité du bouton poussoir Utiliser exclusivement des fraises en parfait état AVIS Utilisez exclusivement des fraises et des outils diamantés...

Page 136: ...tacher de la tête ou se casser Cela entraîne un risque de blessures Il convient donc d utiliser l instrument uniquement si la fraise est enfoncée d au moins 10 mm et solidement serrée Fonctionnement uniquement autorisé lorsque le système de serrage est fermé ATTENTION La pièce à main doit uniquement être utilisée avec le système de serrage fermé 6401553 book Seite 30 Montag 13 Juni 2016 4 30 16 ...

Page 137: ... une fraise Friction Grip Le moteur est à l arrêt 1 Appuyez sur le poussoir et emmanchez la fraise jusqu en butée 2 Contrôlez la bonne fixation en effectuant des mouvements de traction sur la fraise Retrait d une fraise Friction Grip La fraise est à l arrêt Appuyez sur le bouton et retirez la fraise 6401553 book Seite 31 Montag 13 Juni 2016 4 30 16 ...

Page 138: ...fraise sans actionner le bouton poussoir 2 Tournez la fraise en effectuant de légers mouvements dans les deux sens jusqu à ce qu elle s enclenche 3 Effectuez des mouvements de traction et de rotation sur la fraise pour vérifier qu elle est bien fixée Retirer une fraise pour contre angle L instrument de fraisage est à l arrêt Appuyez sur le bouton poussoir et retirez la fraise 6401553 book Seite 32...

Page 139: ...artie centrale de la pièce à main jusqu en butée dans le sens de la flèche A 2 Si vous utilisez une fraise pour contre angle C engagez la broche B avec l extrémité fendue dirigée vers l avant dans la pièce à main La broche compense la différence de longueur entre les fraises pour pièces à main et pour contre angles 3 Engagez la fraise jusqu en butée B C A 6401553 book Seite 33 Montag 13 Juni 2016 ...

Page 140: ...La fraise est serrée lorsque les deux repères E sont l un en face de l autre Si vous utilisez des fraises pour pièce à main à tige dégagée veillez à ce que la tige dégagée n applique pas contre l ouverture prévue pour le système de fixation F 5 Contrôlez la bonne fixation en effectuant des mouvements de traction et de rotation sur la fraise E F D 6401553 book Seite 34 Montag 13 Juni 2016 4 30 16 ...

Page 141: ...n BA ULTIMATE POWER BA ULTIMATE 5 Manipulation 64 01 553 D3551 201 03 03 03 35 Retirer la tige 1 Vissez l outil A fourni 2 Ouvrez le système de serrage 3 Retirez la tige A 6401553 book Seite 35 Montag 13 Juni 2016 4 30 16 ...

Page 142: ...l min Réglez le débit d eau de refroidissement au niveau de la bague de réglage A 50 ml min Conseil vous pouvez mesurer la quantité d eau de refroidissement à l aide d un récipient gradué et d une montre Débit d eau max Débit d eau généralités I Le débit d eau est maximal lorsque les deux repères coïncident A 6401553 book Seite 36 Montag 13 Juni 2016 4 30 16 ...

Page 143: ...t de fraisage L instrument de fraisage est à l arrêt Portez des vêtements de protection adaptés 1 Rincez les voies d eau et d air pendant 30 secondes directement sur le poste de traitement 2 Retirez l instrument de fraisage à l aide d une pincette 3 Procédez à une désinfection préalable directement sur le poste de traitement 39 4 Retirez l instrument du moteur 5 Transportez l instrument dans la sa...

Page 144: ...ur 7 Procédez à l entretien de l instrument avec du spray 44 8 Stérilisez l instrument et les accessoires 47 6 2 À la fin de la journée de travail Instrument Procédez à l entretien de l instrument avec du spray 44 Retirer le moteur pendant la nuit AVIS Après la journée de travail séparez l instrument et le moteur afin d éviter la pénétration d huile dans le moteur électrique Le moteur électrique n...

Page 145: ...e pays et doivent présenter des propriétés bactéricides fongicides et virucides prouvées Les désinfectants qui ont la propriété de fixer les protéines ne doivent pas être employés 1 Pulvérisez la surface avec du désinfectant 2 Essuyez le désinfectant à l aide d un chiffon L instrument est exempt de résidus et sec en vue du traitement ultérieur Observez les indications du fabricant pour l utilisati...

Page 146: ...pour la thermodésinfection d instruments dentaires et satisfaire aux exigences de la norme EN ISO 15883 1 p ex 95 C 203 F et 10 min de temps de maintien Pour l utilisation se reporter à la notice d utilisation de l appareil Contrôle _ Nom du produit BA ULTIMATE POWER BA ULTIMATE est préparé avec un appareil de nettoyage et de désinfection 1 Après la préparation vérifiez avec un bon éclairage min 5...

Page 147: ...ULTIMATE à l air comprimé sous une pression maximale de 3 bar 4 Procédez à l entretien manuel des composants mécaniques 44 5 Procédez à l entretien manuel de la pince de serrage avec bouton poussoir 46 6 Emballez BA ULTIMATE POWER BA ULTIMATE dans un emballage convenant à la stérilisation et au stockage par ex dans un emballage papier stratifié 7 Procédez à une stérilisation 47 6401553 book Seite ...

Page 148: ...s Immédiatement après le traitement AVIS Effectuez la préparation immédiatement après le traitement au trop tard 1 heure après AVIS Ne jamais nettoyer dans une cuve à ultrasons AVIS Ne jamais plonger dans une solution de désinfectant Utiliser du spray BA Ultimate AVIS L utilisation de sprays d autres fabricants peut réduire la longévité du produit Utilisez exclusivement le spray BA ULTIMATE Utilis...

Page 149: ...au moins 10 secondes jusqu à ne plus voir de salissure sous un bon éclairage min 500 Lux et avec un bon indice de rendu des couleurs min 80 Ra 2 Rincez les canaux de propulsion à l aide d un spray 3 Nettoyez les canaux de spray à l aide de l adaptateur correspondant et d un produit adéquat selon les indications du fabricant par ex WL Clean d ALPRO 4 Soufflez les canaux de spray avec l adaptateur c...

Page 150: ... de serrage avec bouton poussoir 46 8 Emballez l instrument dans un emballage convenant à la stérilisation et au stockage par ex dans un emballage papier stratifié 9 Procédez à une stérilisation 47 7 4 Entretien manuel 7 4 1 Entretien mécanique Périodicité Chaque jour à midi et le soir au minimum tous les jours à midi et le soir avant chaque stérilisation après chaque désinfection thermique après ...

Page 151: ...tres fabricants peut réduire la longévité du produit Utilisez exclusivement le spray BA ULTIMATE Procédure Entretien _ Instrument L embout de spray est désinfecté Le joint torique au niveau de l embout de spray est intact 1 Emmanchez l embout de spray sur la buse du pulvérisateur A B C ULTIMATE SPRAY BA A Embout de spray B Joint torique pour embout de spray C Spray BA Ultimate 6401553 book Seite 4...

Page 152: ...à l aide d une lingette désinfectante 5 Répétez le processus jusqu à ce que le spray sortant soit clair 7 4 2 Entretien de la pince de serrage avec bouton poussoir BA L entretien de la pince de serrage avec poussoir avec du spray BA Ultimate élimine les dépôts dans le système de serrage et préserve ainsi son caractère opérationnel Périodicité Périodicité Au moins une fois par semaine Accessoires n...

Page 153: ...e de serrage pendant 1 à 2 secondes IMPORTANT Maintenez le flacon pulvérisateur à la verticale 3 Retirez le spray sortant à l aide d une lingette désinfectante 7 5 Stérilisation Etapes de travail _ Instruments L instrument est nettoyé et désinfecté L instrument est entretenu L instrument est conditionné dans un emballage convenant à la stérilisation et au stockage par ex dans un emballage papier s...

Page 154: ...eils homologués pour la stérilisation sont des stérilisateurs à la vapeur de classe B selon EN 13060 ou de classe S selon EN 13060 et convenant en plus pour la stérilisation de pièces à main de contre angles AVIS Pendant la phase de séchage ne dépassez pas une température de 140 C 284 F Surpression 2 04 bar 29 59 psi Température 134 C 274 F Temps de maintien 3 min programme standard 18 min program...

Page 155: ... du stérilisateur à la vapeur ATTENTION L instrument est chaud Risque de brûlure AVIS N accélérez pas le refroidissement en plongeant l instrument dans de l eau froide Ceci endommage votre instrument 2 Conservez tous les instruments dans des conditions permettant de les préserver de toute contamination 3 Répétez la stérilisation au terme de la durée de conservation 6401553 book Seite 49 Montag 13 ...

Page 156: ... les joints toriques comme décrit en fonction de leur usure Système porte outil Pour des raisons de sécurité technique contrôlez une fois par an le système de serrage des fraises pour contre angles et de fraises pour pièces à main Friction Grip Contrôlez une fois par mois le système de serrage des fraises Friction Grip 52 6401553 book Seite 50 Montag 13 Juni 2016 4 30 16 ...

Page 157: ...binet calcaire les buses et canalisations des têtes de traitement peuvent être rétrécies ou bouchées par des dépôts calcaires Nettoyage de la buse _ Instrument 1 Débouchez régulièrement et avec précaution les orifices des buses à l aide du fil de nettoyage désinfecté 2 Faites tourner brièvement l instrument avec du spray de refroidissement 6401553 book Seite 51 Montag 13 Juni 2016 4 30 16 ...

Page 158: ... 52 64 01 553 D3551 201 03 03 03 8 2 Contrôler le système de serrage FG Périodicité Contrôlez le système de serrage FG au moins une fois par mois Accessoires nécessaires Dispositif de contrôle de la pince de serrage 6401553 book Seite 52 Montag 13 Juni 2016 4 30 16 ...

Page 159: ...pince de serrage jusqu à ce que le repère apparaisse force d extraction 22 N Le dispositif de contrôle de la pince de serrage glisse hors de la pince de serrage avant que la bague de repère apparaisse ATTENTION Cela signifie que la pince de serrage est défectueuse et que la bonne fixation de la fraise ne peut pas être garantie Vous risquez de vous blesser Atelier _ BA 1 Arrêtez d utiliser le produ...

Page 160: ...otice d utilisation BA ULTIMATE POWER BA ULTIMATE 54 64 01 553 D3551 201 03 03 03 Astuce consignez la date et le résultat de la vérification pour votre propre contrôle 6401553 book Seite 54 Montag 13 Juni 2016 4 30 16 ...

Page 161: ..._ riqfj qb mltbo H L _ riqfj qb bëé çä j åì ä ÇÉä çéÉê Ççê _ OMM L _ QM L _ SM L _ OUM _ ORM L _ QR L _ SR Manual del operador 6401553 book Seite 1 Montag 13 Juni 2016 4 33 16 ...

Page 162: ... empezar 5 1 1 Estructura del documento 7 1 2 Vida útil 10 2 Indicaciones de seguridad 11 3 Descripción técnica 13 3 1 Función 13 3 2 Funcionamiento 13 3 3 Estructura BA ULTIMATE POWER 14 3 4 Estructura BA ULTIMATE 16 3 5 Datos técnicos 17 3 6 Datos de producción 22 6401553 book Seite 2 Montag 13 Juni 2016 4 33 16 ...

Page 163: ...das 24 4 2 Antes de iniciar la jornada 24 4 3 Antes de cada paciente 24 5 Manejo 26 5 1 Cambio de instrumento 27 5 2 Inserción y extracción de instrumentos de fresado 28 5 3 Ajuste del spray refrigerante 35 6 Acondicionamiento posterior 36 6 1 Después de cada tratamiento 36 6 2 Al terminar la jornada laboral 37 6401553 book Seite 3 Montag 13 Juni 2016 4 33 16 ...

Page 164: ...ar desinfección previa 38 7 2 Limpieza y desinfección mecanizadas 39 7 3 Limpieza y desinfección manual 41 7 4 Conservación manual 43 7 5 Esterilización 46 8 Mantenimiento 49 8 1 Conservación de los orificios de las toberas del spray 50 8 2 Comprobación del sistema de mordaza FG 51 6401553 book Seite 4 Montag 13 Juni 2016 4 33 16 ...

Page 165: ...IMATE sólo para las aplicaciones descritas en el manual del operador 3 Tenga en cuenta las normas sanitarias las disposiciones sobre seguridad e higiene en el trabajo y las medidas de prevención de accidentes aplicables a BA ULTIMATE POWER BA ULTIMATE Uso previsto Piezas de mano y contrángulos Sostener y accionar el instrumento de fresado _ mecanizado rotativo u oscilante BA ULTIMATE POWER BA ULTI...

Page 166: ...NE Profilaxis contra ángulos azules y verdes Endodoncia _ sin contrángulo especial Endodontología contra ángulos azules y verdes Implantología y cirugía _ azul verde Implantología cirugía tratamiento de huesos contra ángulos azules y verdes Prótesis _ pieza de mano contra ángulos azules y verdes Prótesis pieza de mano contra ángulos azules y verdes Contraindicaciones ninguna Contraindicaciones Nin...

Page 167: ...entifica un peligro que si no se evita provoca lesiones graves o la muerte ADVERTENCIA identifica un peligro que si no se evita puede provocar lesiones graves o la muerte ATENCIÓN identifica un peligro que si no se evita puede provocar lesiones Indicaciones de uso Tenga en cuenta las indicaciones de uso para evitar daños materiales y costes adicionales Las indicaciones de uso se identifican del si...

Page 168: ...E identifica información para evitar costes adicionales así como demás información importante Consejo identifica información para facilitar el trabajo 1 1 2 Formatos y símbolos Los símbolos y formatos utilizados en este documento tienen el siguiente significado 6401553 book Seite 8 Montag 13 Juni 2016 4 33 16 ...

Page 169: ... paso de manejo 2 Segundo paso de manejo o Manejo alternativo Resultado Paso de manejo individual Insta a llevar a cabo una actividad Uso de formatos y símbolos 8 Identifica una referencia a otra parte del texto e indica su número de página Enumeración Identifica una enumeración 6401553 book Seite 9 Montag 13 Juni 2016 4 33 16 ...

Page 170: ...ormalmente una vida útil de 5 años las partes móviles normalmente una vida útil de 3 años En este punto no existe ninguna obligación de garantía ya que el desgaste se puede producir antes o después de los tiempos indicados según el uso y la frecuencia de esterilización y cuidado FG Instrumento de fresado Friction Grip CA Instrumento de fresado de contrángulo HP Instrumento de fresado de pieza de m...

Page 171: ...anual del operador al alcance para consultas posteriores Contaminación cruzada y transmisión de infecciones Prevención de la transmisión de infecciones y la contaminación cruzada Realizar esterilización Prevenga la transmisión de infecciones y la contaminación cruzada entre pacientes operadores y terceros después de atender a cada paciente realice una esterilización Tome las medidas de higiene ade...

Page 172: ...inmediatamente el instrumento Los instrumentos dañados pueden provocar lesiones Informe a su distribuidor dental o al fabricante Reparación_instrumento Reparación No repare el instrumento usted mismo Reparación_BA El instrumento BA es el resultado de un desarrollo muy preciso y no debe ser desmontado por terceros Envíe el instrumento sin desmontar para su mantenimiento o reparación a B A Internati...

Page 173: ...rumento El instrumento transmite la potencia de accionamiento y el número de revoluciones del micromotor o del motor de aire a la herramienta de preparación 3 2 Funcionamiento Instrumento La multiplicación del instrumento influye en el número de revoluciones de trabajo de la herramienta de preparación 6401553 book Seite 13 Montag 13 Juni 2016 4 33 16 ...

Page 174: ...4 3 3 Estructura BA ULTIMATE POWER Contra ángulo G F D C B A E A Cabezal del instrumento B Botón pulsador C Salida del spray refrigerante D Abertura del sistema de mordaza E Salida de luz F Indicación de la multiplicación mediante color G Deslizadera ISO 6401553 book Seite 14 Montag 13 Juni 2016 4 33 16 ...

Page 175: ...Descripción técnica 64 01 553 D3551 201 03 03 04 15 Pieza de mano D E C B A A Abertura del sistema de mordaza B Salida del spray refrigerante C Salida de luz D Parte central de la pieza de mano E Deslizadera ISO 6401553 book Seite 15 Montag 13 Juni 2016 4 33 16 ...

Page 176: ...ULTIMATE G F D C B A E A Cabezal del instrumento B Pulsador C Salida del spray refrigerante D Abertura del sistema de mordaza E Salida de luz solo en BA 250LT BA 45LS BA 65LS F Indicación de la multiplicación mediante color G Deslizadera ISO solo en BA 250LT BA 45LS BA 65LS 6401553 book Seite 16 Montag 13 Juni 2016 4 33 16 ...

Page 177: ... POWER BA 200LTS BA 40LSS BA 60LSS BA 280LSS Multiplicación 1 5 1 1 6 1 1 1 Indicación de la multiplicación mediante color rojo azul verde azul Número máximo de revoluciones del motor en min 1 40000 40000 40000 40000 Número máximo de revoluciones de trabajo en min 1 200000 40000 6700 40000 Sistema de mordaza FG CA CA HP CA 6401553 book Seite 17 Montag 13 Juni 2016 4 33 16 ...

Page 178: ...n x x x x Función de luz x x x x Acoplamiento del instrumento INTRAmatic LUX INTRAmatic LUX INTRAmatic LUX INTRAmatic LUX BA 200LTS BA 40LSS BA 60LSS BA 280LSS BA 250LT BA 250T BA 45 LS BA 45S BA 65LS BA 65S Multiplicación 1 5 1 5 1 1 1 1 6 1 6 1 Indicación de la multiplicación mediante color rojo rojo azul azul verde verde 6401553 book Seite 18 Montag 13 Juni 2016 4 33 16 ...

Page 179: ... revoluciones de trabajo en min 1 170000 170000 40000 40000 6700 6700 Sistema de mordaza FG FG CA CA CA CA Refrigerantes internos x x x x x x Bloqueo doble de reabsorción x x x x x x Función de luz x x x Acoplamiento del instrumento INTRAmati c LUX INTRAmati c INTRAmati c LUX INTRAmati c INTRAmati c LUX INTRAmati c BA 250LT BA 250T BA 45 LS BA 45S BA 65LS BA 65S 6401553 book Seite 19 Montag 13 Jun...

Page 180: ... 04 Instrumentos de fresado FG WB HB Instrumentos de fresado FG CA HP Diámetro del mango en mm 1 590 1 600 2 334 2 350 2 334 2 350 Longitud total máxima en mm 25 34 50 Diámetro de trabajo máximo en mm 2 1 Norma ISO 1797 1 ISO 2157 ISO 1797 1 ISO 1797 1 6401553 book Seite 20 Montag 13 Juni 2016 4 33 16 ...

Page 181: ...4 21 Unidad de tratamiento _ instrumento Unidad de tratamiento BA ULTIMATE POWER BA ULTIMATE Presión aire del spray en bares 2 7 Presión de agua del spray en bares 2 0 Temperatura máxima del agua en C 40 Proporción de agua recomendada en el spray en ml min 50 6401553 book Seite 21 Montag 13 Juni 2016 4 33 16 ...

Page 182: ...al del operador BA ULTIMATE POWER BA ULTIMATE 22 64 01 553 D3551 201 03 03 04 InMetro 3 6 Datos de producción Código HSI _ BANiTi Código HSI HIBC H658 M 675LN 1 S 07 00001 A B C 6401553 book Seite 22 Montag 13 Juni 2016 4 33 16 ...

Page 183: ...TE POWER BA ULTIMATE 3 Descripción técnica 64 01 553 D3551 201 03 03 04 23 A Código de la denominación del producto aquí 675LN 1 B Año de fabricación aquí 2007 C Número de serie aquí 00001 6401553 book Seite 23 Montag 13 Juni 2016 4 33 16 ...

Page 184: ...tes de la puesta en funcionamiento Limpie y conserve el instrumento tras pausas prolongadas 4 2 Antes de iniciar la jornada Enjuague los conductos de agua y aire durante 30 segundos 4 3 Antes de cada paciente Preparación _ Instrumento 1 Enjuague los conductos de agua y aire durante 30 segundos 2 ATENCIÓN Detenga el motor Acople el instrumento 27 3 Coloque el instrumento de fresado 28 6401553 book ...

Page 185: ...µm 6 Compruebe si las toberas presentan obstrucciones o incrustaciones p ej de cal y en caso necesario limpie las toberas 50 Sobrecalentamiento de la zona de preparación ATENCIÓN Una refrigeración insuficiente produce un sobrecalentamiento de la zona de preparación y daños en la sustancia dental Asegúrese de que la proporción de agua es 50ml min 6401553 book Seite 25 Montag 13 Juni 2016 4 33 16 ...

Page 186: ... suelto o un poco desprendido puede soltarse del cabezal o romperse Existe peligro de lesiones Por lo tanto utilice el instrumento solo si el instrumento de fresado está al menos a 10 mm de profundidad y bien sujeto Utilizar solo con el sistema de mordaza cerrado ATENCIÓN Accione la pieza de mano sólo cuando el sistema de mordaza esté cerrado Sobrecalentamiento de la zona de preparación ATENCIÓN U...

Page 187: ...lizar el contrángulo marcado en rojo siempre con spray de refrigeración Indicaciones del fabricante IMPORTANTE En las indicaciones del fabricante encontrará todo lo referente al uso y los datos de funcionamiento de las diferentes herramientas de preparación 5 1 Cambio de instrumento Motor parado ATENCIÓN Inserte o extraiga el instrumento sólo con el motor parado Instrumentos con luz solo en motore...

Page 188: ...acción Nombre del producto _ eliminar BA ULTIMATE POWER BA ULTIMATE extracción El motor está parado Extraiga el instrumento No tire de la manguera de alimentación 5 2 Inserción y extracción de instrumentos de fresado Libertad de movimiento del botón IMPORTANTE Asegúrese de que el botón pueda moverse libremente Utilizar sólo fresas en perfecto estado AVISO Utilice solamente fresas y talladores de d...

Page 189: ... poco desprendido puede soltarse del cabezal o romperse Existe peligro de lesiones Por lo tanto utilice el instrumento solo si el instrumento de fresado está al menos a 10 mm de profundidad y bien sujeto Utilizar solo con el sistema de mordaza cerrado ATENCIÓN Accione la pieza de mano sólo cuando el sistema de mordaza esté cerrado 6401553 book Seite 29 Montag 13 Juni 2016 4 33 16 ...

Page 190: ...tion Grip El motor está parado 1 Pulse el botón e introduzca el instrumento de fresado hasta el tope 2 Compruebe si el instrumento de fresado está bien sujeto tirando de él Extracción del instrumento de fresado Friction Grip El instrumento de fresado debe estar parado Pulse el botón y extraiga el instrumento de fresado 6401553 book Seite 30 Montag 13 Juni 2016 4 33 16 ...

Page 191: ...ntroduzca el instrumento de fresado sin pulsar el botón 2 Encaje el instrumento de fresado girándolo ligeramente en ambas direcciones 3 Compruebe la fijación del instrumento de fresado tirando de él y girándolo Extracción del instrumento de fresado de contrángulo El instrumento de fresado está parado Accione el botón y extraiga el instrumento de fresado 6401553 book Seite 31 Montag 13 Juni 2016 4 ...

Page 192: ...media de la pieza de mano en el sentido de la flecha A hasta el tope 2 Si utiliza un instrumento de fresado de contrángulo C introduzca el perno B en la pieza de mano con la punta hendida hacia delante El perno compensa la diferencia de longitud entre el instrumento de fresado de pieza de mano y de contrángulo 3 Introduzca el instrumento de fresado hasta el tope B C A 6401553 book Seite 32 Montag ...

Page 193: ...do D hasta el tope Cuando las dos marcas E coincidan el instrumento de fresado estará sujeto Si utiliza instrumentos de fresado de pieza de mano con mango escalonado asegúrese de que el mango escalonado no ocupe la abertura para el mandril F 5 Compruebe si el instrumento de fresado está bien sujeto tirando de él y girándolo E F D 6401553 book Seite 33 Montag 13 Juni 2016 4 33 16 ...

Page 194: ...r BA ULTIMATE POWER BA ULTIMATE 5 Manejo 64 01 553 D3551 201 03 03 04 34 Retirar perno 1 Enrosque la herramienta suministrada A 2 Abra el sistema de mordaza 3 Extraiga el perno A 6401553 book Seite 34 Montag 13 Juni 2016 4 33 16 ...

Page 195: ...Ajuste el caudal del agua refrigerante con el anillo de regulación A 50 ml min Consejo puede medir la cantidad de agua refrigerante con un vaso de dosificación y un reloj Caudal de agua máximo Caudal de agua Información general I El caudal de agua máximo está ajustado cuando coinciden las dos marcas A 6401553 book Seite 35 Montag 13 Juni 2016 4 33 16 ...

Page 196: ...nstrumentos _ Instrumento de fresado El instrumento de fresado está parado Utilice ropa de protección adecuada 1 Enjuague los conductos de agua y aire directamente en la unidad de tratamiento durante 30 segundos 2 Retire el instrumento de fresado con unas pinzas 3 Lleve a cabo una desinfección previa directamente en la unidad de tratamiento 38 4 Separe el instrumento del motor 5 Transporte el inst...

Page 197: ... los requisitos nacionales locales pertinentes 7 Conserve el instrumento con spray 43 8 Esterilice el instrumento y los accesorios 46 6 2 Al terminar la jornada laboral Instrumento Conserve el instrumento con spray 43 Desmontar el motor durante la noche AVISO No deje ningún instrumento montado en el motor durante la noche para que no caiga aceite al electromotor No lubrique nunca el electromotor 6...

Page 198: ... su país y tener propiedades bactericidas fungicidas y virucidas probadas Utilice únicamente productos de desinfección sin efecto fijador de proteínas 1 Rocíe la superficie con desinfectante 2 Elimine el desinfectante frotando con un paño Para continuar el acondicionamiento el instrumento no debe presentar residuos y debe estar seco Tenga en cuenta las indicaciones del fabricante sobre la aplicaci...

Page 199: ...a desinfección de instrumentos odontológicos y debe cumplir la norma EN ISO 15883 1 p ej 95 C 203 F y un tiempo de permanencia de 10 min Consulte la aplicación en el Manual del operador del equipo Controles _ nombre del producto BA ULTIMATE POWER BA ULTIMATE está equipado con un equipo de limpieza y desinfección 1 Compruebe en un entorno con buena iluminación como mín 500 Lux y un índice de reprod...

Page 200: ...ULTIMATE POWER BA ULTIMATE con aire comprimido con un máximo de 3 bares 4 Realice los trabajos de conservación de las piezas mecánicas de forma manual 44 5 Realice los trabajos de conservación del mandril de botón de forma manual 45 6 Embale BA ULTIMATE POWER BA ULTIMATE empleando un embalaje adecuado para la esterilización y el almacenamiento p ej papel o laminado 7 Lleve a cabo un proceso de est...

Page 201: ...tamente tras el tratamiento AVISO Lleve a cabo el acondicionamiento inmediatamente después del tratamiento a más tardar tras una hora AVISO No limpiar en baño de ultrasonidos AVISO No sumergir en soluciones desinfectantes Uso de BA UltimateSpray AVISO El uso de sprays de otros fabricantes puede acortar la vida útil del producto Utilice exclusivamente el spray BA Ultimate usar cepillos suaves IMPOR...

Page 202: ... F calidad de agua potable como mínimo al menos 10 segundos hasta comprobar que no se aprecian restos de suciedad en un entorno con buena iluminación mín 500 Lux y un índice de reproducción cromática mín 80 Ra 2 Enjuague con spray los canales del engranaje 3 Limpie los canales de spray con el correspondiente adaptador y un medio adecuado según las indicaciones del fabricante p ej WL Clean de ALPRO...

Page 203: ...aje 6 Realice los trabajos de conservación de las piezas mecánicas de forma manual 44 7 Realice los trabajos de conservación del mandril de botón de forma manual 45 8 Embale el instrumento empleando un embalaje adecuado para la esterilización y el almacenamiento p ej papel o laminado 9 Lleve a cabo un proceso de esterilización 47 6401553 book Seite 43 Montag 13 Juni 2016 4 33 16 ...

Page 204: ...ización después de cada desinfección térmica después de cada desinfección térmica sin conservación integrada accesorios necesarios Accesorios necesarios Elemento de spray _BA Uso de BA UltimateSpray AVISO El uso de sprays de otros fabricantes puede acortar la vida útil del producto Utilice exclusivamente el spray BA Ultimate A B C ULTIMATE SPRAY BA A Adaptador de spray B Anillo toroidal para adapt...

Page 205: ...asta que encaje y sujételo 3 Rocíe el instrumento con spray durante 1 2 segundos IMPORTANTE mantenga el envase del spray en posición vertical 4 Emplee un paño de desinfección para recoger el spray expulsado 5 Repita esta acción hasta que el spray expulsado sea claro 7 4 2 Cuidado del mandril de botón BA La conservación del mandril de botón con BA Ultimate Spray elimina los depósitos del sistema de...

Page 206: ...y Procedimiento Procedimiento _ contrángulo El instrumento está limpio y desinfectado 1 Fije el cabezal del contra ángulo con el mandril a la tobera del envase del spray 2 Pulverice spray sobre el mandril durante 1 2 segundos IMPORTANTE mantenga el envase del spray en posición vertical 3 Retire el spray que se expulsa con un paño de desinfección ULTIMATE SPRAY BA 6401553 book Seite 46 Montag 13 Ju...

Page 207: ... en buen estado El instrumento está embalado adecuadamente para la esterilización y el almacenamiento embalaje de papel laminado conforme a la norma ISO 11607 Esterilice el instrumento en el esterilizador de vapor con vapor saturado Unidad presión en bares y psi ww 134 C 274 F Sobrepresión 2 04 bares 29 59 psi Temperatura 134 C 274 F Tiempo de permanencia 3 min 6401553 book Seite 47 Montag 13 Juni...

Page 208: ...perarse los 140 C 284 F Después de la esterilización título Después de la esterilización Pasos siguientes_instrumentos 1 Extraiga inmediatamente el instrumento del esterilizador a vapor ATENCIÓN El instrumento está muy caliente Existe peligro de quemaduras AVISO No acelere el proceso de enfriamiento sumergiendo el instrumento en agua Esto causa daños en el instrumento 2 Guarde todos los instrument...

Page 209: ...idales según su desgaste tal y como se indica Sistema portaherramientas Por motivos de seguridad compruebe anualmente el sistema de mordaza de los instrumentos de fresado de contrángulo y de los instrumentos de fresado de pieza de mano Friction Grip Compruebe una vez al mes el sistema de mordaza de los instrumentos de fresado Friction Grip 51 6401553 book Seite 49 Montag 13 Juni 2016 4 33 16 ...

Page 210: ... de cal en el agua corriente es muy alto las toberas del spray refrigerante pueden estrecharse u obstruirse debido a los depósitos calcáreos Limpieza de la tobera _ instrumento 1 Avance con precaución por las aberturas de las boquillas el alambre de limpieza desinfectado 2 Deje funcionar el instrumento brevemente con el spray de refrigeración 6401553 book Seite 50 Montag 13 Juni 2016 4 33 16 ...

Page 211: ...tenimiento 64 01 553 D3551 201 03 03 04 51 8 2 Comprobación del sistema de mordaza FG Intervalo Compruebe el sistema de mordaza FG al menos una vez al mes Accesorios necesarios Dispositivo de comprobación de mandril 6401553 book Seite 51 Montag 13 Juni 2016 4 33 16 ...

Page 212: ...ivo de comprobación de mandril hasta que visualice el anillo de marcación fuerza de extracción 22 N El dispositivo de comprobación de mandril se desprende del mandril antes de que se visualice la marca del anillo ATENCIÓN El mandril está defectuoso y no se puede garantizar la fijación del instrumento de fresado Peligro de lesiones Taller _ BA 1 Deje de usar el producto 2 Sustituya el sistema de mo...

Page 213: ...operador BA ULTIMATE POWER BA ULTIMATE 8 Mantenimiento 64 01 553 D3551 201 03 03 04 53 Consejo Para su propio control documente la fecha y el resultado de la comprobación 6401553 book Seite 53 Montag 13 Juni 2016 4 33 16 ...

Page 214: ...8 Mantenimiento Manual del operador BA ULTIMATE POWER BA ULTIMATE 54 64 01 553 D3551 201 03 03 04 6401553 book Seite 54 Montag 13 Juni 2016 4 33 16 ...

Page 215: ..._ riqfj qb mltbo H L _ riqfj qb fí äá åç fëíêìòáçåá ÇDìëç _ OMM L _ QM L _ SM L _ OUM _ ORM L _ QR L _ SR Istruzioni d uso 6401553 book Seite 1 Montag 13 Juni 2016 4 36 16 ...

Page 216: ... 1 Prima di iniziare 5 1 1 Struttura del documento 6 1 2 Durata utile 9 2 Istruzioni di sicurezza 11 3 Descrizione tecnica 13 3 1 Funzione 13 3 2 Funzionamento 13 3 3 Montaggio BA ULTIMATE POWER 14 3 4 Montaggio BA ULTIMATE 16 3 5 Dati tecnici 17 3 6 Dati di produzione 23 6401553 book Seite 2 Montag 13 Juni 2016 4 36 16 ...

Page 217: ...di inutilizzo prolungati 25 4 2 Prima dell inizio di una giornata di lavoro 25 4 3 Prima di ogni paziente 25 5 Uso 27 5 1 Cambio strumento 28 5 2 Inserimento e rimozione delle frese 29 5 3 Regolazione dello spray di raffreddamento 36 6 Post processo 37 6 1 Dopo ogni trattamento 37 6 2 Al termine della giornata di lavoro 38 6401553 book Seite 3 Montag 13 Juni 2016 4 36 16 ...

Page 218: ...guire una predisinfezione 39 7 2 Pulizia e disinfezione meccaniche 40 7 3 Pulizia e disinfezione manuale 42 7 4 Trattamento manuale 44 7 5 Sterilizzazione 47 8 Manutenzione 50 8 1 Manutenzione dell apertura dell ugello dello spray 51 8 2 Verifica del sistema di serraggio FG 52 6401553 book Seite 4 Montag 13 Juni 2016 4 36 16 ...

Page 219: ...ATE leggere le istruzioni per l uso 2 Utilizzare il micromotore BA ULTIMATE POWER BA ULTIMATE solo per le applicazioni descritte nelle istruzioni per l uso 3 Rispettare le normative vigenti per il micromotore BA ULTIMATE POWER BA ULTIMATE in materia di igiene tutela della salute e sicurezza nei luoghi di lavoro Uso previsto Manipoli diritti e contrangoli tenere ed azionare la fresa _ lavorazione r...

Page 220: ...nza contrangolo speciale Endodontologia contrangoli blu e verdi implantologia e chirurgia _ blu verde Implantologia chirurgia trattamento di ossa contrangoli blu e verdi protesi _ manipolo contrangoli blu e verdi Protesi manipolo contrangoli blu e verdi Nessuna controindicazione Controindicazioni Nessuna Destinatari Personale odontoiatrico specializzato Questo prodotto deve essere utilizzato esclu...

Page 221: ...e la morte o gravi lesioni ATTENZIONE indica un pericolo che se non viene evitato può provocare lesioni Avvertenze d uso Prestare attenzione alle avvertenze d uso per evitare danni materiali e costi aggiuntivi Le avvertenze d uso sono contrassegnate come segue AVVISO indica misure per evitare danni materiali IMPORTANTE indica informazioni importanti e informazioni per evitare costi aggiuntivi Sugg...

Page 222: ...1 2 Formattazione e caratteri La formattazione e i caratteri utilizzati in questo documento hanno il seguente significato Presupposto 1 Primo passaggio 2 Secondo passaggio oppure Azione alternativa Risultato Passaggio singolo Invita a eseguire un azione 6401553 book Seite 8 Montag 13 Juni 2016 4 36 16 ...

Page 223: ...i codici usati T1 LINE T1 CLASSIC Utilizzo di formattazione e caratteri 8 Contrassegna un riferimento a un altro punto del testo e ne indica il numero di pagina Elenco numerato Contrassegna un elenco numerato FG Fresa Friction Grip CA Fresa per contrangolo HP Fresa per manipolo 6401553 book Seite 9 Montag 13 Juni 2016 4 36 16 ...

Page 224: ...nti non mobili hanno solitamente una durata di 5 anni i componenti mobili hanno solitamente una durata di 3 anni La presente indicazione non genera alcun diritto di garanzia poiché l usura può insorgere anche prima o dopo l intervallo indicato a seconda dell utilizzo e della frequenza di sterilizzazione e manutenzione 6401553 book Seite 10 Montag 13 Juni 2016 4 36 16 ...

Page 225: ... uso a portata di mano per la consultazione Contaminazione crociata e trasmissione di infezioni Prevenzione della trasmissione di infezioni e contaminazioni crociate Eseguire la sterilizzazione Prevenire la trasmissione delle infezioni e le contaminazioni crociate tra pazienti operatori e terzi eseguire una sterilizzazione dopo ogni paziente Adottare misure igieniche adeguate ad esempio indossare ...

Page 226: ...i interrompere immediatamente l uso Gli strumenti danneggiati possono causare lesioni Informare il proprio deposito Dental o il fabbricante Riparazione _ strumento Riparazione Non riparare lo strumento da soli Riparazione _ BA Lo strumento BA è il risultato di uno sviluppo preciso e non deve essere smontato da terzi Spedire lo strumento non smontato per l assistenza o la riparazione a B A Internat...

Page 227: ... 1 Funzione Strumento Lo strumento trasmette la potenza e il regime di rotazione del motore elettrico o ad aria all utensile di preparazione 3 2 Funzionamento Strumento Il rapporto di trasmissione dello strumento influisce sul numero di giri di esercizio dell utensile di preparazione 6401553 book Seite 13 Montag 13 Juni 2016 4 36 16 ...

Page 228: ...ggio BA ULTIMATE POWER Contrangolo G F D C B A E A Testa dello strumento B Pulsante C Getto dello spray di raffreddamento D Apertura del sistema pinza di serraggio E Superficie di uscita della luce F Contrassegno colorato per rapporto di trasmissione G Guida ISO 6401553 book Seite 14 Montag 13 Juni 2016 4 36 16 ...

Page 229: ...tecnica 64 01 553 D3551 201 03 03 11 15 Italiano Manipolo D E C B A A Apertura del sistema di serraggio B Getto dello spray di raffreddamento C Punto di uscita della luce D Parte centrale del manipolo E Guida ISO 6401553 book Seite 15 Montag 13 Juni 2016 4 36 16 ...

Page 230: ...G F D C B A E A Testa dello strumento B Pulsante C Getto dello spray freddo D Apertura del sistema pinza di serraggio E Punto di uscita della luce solo per BA 250LT BA 45LS BA 65LS F Contrassegno colorato per rapporto di trasmissione G Guida ISO solo per BA 250LT BA 45LS BA 65LS 6401553 book Seite 16 Montag 13 Juni 2016 4 36 16 ...

Page 231: ...OWER BA 200LTS BA 40LSS BA 60LSS BA 280LSS Rapporto di trasmissione 1 5 1 1 6 1 1 1 Contrassegno colorato per rapporto di trasmissione rosso blu verde blu Numero di giri motore massimo in min 1 40000 40000 40000 40000 Numero di giri di esercizio massimo in min 1 200000 40000 6700 40000 Sistema di serraggio FG CA CA HP CA 6401553 book Seite 17 Montag 13 Juni 2016 4 36 16 ...

Page 232: ...D3551 201 03 03 11 Sistema di raffreddamento interno x x x x Blocco antiriflusso x x x x Funzione luce x x x x Raccordo dello strumento INTRAmatic LUX INTRAmatic LUX INTRAmatic LUX INTRAmatic LUX BA 200LTS BA 40LSS BA 60LSS BA 280LSS 6401553 book Seite 18 Montag 13 Juni 2016 4 36 16 ...

Page 233: ...1 5 1 5 1 1 1 1 6 1 6 1 Contrassegno colorato per rapporto di trasmissione rosso rosso blu blu verde verde Numero di giri motore massimo in min 1 40000 40000 40000 40000 40000 40000 Numero di giri di esercizio massimo in min 1 170000 170000 40000 40000 6700 6700 Sistema di serraggio FG FG CA CA CA CA Sistema di raffreddamento interno x x x x x x 6401553 book Seite 19 Montag 13 Juni 2016 4 36 16 ...

Page 234: ...x x x Funzione luce x x x Raccordo dello strumento INTRAmati c LUX INTRAmati c INTRAmati c LUX INTRAmati c INTRAmati c LUX INTRAmati c BA 250LT BA 250T BA 45 LS BA 45S BA 65LS BA 65S FG CA HP Diametro dello stelo in mm 1 590 1 600 2 334 2 350 2 334 2 350 Lunghezza complessiva massima in mm 25 34 50 6401553 book Seite 20 Montag 13 Juni 2016 4 36 16 ...

Page 235: ...1 03 03 11 21 Italiano riunito _ strumento Riunito Diametro di lavoro massimo in mm 2 1 Norma ISO 1797 1 ISO 2157 ISO 1797 1 ISO 1797 1 FG CA HP BA ULTIMATE POWER BA ULTIMATE Pressione aria spray in bar 2 7 Pressione acqua spray in bar 2 0 6401553 book Seite 21 Montag 13 Juni 2016 4 36 16 ...

Page 236: ...so BA ULTIMATE POWER BA ULTIMATE 22 64 01 553 D3551 201 03 03 11 Temperatura massima dell acqua in C 40 Quantità di acqua consigliata nello spray in ml min 50 BA ULTIMATE POWER BA ULTIMATE 6401553 book Seite 22 Montag 13 Juni 2016 4 36 16 ...

Page 237: ... POWER BA ULTIMATE 3 Descrizione tecnica 64 01 553 D3551 201 03 03 11 23 Italiano InMetro 3 6 Dati di produzione Codice HSI _ BANiTi Codice HSI HIBC H658 M 675LN 1 S 07 00001 A B C 6401553 book Seite 23 Montag 13 Juni 2016 4 36 16 ...

Page 238: ...zioni d uso BA ULTIMATE POWER BA ULTIMATE 24 64 01 553 D3551 201 03 03 11 A Codice di denominazione prodotto qui 675LN 1 B Anno di produzione qui 2007 C Numero di serie qui 00001 6401553 book Seite 24 Montag 13 Juni 2016 4 36 16 ...

Page 239: ... della messa in servizio Pulire e curare lo strumento dopo prolungati intervalli di inutilizzo 4 2 Prima dell inizio di una giornata di lavoro Sciacquare i condotti dell acqua e dell aria per 30 secondi 4 3 Prima di ogni paziente Preparazione _ Strumento 1 Sciacquare i condotti dell acqua e dell aria per 30 secondi 2 ATTENZIONE Arrestare il motore Inserire lo strumento 28 3 Inserire la fresa 29 64...

Page 240: ... 6 Controllare gli ugelli per individuare eventuali ostruzioni o depositi ad es di calcare quindi pulire gli ugelli se necessario 51 Surriscaldamento del punto di preparazione ATTENZIONE Un raffreddamento insufficiente causa il surriscaldamento del sito di preparazione e danneggia la sostanza dentale Assicurarsi che la quantità d acqua sia maggiore di 50ml min 6401553 book Seite 26 Montag 13 Juni ...

Page 241: ...parzialmente estratta può sganciarsi dalla testa o spezzarsi Pericolo di lesioni Utilizzare pertanto lo strumento solo se la fresa è inserita per almeno 10 mm e risulta serrata correttamente Azionare solo con sistema di serraggio chiuso ATTENZIONE Azionare il manipolo solo con sistema di serraggio chiuso Surriscaldamento del punto di preparazione ATTENZIONE Un raffreddamento insufficiente causa il...

Page 242: ...tti causa l azionamento del pulsante con conseguente pericolo di ustione della mucosa orale Contrangolo rosso ATTENZIONE Utilizzare il contrangolo contrassegnato in rosso sempre con spray di raffreddamento Rispetto delle indicazioni del produttore IMPORTANTE L applicazione e i dati di utilizzo dei diversi utensili di preparazione sono riportati nelle indicazioni del costruttore 6401553 book Seite ...

Page 243: ..._nome del prodotto Inserimento nome del prodotto Inserimento BA ULTIMATE POWER BA ULTIMATE con guida ISO Il motore è fermo 1 Inserire lo strumento fino a farlo scattare in posizione 2 Se si utilizza un motore con una scanalatura di luce A ruotare lo strumento finché la guida ISO non scatta in posizione Rimozione nome del prodotto _ rimozione Rimozione di BA ULTIMATE POWER BA ULTIMATE Il motore è f...

Page 244: ...giati Utilizzare frese e strumenti diamantati puliti per evitare sporcizia nel sistema di serraggio Serraggio della fresa _ Strumento ATTENZIONE Una fresa allentata o parzialmente estratta può sganciarsi dalla testa o spezzarsi Pericolo di lesioni Utilizzare pertanto lo strumento solo se la fresa è inserita per almeno 10 mm e risulta serrata correttamente Azionare solo con sistema di serraggio chi...

Page 245: ...FG Inserimento della fresa Friction Grip Il motore è fermo 1 Premere il pulsante e inserire la fresa fino alla battuta 2 Verificare tirandola che la fresa sia saldamente innestata Rimozione della fresa Friction Grip La fresa è ferma Premere il pulsante ed estrarre la fresa 6401553 book Seite 31 Montag 13 Juni 2016 4 36 16 ...

Page 246: ... 1 Inserire la fresa senza attivare il coperchio a pressione 2 Far scattare la fresa in posizione con un lieve movimento di rotazione in un verso e nell altro 3 Verificare tirandola e ruotandola che la fresa sia saldamente innestata Rimozione della fresa per contrangolo La fresa è ferma Premere il pulsante ed estrarre la fresa 6401553 book Seite 32 Montag 13 Juni 2016 4 36 16 ...

Page 247: ... parte centrale del manipolo in direzione della freccia A fino alla battuta 2 Se si utilizza la fresa per contrangolo C inserire nel manipolo dapprima il perno B con l estremità fessurata Il perno compensa la differenza di lunghezza tra la fresa per manipolo e quella per contrangolo 3 Introdurre la fresa fino alla battuta B C A 6401553 book Seite 33 Montag 13 Juni 2016 4 36 16 ...

Page 248: ... Quando entrambi i contrassegni E si trovano l uno di fronte all altro la fresa è serrata Quando si utilizzano frese per manipolo con stelo di lunghezza ridotta accertarsi che lo stelo non poggi direttamente sull apertura della pinza di serraggio F 5 Verificare tirandola e ruotandola che la fresa sia saldamente innestata E F D 6401553 book Seite 34 Montag 13 Juni 2016 4 36 16 ...

Page 249: ...E POWER BA ULTIMATE 5 Uso 64 01 553 D3551 201 03 03 11 35 Italiano Rimozione del perno 1 Avvitare l utensile A in dotazione 2 Aprire il sistema di serraggio 3 Estrarre il perno A 6401553 book Seite 35 Montag 13 Juni 2016 4 36 16 ...

Page 250: ...ta dell acqua di raffreddamento 50 ml min con l anello di regolazione A Suggerimento La quantità dell acqua di raffreddamento può essere misurata con un bicchiere dosatore e un orologio Portata max dell acqua Portata d acqua generale I Il flusso d acqua massimo è impostato quando i due contrassegni sono l uno di fronte all altro A 6401553 book Seite 36 Montag 13 Juni 2016 4 36 16 ...

Page 251: ...rumenti _ fresa La fresa è ferma Indossare indumenti protettivi adeguati 1 Lavare direttamente sul riunito le vie di passaggio dell aria e dell acqua per 30 secondi 2 Rimuovere la fresa con una pinzetta 3 Eseguire una predisinfezione direttamente sul riunito 39 4 Estrarre lo strumento dal motore 5 Trasportare lo strumento in un contenitore per il trasporto idoneo nel locale per la pulizia e la dis...

Page 252: ...i 7 Trattare lo strumento con lo spray 44 8 Sterilizzare lo strumento e gli accessori 47 6 2 Al termine della giornata di lavoro Strumento Trattare lo strumento con lo spray 44 Rimozione del micromotore nelle ore notturne AVVISO Durante la notte non lasciare alcuno strumento sul micromotore per evitare che l olio penetri nel motore elettrico Non lubrificare mai il micromotore elettrico 6401553 boo...

Page 253: ...roprio Paese e possedere delle comprovate proprietà battericide fungicide e virucide Utilizzare solo disinfettanti che non agevolano il fissaggio delle proteine 1 Spruzzare il disinfettante sulla superficie 2 Asciugare il disinfettante con un panno Per l ulteriore preparazione lo strumento è asciutto e privo di residui Nell impiego di disinfettanti per strumenti attenersi alle indicazioni del prod...

Page 254: ...suo fabbricante per la pulizia e la disinfezione di strumenti odontoiatrici e deve essere conforme alla norma EN ISO 15883 1 ad es 95 C 203 F e 10 min di permanenza Per le modalità d uso dell apparecchio consultare le relative istruzioni per l uso Controllo _ Nome prodotto BA ULTIMATE POWER BA ULTIMATE è sottoposto a preparazione mediante un apparecchio per la pulizia e la disinfezione 1 Osservare...

Page 255: ...continuare la preparazione 3 Asciugare BA ULTIMATE POWER BA ULTIMATE con aria ad una pressione max di 3 bar 4 Trattare le parti meccaniche manualmente 45 5 Trattare la pinza di serraggio a pulsante manualmente 46 6 Confezionare BA ULTIMATE POWER BA ULTIMATE in una busta idonea alla sterilizzazione e alla conservazione ad es una busta in carta laminato 7 Eseguire la sterilizzazione 48 6401553 book ...

Page 256: ...i dopo 1 ora AVVISO Non pulire mai in un bagno a ultrasuoni AVVISO Non immergere mai in soluzioni disinfettanti Utilizzare lo Spray BA Ulitmate AVVISO L utilizzo di spray di altri produttori può ridurre la durata del prodotto Utilizzare esclusivamente lo Spray BA Ultimate utilizzare una spazzola morbida IMPORTANTE Per la pulizia utilizzare una spazzola morbida pulita e disinfettata procedura _ str...

Page 257: ...noscibile alcun tipo di sporco tuttavia per almeno 10 secondi 2 Sciacquare i canali di trasmissione con lo spray 3 Pulire i canali dello spray con un adattatore idoneo e un mezzo idoneo secondo le indicazioni del produttore per es WL Clean di ALPRO 4 Soffiare i canali dello spray con il relativo adattatore ad una pressione di 2 5 3 bar finché non fuoriesce più umidità tuttavia per almeno 10 second...

Page 258: ... parti meccaniche manualmente 45 7 Trattare la pinza di serraggio a pulsante manualmente 46 8 Confezionare lo strumento in un imballaggio idoneo alla sterilizzazione e alla conservazione ad es un imballaggio in carta laminato 9 Eseguire la sterilizzazione 48 6401553 book Seite 44 Montag 13 Juni 2016 4 36 16 ...

Page 259: ... sterilizzazione dopo ogni termodisinfezione dopo ogni termodisinfezione senza trattamento integrato Accessori necessari Accessori necessari Raccordo spray _BA Utilizzare lo Spray BA Ulitmate AVVISO L utilizzo di spray di altri produttori può ridurre la durata del prodotto Utilizzare esclusivamente lo Spray BA Ultimate A B C ULTIMATE SPRAY BA A Raccordo spray B O ring per raccordo spray C Spray BA...

Page 260: ...lo saldamente 3 Spruzzare lo spray nello strumento per 1 2 secondi IMPORTANTE Tenere la bomboletta dello spray in posizione verticale 4 Raccogliere lo spray fuoriuscito con una salvietta disinfettante 5 Ripetere la procedura finché lo spray fuoriuscito è chiaro 7 4 2 Trattamento della pinza di serraggio a pulsante BA Il trattamento della pinza di serraggio a pulsante con spray BA Ultimate elimina ...

Page 261: ...edura Procedura _ contrangolo Lo strumento è pulito e disinfettato 1 Inserire saldamente la testa del contrangolo con la pinza di serraggio nell ugello dello spray 2 Spruzzare sulla pinza di serraggio per 1 2 secondi IMPORTANTE Tenere la bomboletta dello spray in posizione verticale 3 Rimuovere lo spray fuoriuscito con una salvietta disinfettante ULTIMATE SPRAY BA 6401553 book Seite 47 Montag 13 J...

Page 262: ...brificato Lo strumento è imbustato in un imballaggio adatto per la sterilizzazione e la conservazione busta di carta laminato a norma ISO 11607 Sterilizzare lo strumento nella sterilizzatrice a vapore con vapore acqueo saturo Unità pressione in bar e psi ww 134 C 274 F Sovrapressione 2 04 bar 29 59 psi Temperatura 134 C 274 F Tempo di permanenza 3 min 6401553 book Seite 48 Montag 13 Juni 2016 4 36...

Page 263: ...e durante la fase di asciugatura non superare i 140 C 284 F Dopo la sterilizzazione titolo Dopo la sterilizzazione Passaggi successivi _ strumenti 1 Togliere subito lo strumento dallo sterilizzatore a vapore ATTENZIONE Lo strumento è caldo Pericolo di ustione AVVISO Non accelerare il raffreddamento immergendo lo strumento nell acqua fredda Ciò danneggia lo strumento 2 Preservare tutti gli strument...

Page 264: ...n elastomero ad esempio gli O ring in base al grado di usura come descritto Sistema di supporto per utensile Verificare annualmente il sistema di serraggio delle frese per contrangolo e per manipolo per motivi tecnici di sicurezza Friction Grip Verificare mensilmente il sistema di serraggio delle frese Friction Grip 52 6401553 book Seite 50 Montag 13 Juni 2016 4 36 16 ...

Page 265: ...a di rete contiene calcare gli ugelli dello spray di raffreddamento potrebbero restringersi o intasarsi a causa dei depositi di calcare Pulizia dell ugello _ Strumento 1 Introdurre con cautela e ad intervalli regolari il filo per la pulizia disinfettato attraverso i fori degli ugelli 2 Attivare brevemente lo strumento con spray di raffreddamento 6401553 book Seite 51 Montag 13 Juni 2016 4 36 16 ...

Page 266: ...E 52 64 01 553 D3551 201 03 03 11 8 2 Verifica del sistema di serraggio FG Intervallo Verificare il sistema di serraggio FG almeno una volta al mese Accessori necessari Dispositivo di prova per pinza di serraggio 6401553 book Seite 52 Montag 13 Juni 2016 4 36 16 ...

Page 267: ...i estrazione 22 N Il dispositivo di prova scivola dalla pinza di serraggio prima della comparsa dell anello di marcatura ATTENZIONE La pinza di serraggio è difettosa e non può essere garantita una presa stabile della fresa Pericolo di lesioni Laboratorio _ BA 1 Sospendere l utilizzo del prodotto 2 Far sostituire il sistema di serraggio in un laboratorio di riparazione autorizzato da B A Internatio...

Page 268: ...8 Manutenzione Istruzioni d uso BA ULTIMATE POWER BA ULTIMATE 54 64 01 553 D3551 201 03 03 11 6401553 book Seite 54 Montag 13 Juni 2016 4 36 16 ...

Page 269: ..._ riqfj qb mltbo H L _ riqfj qb kÉÇÉêä åÇë dÉÄêìáâÉêëÜ åÇäÉáÇáåÖ _ OMM L _ QM L _ SM L _ OUM _ ORM L _ QR L _ SR Gebruikershandleiding 6401553 book Seite 1 Montag 13 Juni 2016 4 39 16 ...

Page 270: ...1 Voor u begint 5 1 1 Opbouw van de documentatie 7 1 2 Levensduur 10 2 Veiligheidsaanwijzingen 11 3 Technische beschrijving 13 3 1 Taken 13 3 2 Werking 13 3 3 Opbouw BA ULTIMATE POWER 14 3 4 Opbouw BA ULTIMATE 16 3 5 Technische gegevens 17 3 6 Productiegegevens 22 6401553 book Seite 2 Montag 13 Juni 2016 4 39 16 ...

Page 271: ...angere perioden van stilstand 24 4 2 Voor het begin van een werkdag 24 4 3 Voor iedere patiënt 24 5 Bediening 26 5 1 Instrument vervangen 27 5 2 Boorinstrumenten aanbrengen en verwijderen 28 5 3 Koelvloeistof instellen 35 6 Navolgende behandeling 36 6 1 Na elke behandeling 36 6 2 Aan het einde van de werkdag 37 6401553 book Seite 3 Montag 13 Juni 2016 4 39 16 ...

Page 272: ...ar maken 38 7 1 Voordesinfectie uitvoeren 38 7 2 Machinaal reinigen en ontsmetten 39 7 3 Manueel reinigen en ontsmetten 40 7 4 Manueel reinigen 43 7 5 Steriliseren 46 8 Onderhoud 49 8 1 Onderhoud aan opening van sproeimondstuk 50 8 2 FG spansysteem controleren 51 6401553 book Seite 4 Montag 13 Juni 2016 4 39 16 ...

Page 273: ...Gebruik BA ULTIMATE POWER BA ULTIMATE alleen voor toepassingen die in de gebruikershandleiding beschreven zijn 3 Neem de voor BA ULTIMATE POWER BA ULTIMATE geldende hygiënevoorschriften de bepalingen inzake bescherming op het werk en de maatregelen ter preventie van ongevallen in acht Reglementair gebruik Handstukken en ellebogen Boorinstrument vasthouden en aandrijven _ roterende of oscillerende ...

Page 274: ...LINE profylaxe blauwe en groene ellebogen Endodontologie _ zonder speciale elleboog endodontologie blauwe en groene ellebogen implantologie en chirurgie _ blauw groen implantologie chirurgie bewerking van bot blauwe en groene ellebogen prothetiek _ handstuk blauwe en groene ellebogen prothetiek handstuk blauwe en groene ellebogen Contra indicatie _ geen Tegenaanwijzingen contra indicaties Geen Doe...

Page 275: ...of ernstig letsel veroorzaakt wanneer het niet wordt vermeden WAARSCHUWING wijst op een gevaar dat overlijden of ernstig letsel kan veroorzaken wanneer het niet wordt vermeden VOORZICHTIG wijst op een gevaar dat letsel kan veroorzaken wanneer het niet wordt vermeden Aanwijzingen voor gebruik Let op de aanwijzingen voor gebruik om materiële schade en extra kosten te vermijden De aanwijzingen voor g...

Page 276: ... 03 19 BELANGRIJK wijst op belangrijke informatie en informatie om extra kosten te vermijden Tip wijst op informatie om het werk te vereenvoudigen 1 1 2 Opmaak en tekens De in dit document gebruikte opmaak en tekens hebben de volgende betekenis 6401553 book Seite 8 Montag 13 Juni 2016 4 39 16 ...

Page 277: ...gsstap 2 Tweede handelingsstap of Alternatieve handeling Resultaat Individuele handelingsstap Geeft u de opdracht om een activiteit uit te voeren Gebruikte opmaak en tekens 8 Geeft een verwijzing naar een ander tekstdeel met vermelding van het paginanummer Opsomming Geeft een opsomming aan 6401553 book Seite 9 Montag 13 Juni 2016 4 39 16 ...

Page 278: ...rdelen een kenmerkende levensduur van 5 jaar bewegende onderdelen een kenmerkende levensduur van 3 jaar Hieraan kunnen geen rechten op garantie worden ontleend aangezien slijtage ook voor of na de bovenstaande perioden kan ontstaan afhankelijk van de mate van gebruik sterilisatie en onderhoud FG Wrijvingsgrip boorinstrument CA Elleboog boorinstrument HP gereedschapshouder boorinstrument 6401553 bo...

Page 279: ...em het Reglementaire gebruik in acht Bewaar deze documentatie op een plaats onder handbereik Kruisbesmetting en infectieoverdracht Preventie van infectieoverdracht en kruisbesmetting Sterilisatie uitvoeren Vermijd infectieoverdracht en kruisbesmetting tussen patiënten gebruikers en derden voer na iedere patiënt een sterilisatie uit Neem de nodige hygiënemaatregelen Draag bijvoorbeeld beschermende ...

Page 280: ...ngen veroorzaken Neem contact op met uw leverancier van tandheelkundige producten of met de fabrikant Reparatie_Instrument Reparatie Repareer het instrument niet zelf Reparatie _ BA Het BA instrument is het resultaat van een nauwgezette ontwikkeling en mag niet door derden worden gedemonteerd Stuur het intacte instrument voor service of reparaties ofwel naar B A International Ltd of naar een servi...

Page 281: ...ing 3 1 Taken Instrument Het instrument dient voor de overdracht van het aandrijfvermogen en het toerental van de elektrische motor of de persluchtmotor op het preparatiegereedschap 3 2 Werking Instrument De vertaling van het instrument beïnvloedt het werktoerental van het preparatiegereedschap 6401553 book Seite 13 Montag 13 Juni 2016 4 39 16 ...

Page 282: ...4 01 553 D3551 201 03 03 19 3 3 Opbouw BA ULTIMATE POWER Elleboog G F D C B A E A Instrumentenkop B Drukknop C Uittreding koelspray D Opening van het spantangsysteem E Lichtopening F Kleurenidentificatie voor overbrenging G ISO slider 6401553 book Seite 14 Montag 13 Juni 2016 4 39 16 ...

Page 283: ...ULTIMATE 3 Technische beschrijving 64 01 553 D3551 201 03 03 19 15 Nederlands Handstuk D E C B A A Opening van spansysteem B Uittreding koelspray C Lichtopening D Handstuk middendeel E ISO slider 6401553 book Seite 15 Montag 13 Juni 2016 4 39 16 ...

Page 284: ... 4 Opbouw BA ULTIMATE G F D C B A E A Instrumentenkop B Drukknop C Uittreding koelspray D Opening van het spantangsysteem E Uittredend licht alleen bij BA 250LT BA 45LS BA 65LS F Kleurenidentificatie ter vertaling G ISO slider alleen bij BA 250LT BA 45LS BA 65LS 6401553 book Seite 16 Montag 13 Juni 2016 4 39 16 ...

Page 285: ...WER BA 200LTS BA 40LSS BA 60LSS BA 280LSS Overbrenging 1 5 1 1 6 1 1 1 Kleurenidentificatie voor overbrenging rood blauw groen blauw Maximale motortoerental in min 1 40000 40000 40000 40000 Maximale motortoerental in min 1 200000 40000 6700 40000 Spansysteem FG CA CA HP CA Inwendig toegevoerde koelmedia x x x x Terugzuigblokkering x x x x 6401553 book Seite 17 Montag 13 Juni 2016 4 39 16 ...

Page 286: ...ic LUX INTRAmatic LUX BA 200LTS BA 40LSS BA 60LSS BA 280LSS BA 250LT BA 250T BA 45 LS BA 45S BA 65LS BA 65S Overbrenging 1 5 1 5 1 1 1 1 6 1 6 1 Kleurenidentificatie voor overbrenging rood rood blauw blauw groen groen Maximale motortoerental in min 1 40000 40000 40000 40000 40000 40000 Maximale motortoerental in min 1 170000 170000 40000 40000 6700 6700 6401553 book Seite 18 Montag 13 Juni 2016 4 ...

Page 287: ...ansysteem FG FG CA CA CA CA Inwendig toegevoerde koelmedia x x x x x x Terugzuigblokkering x x x x x x Lichtfunctie x x x Instrumentenkoppeling INTRAmati c LUX INTRAmati c INTRAmati c LUX INTRAmati c INTRAmati c LUX INTRAmati c BA 250LT BA 250T BA 45 LS BA 45S BA 65LS BA 65S 6401553 book Seite 19 Montag 13 Juni 2016 4 39 16 ...

Page 288: ...3551 201 03 03 19 Boorinstrumenten FG WB HB Boorinstrumenten FG CA HP Schachtdiameter in mm 1 590 1 600 2 334 2 350 2 334 2 350 Maximale totaallengte in mm 25 34 50 Maximale werkdiameter in mm 2 1 Norm ISO 1797 1 ISO 2157 ISO 1797 1 ISO 1797 1 6401553 book Seite 20 Montag 13 Juni 2016 4 39 16 ...

Page 289: ... 201 03 03 19 21 Nederlands Behandelingseenheid _ Instrument Behandelstoel BA ULTIMATE POWER BA ULTIMATE Druk sproeierlucht in bar 2 7 Druk sproeiwater in bar 2 0 Maximale watertemperatuur in C 40 Aanbevolen wateraandeel in de spray in ml min 50 6401553 book Seite 21 Montag 13 Juni 2016 4 39 16 ...

Page 290: ...Gebruikershandleiding BA ULTIMATE POWER BA ULTIMATE 22 64 01 553 D3551 201 03 03 19 InMetro 3 6 Productiegegevens HSI Code _ BANiTi HSI HIBC code H658 M 675LN 1 S 07 00001 A B C 6401553 book Seite 22 Montag 13 Juni 2016 4 39 16 ...

Page 291: ...TE POWER BA ULTIMATE 3 Technische beschrijving 64 01 553 D3551 201 03 03 19 23 Nederlands A Code van de productbenaming hier 675LN 1 B Fabricagejaar hier 2007 C Serienummer hier 00001 6401553 book Seite 23 Montag 13 Juni 2016 4 39 16 ...

Page 292: ...mt Reinig en verzorg de turbine als ze langere tijd niet werd gebruikt 4 2 Voor het begin van een werkdag Spoel de water en luchtleidingen gedurende 30 seconden door 4 3 Voor iedere patiënt Voorbereiding_Instrument 1 Spoel de water en luchtleidingen gedurende 30 seconden door 2 VOORZICHTIG Stop de motor Breng het instrument aan 27 3 Plaats het boorinstrument erin 28 4 Stel voldoende koelwater in 5...

Page 293: ... sproeiers op verstopping en afzetting van bijv kalk en reinig de sproeiers indien nodig 50 Oververhitting van de voorbereidingsplaats VOORZICHTIG Een gebrekkige koeling leidt tot oververhitting van de voorbereidingsplaats en tot ernstige beschadiging van het gebit Zorg ervoor dat het watergehalte 50 ml min bedraagt 6401553 book Seite 25 Montag 13 Juni 2016 4 39 16 ...

Page 294: ...elijk uitgetrokken boor kan uit de kop loskomen of afbreken Er bestaat gevaar voor verwondingen Gebruik de turbine alleen als het boorinstrument minstens 10 mm diep en vast ingespannen is Alleen bij gesloten spansysteem gebruiken VOORZICHTIG Gebruik de gereedschapshouder alleen bij een gesloten spansysteem Oververhitting van de voorbereidingsplaats VOORZICHTIG Een gebrekkige koeling leidt tot over...

Page 295: ...boog terug Hierbij wordt de drukknop bediend en bestaat gevaar van verbranding voor de slijmhuid van de mond rode elleboog VOORZICHTIG Gebruik de rood gemarkeerde elleboog uitsluitend met koelspray Neem de gegevens van de producent in acht BELANGRIJK In de informatie van de producent vindt u de gebruiks en bedrijfsgegevens van de diverse speciale preparatiegereedschappen 6401553 book Seite 27 Mont...

Page 296: ...op motoren zonder licht Opsteken_Productnaam Productnaam opsteken BA ULTIMATE POWER BA ULTIMATE opsteken met ISO slider De motor staat stil 1 Steek het instrument erop tot het hoorbaar vastklikt 2 Als u een motor met een geleideopening A gebruikt draait u het instrument totdat de ISOslider vastklikt Verwijderen Productnaam _ Verwijderen BA ULTIMATE POWER BA ULTIMATE verwijderen De motor staat stil...

Page 297: ...ie scherp en onbeschadigd zijn Gebruik schone boren en diamantslijpers om vuil in het spansysteem te vermijden Inspannen van de boor _ Instrument VOORZICHTIG Een losse of gedeeltelijk uitgetrokken boor kan uit de kop loskomen of afbreken Er bestaat gevaar voor verwondingen Gebruik de turbine alleen als het boorinstrument minstens 10 mm diep en vast ingespannen is Alleen bij gesloten spansysteem ge...

Page 298: ...ent aanbrengen De motor staat stil 1 Druk de drukknop in en schuif het boorinstrument er tot de aanslag in 2 Controleer of het boorinstrument goed vast zit door er aan te trekken Wrijvingsgrip boorinstrument verwijderen Het boorinstrument staat stil Druk de drukknop in en trek het boorinstrument eruit 6401553 book Seite 30 Montag 13 Juni 2016 4 39 16 ...

Page 299: ...1 Breng het boorinstrument aan zonder de drukknop te bedienen 2 Vergrendel het boorinstrument door het een beetje heen en weer te draaien 3 Controleer of het boorinstrument goed vastzit door eraan te trekken en te draaien Elleboog boorinstrument verwijderen Het boorinstrument staat stil Druk de drukknop in en trek het boorinstrument eruit 6401553 book Seite 31 Montag 13 Juni 2016 4 39 16 ...

Page 300: ...ai de gereedschapshouder het middendeel in pijlrichting A tot aan de aanslag 2 Als u een elleboog boorinstrument C gebruikt brengt u de stift B met het gegroefde uiteinde vooraan in de gereedschapshouder aan De stift compenseert het lengteverschil tussen de handboor en het elleboog boorinstrument 3 Breng het boorinstrument tot aan de aanslag in B C A 6401553 book Seite 32 Montag 13 Juni 2016 4 39 ...

Page 301: ...anslag te draaien Als de bouten en de markeringen E tegenover elkaar staan is het boorinstrument gespannen Als u de gereedschapshouder boorinstrumenten met getrapte schacht gebruikt let erop dat de getrapte schacht niet op de opening voor de spantang rust F 5 Controleer of het boorinstrument goed vast zit door er aan te trekken en te draaien E F D 6401553 book Seite 33 Montag 13 Juni 2016 4 39 16 ...

Page 302: ...iding BA ULTIMATE POWER BA ULTIMATE 34 64 01 553 D3551 201 03 03 19 De stift verwijderen 1 Schroef het meegeleverde gereedschap A in 2 Open het spansysteem 3 Trek de stift eruit A 6401553 book Seite 34 Montag 13 Juni 2016 4 39 16 ...

Page 303: ...n instellen 50 ml min Stel het debiet van het koelwater met regelring A in 50 ml min Tip u kunt de koelwaterhoeveelheid met een maatbeker en een klok meten Maximaal waterdebiet Waterdebiet algemeen I De maximale waterdoorvoer is ingesteld wanneer de beide markeringen tegenover elkaar liggen A 6401553 book Seite 35 Montag 13 Juni 2016 4 39 16 ...

Page 304: ...strumenten _ boorinstrument Het boorinstrument staat stil Draag geschikte beschermende kleding 1 Spoel de water en luchtleidingen direct vanaf de behandelingseenheid gedurende 30 seconden door 2 Verwijder het boorinstrument met een pincet 3 Voer direct op de behandelingseenheid een voorbereidende desinfectie uit 38 4 Trek het instrument van de motor 5 Transporteer het instrument in een geschikte t...

Page 305: ... de desbetreffende nationale lokale voorschriften mogelijk 7 Onderhoud het instrument met spray 43 8 Steriliseer het instrument en de accessoires 46 6 2 Aan het einde van de werkdag Instrument Onderhoud het instrument met spray 43 verwijder s nachts de motor AANWIJZING Laat s nachts geen instrument op de motor zodat geen olie in de elektrische motor loopt De elektrische motor nooit oliën 6401553 b...

Page 306: ...rd zijn en moeten aantoonbaar bactericide fungicide en virucide eigenschappen hebben Gebruik uitsluitend desinfectiemiddelen die geen proteïnefixerende werking hebben 1 Besproei het oppervlak met desinfectiemiddel 2 Neem het desinfectiemiddel met een doek af De turbine is voor de verdere voorbereiding vrij van alle restanten en droog Let op de informatie van de fabrikant over gebruik van het midde...

Page 307: ...ant zijn goedgekeurd voor het reinigen en ontsmetten van tandheelkundige instrumenten en moet voldoen aan EN ISO 15883 1 bijv 95 C 203 F en 10 min stoptijd In de gebruiksaanwijzing van het toestel vindt u de toepassing Controle _ Productnaam BA ULTIMATE POWER BA ULTIMATE is met een reinigings en desinfectietoestel voorbereid 1 Controleer bij een goede verlichting min 500 lux en kleurweergave index...

Page 308: ... manueel 45 6 Verpak BA ULTIMATE POWER BA ULTIMATE in een verpakking die voor sterilisatie en opslag geschikt is bijv papier laminaatverpakking 7 Voer een sterilisatie uit 47 7 3 Manueel reinigen en ontsmetten Handmatige reiniging mogelijk in uitzonderingsgevallen BELANGRIJK In uitzonderingsgevallen en met inachtneming van nationale plaatselijke bepalingen kan een handmatige voorbereiding mogelijk...

Page 309: ...et gebruik van sprays van andere fabrikanten kan de levensduur van het product beperken Gebruik uitsluitend spray BA Ultimate zachte borstel gebruiken BELANGRIJK Gebruik voor de reiniging een zachte schone en gedesinfecteerde borstel Werkwijze _ instrument met geïntegreerde spray Draag geschikte beschermende kleding Alle desinfectiemiddelen moeten in uw land goedgekeurd zijn en moeten aantoonbaar ...

Page 310: ...ansmissiekanalen met spray 3 Reinig de sproeikanalen met de betreffende adapter en een geschikt middel volgens de aanwijzingen van de fabrikant bijvoorbeeld WL Clean van ALPRO 4 Blaas de sproeikanalen met de betreffende adapter uit met 2 5 3 bar tot er geen vocht meer naar buiten komt maar minstens 10 seconden U kunt bijvoorbeeld WL dry van ALPRO gebruiken 5 Voer een thermische desinfectie of een ...

Page 311: ...tie en opslag geschikt is bijvoorbeeld papier laminaat verpakking 9 Voer een sterilisatie uit 47 7 4 Manueel reinigen 7 4 1 Mechanica onderhouden Intervallen elke middag en avond minstens elke middag en avond voor iedere sterilisatie na iedere thermische desinfectie na iedere thermische desinfectie zonder geïntegreerd onderhoud 6401553 book Seite 43 Montag 13 Juni 2016 4 39 16 ...

Page 312: ...prays van andere fabrikanten kan de levensduur van het product beperken Gebruik uitsluitend spray BA Ultimate Werkwijze Onderhoud _ Instrument Het sproeieropzetstuk is gedesinfecteerd De O ring op het sproeier opzetstuk is intact 1 Steek het sproeier opzetstuk op de sproeier van de spuitbus A B C ULTIMATE SPRAY BA A Sproeieropzetstuk B O ring voor sproeieropzetstuk C BA Ultimate spray 6401553 book...

Page 313: ... 4 Neem naar buiten komende spray met een desinfectiedoekje op 5 Herhaal deze producedure zolang nodig 7 4 2 Drukknop spantang onderhouden BA Het gebruik van BA Ultimate Spray voor de verzorging van de drukknop spantang verwijdert afzettingen in het spansysteem en houdt zo de goede werking in stand Interval Interval Minstens eenmaal per week Noodzakelijke accessoires BA Ultimate spray BA Ultimate ...

Page 314: ...Het instrument is gereinigd en gedesinfecteerd 1 Breng de elleboogkop met de spantang vast op de kop van de spuitbus aan 2 Sproei de spantang gedurende 1 2 seconden door BELANGRIJK houd de spuitbus verticaal 3 Neem naar buiten komende spray met een desinfectiedoekje weg ULTIMATE SPRAY BA 6401553 book Seite 46 Montag 13 Juni 2016 4 39 16 ...

Page 315: ...d van het instrument is voltooid Het instrument is verpakt in een verpakking die voor sterilisatie en opslag geschikt is bijvoorbeeld papier laminaat verpakking dat voldoet aan ISO 11607 Steriliseer het instrument in de stoomsterilisator met verzadigde waterdamp Eenheid druk in bar en psi ww 134 C 274 F Overdruk 2 04 bar 29 59 psi Temperatuur 134 C 274 F Stoptijd 3 min 6401553 book Seite 47 Montag...

Page 316: ... tijdens de droogfase een temperatuur van 140 C 284 F niet Na de sterilisatie titel Na de sterilisatie Volgstappen _ Instrumenten 1 Haal het instrument onmiddellijk uit de autoclaaf VOORZICHTIG Het instrument is heet Er bestaat gevaar voor brandwonden AANWIJZING Versnel het afkoelen niet door het instrument in koud water onder te dompelen Dit beschadigt uw instrument 2 Bewaar alle instrumenten bes...

Page 317: ... ringen wanneer deze versleten zijn zoals beschreven Bevestigingssysteem voor werktuigen Controleer het spansysteem van de elleboog boorinstrument en het gereedschapshouder boorinstrumenten om veiligheidsredenen jaarlijks Wrijvingsgreep Controleer het spansysteem van de boordinstrumenten met wrijvingsgreep maandelijks 51 6401553 book Seite 49 Montag 13 Juni 2016 4 39 16 ...

Page 318: ...gwater Bij kalkhoudend leidingwater kunnen de koelvloeistofmondstukken door kalkafzettingen nauwer worden of kan de capaciteit teruglopen Sproeiers reinigen _ Instrument 1 Prik de sproeieropeningen geregeld voorzichtig door met de gedesinfecteerde reinigingsdraad 2 Laat het instrument kort met koelspray lopen 6401553 book Seite 50 Montag 13 Juni 2016 4 39 16 ...

Page 319: ...derhoud 64 01 553 D3551 201 03 03 19 51 Nederlands 8 2 FG spansysteem controleren Interval Controleer het FG spansysteem minstens één keer per maand Noodzakelijke accessoires Controlesysteem voor de spantang 6401553 book Seite 51 Montag 13 Juni 2016 4 39 16 ...

Page 320: ...ntrolesysteem voor de spantang tot de markeringsring verschijnt trekkracht 22 N Glipt het controlesysteem uit de spantang voor de markeringsring verschijnt VOORZICHTIG De spantang is defect en de goede bevestiging van het boorinstrument kan niet worden gewaarborgd Er bestaat verwondingsgevaar Werkplaats _ BA 1 Gebruik het product niet meer 2 Laat het spansysteem in een door B A International erken...

Page 321: ...g BA ULTIMATE POWER BA ULTIMATE 8 Onderhoud 64 01 553 D3551 201 03 03 19 53 Nederlands Tip documenteer het tijdstip en het resultaat van de inspectie voor uw eigen controle 6401553 book Seite 53 Montag 13 Juni 2016 4 39 16 ...

Page 322: ...8 Onderhoud Gebruikershandleiding BA ULTIMATE POWER BA ULTIMATE 54 64 01 553 D3551 201 03 03 19 6401553 book Seite 54 Montag 13 Juni 2016 4 39 16 ...

Page 323: ...érilisé avant sa mise au rebus Observer les prescriptions nationales à la mise au re bus Eliminación Este producto no contiene sustancias nocivas para el medio ambiente según los conocimientos actuales Si está esterilizado puede desecharse con los residuos metálicos Smaltimento Allo stato delle attuali conoscenze scientifiche il prodotto non contiene sostanze pericolose per l ambiente Sterilizzare...

Page 324: ... táàòáÖáåÖÉå áå ÜÉí â ÇÉê î å ÇÉ íÉÅÜåáëÅÜÉ çåíïáââÉäáåÖ îççêÄÉÜçìÇÉåK aPRRNKOMNKMPKMPKMV MTKOMNS ûKJkêKW NON TMV SQ MN RRP aPRRN j ÇÉ áå dÉêã åó Consult Instructions For Use Fragile Keep dry Date of manufacture 134 C xxx Can be Catalogue Serial sterilized REF ATTENTION SN number Manufacturer with care handle number kPa Relative humidity Tempe rature Air pressure _K K fåíÉêå íáçå ä iíÇK råáí VI há...

Reviews: