AirborneM2M™ User Guide
72
When attempting to make an out-bound connection to a device on the public network, the public network IP
address of the device should be used. Figure 20, e.g.: the client with address 192.168.2.100, wants to
connect to an FTP server with the address of 123.45.67.99, on the public network to perform a firmware
download. The FTP address that would be used in the
Configuration/Advanced Settings
FTP Server
Address or Name would be
123.45.67.99.
Note that this is not within the subnet of the Ethernet client.
However, the NAT router will do the necessary address translations and packet header manipulations to
ensure that out-bound and in-bound connections are maintained.
Any traffic between the Airborne Ethernet Adapter’s Ethernet interface and Ethernet client on the private
network will not be broadcast on the public network unless it is directed at the public network.
For most users, there will be no modification of the private network settings needed and, if the target
Ethernet client uses DHCP to obtain an IP address, no change in configuration will be required.
BRIDGE FUNCTIONALITY
When the Adapter is a bridge, the Ethernet and 802.11 interfaces will be bridged together. All packets
received on either interface will be forwarded to the other interface. Both interfaces reside on the same
network, there are no Private and Public networks. The Ethernet IP configuration is used and the 802.11 IP
configuration is ignored. The 802.11 interface will assume the IP address of the first Ethernet network client
that has traffic sent across the bridge.
When acting as a bridge, the Adapter is still listening on the configured ports for remote access to the
Adapter. If traffic to any of the configured ports (http, telnet, ftp, ssh, etc.) need to pass through the module,
then the ports need to be reconfigured to use non-default settings.
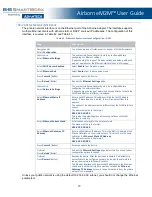
Table 44 - Ethernet Adapter interface Configuration
Step
Description
Navigation Bar
Select
Configuration
You will see a group of fields under the banner of WLAN Parameters.
Feature Link
Select
Express Setup
A page showing the range of basic Wireless and Ethernet options and fields.
Select
Ethernet Role
Select
Router
from the drop down menu.
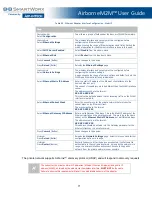
Select
Ethernet Static IP Address
Enter the static IP address for the Ethernet network.
The IP address should be on the same subnet as the other network clients.
The address must be in the format:
XXX.XXX.XXX.XXX
Select
Ethernet Subnet Mask
Enter the subnet mask for the private network that matches the subnet mask
of the Ethernet client and network.
The mask must be in the format:
XXX.XXX.XXX.XXX
Optional
Select
Web Server Port
Enter a different value for this port if you want normal Web Server traffic that
uses port 80 to pass through the adapter.
Optional
Select
Telnet Port
Enter a different value for this port if you want normal telnet traffic that uses
port 23 to pass through the adapter.
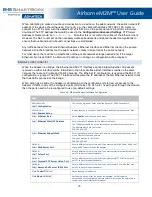
Optional
Select
Internal FTP Server Listen Port
Enter a different value for this port if you want normal FTP traffic that uses
port 21 to pass through the adapter.
Optional
Select
Secure Shell Server (SSH) Port
Enter a different value for this port if you want normal SSH traffic that uses
port 22 to pass through the adapter.
Press
Commit
[Button]
Saves changes to the device.
Press
Restart
[Button]
Restarts the device. After the device as rebooted, it will attempt to
authenticate to the configured wireless network. As long as the network is in
range, the wireless interface will connect.


