Bischoff & Bischoff GmbH | 03.05.2017
EN
13
12
Alevo
| Rollator
Rollator |
Alevo
4.6.
Adjusting / activating the brakes
Service brake
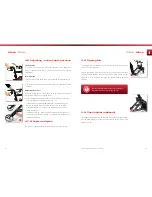
To activate the service brake, pull both handbrake levers upward on
the push handles upward (Fig. 9). Service and locking brake act on the
fixed wheels.
Locking brake
•
Press down on both brake levers to activate the locking device (Fig.
10).
•
To release the locking brake pull both brake levers back into middle
position.
Adjusting the brakes
The brake is set properly, if the brake pins do not touch the wheel and
the locking brake can be activated easily.
•
You can adjust the brake for harder or softer action by pressing in
and then rotating the protective cap (Fig. 11).
•
If the wheel can still be moved despite the activated brake, you
need to adjust the brake for harder action. To do so, turn the
protective cap (Fig. 11) on the brake mechanism in a counter-
clockwise direction.
•
If the brake rubs, you need to adjust the brake for softer action. To
do so, turn the protective cap (Fig. 11) on the brake mechanism in
a clockwise direction.
4.7. Wheels and tyres
Your rollator is equipped with flat-proof PU wheels 200 x 35 mm.
4.8. Tipping Aid
The tipping aid is intended to make it easier for users to overcome
curbs and small obstacles.
Step on the tipping aid with your foot (Fig. 12) and at the same time
pull on the push handles. The front wheels lift slightly off the ground
and with a little force you can push the rollator slightly past the
obstacle.
4.9. Cane holder (optional)
The optional cane holder can be attached with only a few simple steps.
You can place both parts of the cane holder easily on the frame of the
rollator (Fig. 13).
12
9
10
13
11
Caution! Make sure the rollator is positioned on
level ground when using the tipping aid.


