background image

R E P L A C I N G   C A R T R I D G E S

A. 

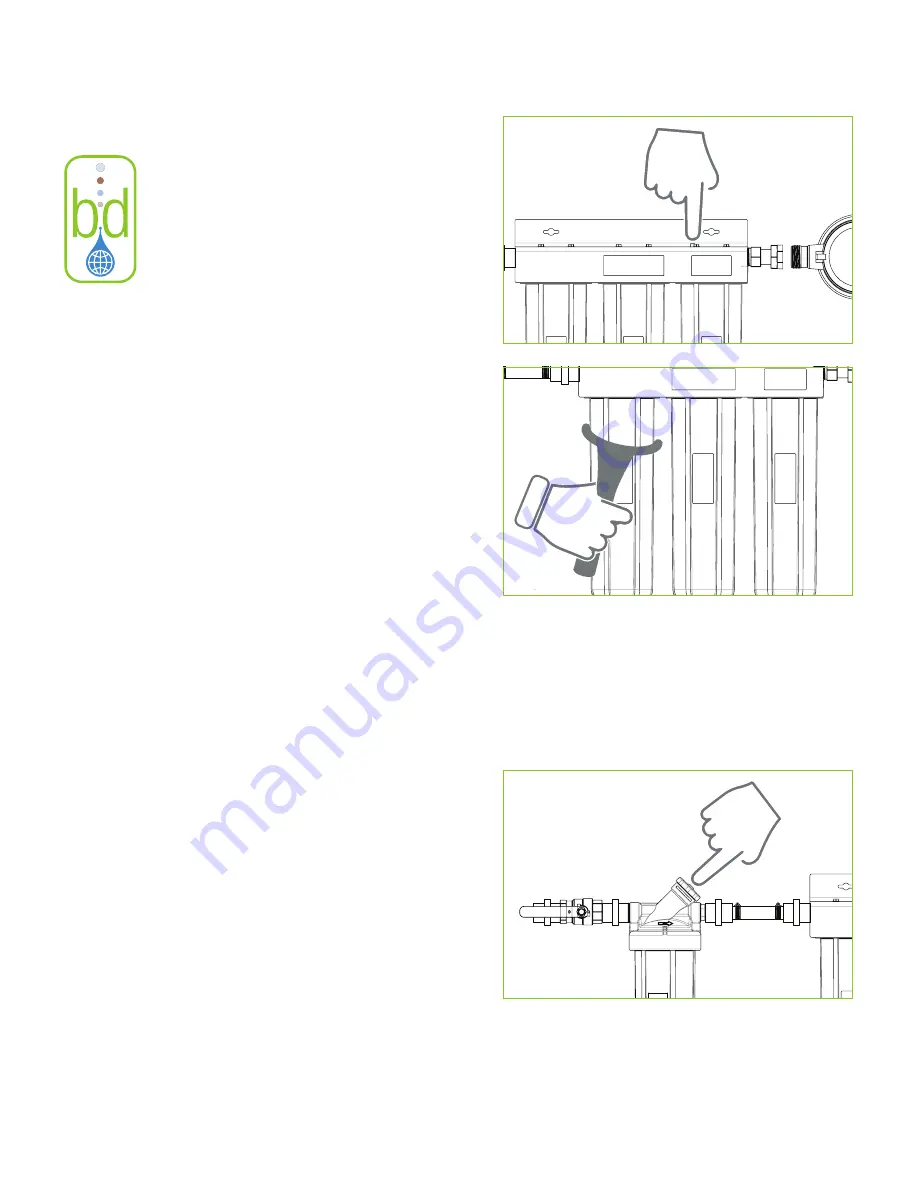
Shut off  the water supply - using the ball 

valve connected to the left-hand (inlet) side of 
the single stage housing.

B.

 Release pressure – prior to attempting to re-

move the fi lter housing, the pressure will need 
to be released. Push red pressure release but-
tons on each housing to release the pressure. 

C. 

Removing cartridges – using the wrench 

provided, unscrew the appropriate housings 
containing the cartridge(s) that you wish to 
replace. This can be done by turning the car-
tridge housing counter clock-wise until loose. 
Unscrew the cartridge housing carefully as it 
will be fi lled with water and quite heavy. Re-
move and discard the exhausted cartridge.

D. 

When removing the cartridge housing, it is 

common for the O-ring seal to lift out of the 
groove and, at times, may even stick to the 
head of the fi lter housing. Do not lose the 
rubber O-ring seal.

E. 

Check the runner O-ring for nicks and use a 

replacement if necessary. Rub Vaseline

TM 

onto 

the O-ring and place back onto the housing. Do 
not wipe off  residual Vaseline

TM 

. Ensure O-ring 

is well seated into groove.

F. 

For convenience, the single stage brack-

et and housing containing the sediment fi lter 
(stage one - 6001) can be bypassed individ-
ually. The valve lists options to “bypass” and 
“fi lter.” Turn the valve clockwise to bypass the 
water fl ow. Press the red pressure release in 
the middle of the valve. Follow steps C. – E. 
for replacement. Ensure that you twist the 
valve counter-clockwise after the sediment 
fi lter has been replaced. Failure to do so 
will diminish the system’s function and the 
following fi lters’ lifespan.

BDC6000BB

 Certifi ed Nanotechnology Whole House Purifi cation System 


9

Hel neu st 57

Summary of Contents for BDC6000BB

Page 1: ...hrough Water Purification Systems BDC6000BB Certified Nanotechnology Whole House Purification System NSF P 231 Certified Hel neu st 57 6002 6003 6004 6001 FILTER System tested and certified to meet the requirements of NSF Protocol P231 and NSF ANSI Standards 42 53 Rev 11 28 2018 ...

Page 2: ...COMPANY DISCLAIMS ALL OTHER WARRAN TIES WHETHER EXPRESS OR IMPLIED INCLUDING BUT NOT LIMITED TO THE IMPLIED WARRANTY OF MERCHANT ABILITY AND FITNESS FOR A PARTICULAR PURPOSE WITH REGARD TO THE PRODUCTS PARTS AND ANY ACCOMPA NYING WRITTEN MATERIALS To the maximum extent permitted by applicable law B David Company shall not be liable for any damages whatsoever including but not limited to loss of ti...

Page 3: ...artridge replacement Do not use this system with microbiologically unsafe water Reduces chlorine taste and odor and chloramines Reduces dirt rust and other particulates Removes bacteria cysts and viruses Effectively reduces Volatile Organic Chemicals VOCs including Trihalomethanes THMs No electricity or chemicals are required No water wastage Before You Start In order to receive all of the benefits ...

Page 4: ...ting Temperature Operating Pressure Hel neu st 57 Metric 71 12H x 55 88D x 101 6W cm 25 59 Kg 30 28 liters per minute 3 34 51 67 Degrees C Min 11 750 586 g mm2 Max 43 895 947 g mm2 5 600 g mm2 maximum American Standard 28H x 9D x 40W inches 52 lbs 8 gallons per minute 38 125 Degrees F Min 40 PSI Max 150 PSI Depends on incoming line pressure and flow Note Flow meter volume is listed in US Gallons 26...

Page 5: ...Wash your hands thoroughly 1 There is a master shut off valve installed in your plumbing line Most often it is located near the point where the water enters the building Use this master valve to shut off the water flow to the entire building prior to installation 2 The plastic heads of the BDC 6000BB water purification system housings are tapped in to the National Pipe Thread NPT Clean the connecting ...

Page 6: ...the wall thread one black fitting to the left hand inlet side of the three stage bracket and housings Then thread the first coupler to the outlet side of the 3 stage bracket Thread the flow meter to the coupler An arrow on the flow meter provides the correct flow direction Thread the second coupler on the right hand outlet side of the flow meter Lastly thread the flow restrictor onto the open coupler Aga...

Page 7: ...e that is over the black fitting 7 Mount the system to the wall using the wall anchors and screws provided for each specific bracket Be sure that the system is NOT supported by any existing pipes Also be sure that each bracket is securely anchored to the wall as the system is very heavy when filled with water during operation BDC6000BB Certified Nanotechnology Whole House Purification System 7 Hel ne...

Page 8: ...e Ensure cartridges are properly seated before tightening with the provided wrench DO NOT FORCE To ensure the bottom gasket remains in place follow these steps A Place new cartridge on firm surface B Ensure gasket is in place on both ends C Lower housing down onto cartridge D Hold the cartridge in place and turn the housing and cartridge 180 degrees E Check to make sure gasket is in place at the to...

Page 9: ... for the O ring seal to lift out of the groove and at times may even stick to the head of the filter housing Do not lose the rubber O ring seal E Check the runner O ring for nicks and use a replacement if necessary Rub VaselineTM onto the O ring and place back onto the housing Do not wipe off residual VaselineTM Ensure O ring is well seated into groove F For convenience the single stage brack et and...

Page 10: ...ing water for consumption Do not allow the system to freeze Water contained within the system will expand and damage the system and its capacity to purify any water For longer periods of non use weeks or months the following steps must be taken A Empty water from the entire system B Remove cartridges from their housings C Clean cartridge housings thoroughly D Clean and air dry exterior of the cart...

Page 11: ...housing 1 Rinse out and fill approximately 1 3 full of water 2 Add two caps full of 5 household bleach 5 sodium hypochlorite and scrub with a brush or a sponge If bleach is not available wash thoroughly with soap and warm water 3 Rinse thoroughly E Insert new cartridge to housing F Lubricate the O ring seal with a thin coat of petroleum jelly Vaseline TM Do not wipe the O ring clean of lubricant Th...

Page 12: ...4 6001 Sediment with S2 reduction 1 15 6002 Parallax Nano Filter 1 16 6003 Advanced Carbon TCO 3 1 17 6004 Anti Bacterial with H1A 1 19 153070 20 SMP BB HFPP BL 3 20 142929 CAUTION LABEL 20 OPAQUE BB 4 21 4005160 HOSE 1 ID X 1 375 OD 16 IN 22 4005151 FITTING 1 NPT X 1 BARB PP 2 23 4005161 CLAMP HOSE SS 2 24 655107 20 WH WH BB W BY PASS 1 4 C 1 25 244994 WB UB KIT BRACKET 1 C 1 26 4005208 METER 1 1...

Page 13: ... 659 85 25 978 589 8 23 22 406 40 16 00 3 18 20 20 20 20 1 INLET OUTLET 2 215 39 8 48 4 9 19 12 11 5 17 10 10 4 4 11 15 16 14 19 19 21 22 23 22 23 24 25 28 26 27 13 BDC6000BB Certified Nanotechnology Whole House Purification System 13 E X P L O D E D PA R T S V I E W Manufactured by B David Company 9333 Sheridan Avenue South Bloomington MN 55431 ...

Reviews: