


RELEASED
6-30-19
REFERENCE
NUMBER
INS-2811-00
40429 Brickyard Drive • Madera, CA 93636 • USA
559.438.5800 • FAX 559.438.5900
www.bklighting.com • info@bklighting.com
B-K LIGHTING
IMPORTANT SAFETY INFORMATION LISTED ON REVERSE
READ, FOLLOW, AND SAVE ALL SAFETY AND INSTALLATION INSTRUCTIONS
THIS DOCUMENT CONTAINS PROPRIETARY INFORMATION OF B-K LIGHTING, INC. AND ITS RECEIPT OR POSSESSION DOES NOT CONVEY ANY RIGHTS TO REPRODUCE, DISCLOSE ITS CONTENTS, OR TO MANUFACTURE, USE OR SELL ANYTHING
IT MAY DESCRIBE. REPRODUCTION, DISCLOSURE OR USE WITHOUT SPECIFIC WRITTEN AUTHORIZATION OF B-K LIGHTING, INC. IS STRICTLY FORBIDDEN.
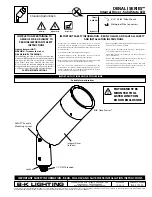
Fixture Installation
TECHNOLOGY
with
TECHNOLOGY
PALM TREE RING INTEGRAL
ArtiStar™ Series
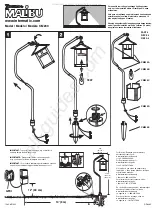
Standard Installation
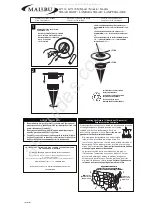
1.
Place tree ring fixture around tree.
Move fixture to desired height. Tighten
the entire assembly to the tree with
provided stand-offs.
2. Secure by hooking end of strap over two (2)
Phillips screws. Secure by tightening two (2)
Phillips screws with Phillips screwdriver.
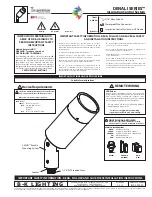
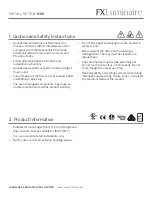
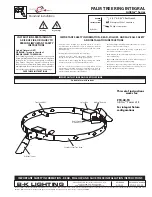
5. Bring line voltage cable from power line to
main splice box location. Loosen cord grip on
bottom of splice box, feed linevoltage cable
from power line through, then tighten cord grip
to secure.
4. Remove top of transformer housing by
removing (4) #8-32 set screws using 5/64” Allen
wrench.
Transformer housing will be marked for
primary.
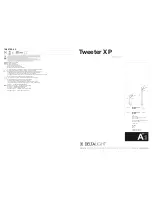
WIRING DIAGRAM
6. Make watertight connections from primary
branch circuit to transformer with waterproof
wire connectors. (By Others). Fixtures are pre-
wired at factory on the secondary side.
See
wiring diagram.
LINE
Fixture
COM
GROUND
Transformer
GROUND IN HOUSING
Factory
Wired
3. Connect secondary cable then twist to secure
in place.
7. Replace top of transformer housing with (4)
#8-32 screws with 5/64” Allen wrench.