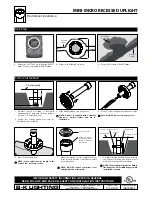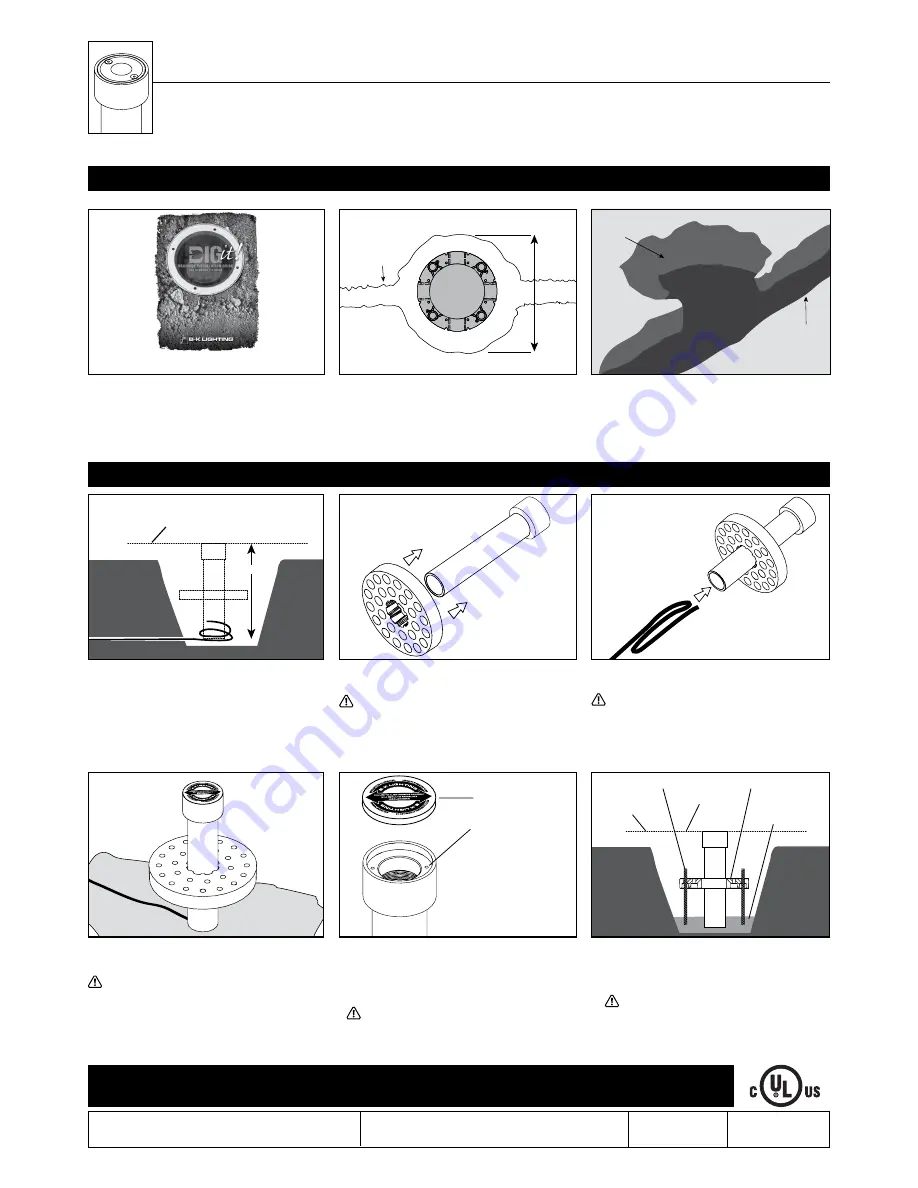
7. Per DIG-IT Guide, backfill the gap between
the bottom of housing and bottom of hole
with sand or pea gravel for drainage.
NOTE: The mounting collar must be flush to
finished grade. Use stability flange to aid in
installation as shown.
5. Place Power Pipe in hole.
NOTE: Leave sufficient wire length in the
Power Pipe™ for future service.
RELEASE DATE
11/02/2021
REFERENCE NUMBER
INS000933
40429 Brickyard Drive • Madera, CA 93636 • USA
559.438.5800 • FAX 559.438.5900
www.bklighting.com • info@bklighting.com
B-K LIGHTING
Finished grade
8 3/4”
2 window
faceplate
shown
Finished grade
8 3/4”
LINE
12V
FIXTURE
COM
Remote
Transformer
COM
Optical opening on
faceplate will align with
alignment arrows on
temporary cover
Optical opening on
faceplate will align with
alignment arrows on
temporary cover
Stability flange
Rebar or stake (by others)
Pea gravel or sand
Finished grade
Concrete
Stability flange
Rebar or stake (by others)
Pea gravel or sand
Finished grade
Concrete
Finished grade
Concrete
Wire nuts must
clear opening
6”
min.
Finished grade
8 3/4”
2 window
faceplate
shown
Finished grade
8 3/4”
LINE
12V
FIXTURE
COM
Remote
Transformer
COM
Optical opening on
faceplate will align with
alignment arrows on
temporary cover
Optical opening on
faceplate will align with
alignment arrows on
temporary cover
Stability flange
Rebar or stake (by others)
Pea gravel or sand
Finished grade
Concrete
Stability flange
Rebar or stake (by others)
Pea gravel or sand
Finished grade
Concrete
Finished grade
Concrete
Wire nuts must
clear opening
6”
min.
Dia.
(56mm)
(32mm)
1 1/4"
(191mm)
7 1/2"
2 1/4"
8 3/4"
(222mm)
(42mm)
1 5/8" Dia.
(56mm)
8 3/4"
(222mm)
(32mm)
1 1/4"
Dia.
2 1/4"
7 1/2"
(191mm)
(42mm)
1 5/8" Dia.
6" Dia.
(152mm)
2 1/4" Dia.
(57mm)
1 1/2" O.C.
(38mm)
7/8"
(152mm)
(22mm)
Concrete
Pour Collar
5’
(1524mm)
18 Ga.
2 low voltage
direct burial
cable
MINI-MICRO RECESSED UPLIGHT
Arrows on temporary
cover indicate screw
pattern for faceplate
attachement
Temporary cover
Faceplate
BKSSL
Power Pipe™
Concrete Pour collar
Stability Flange
Body
6. Orient the arrows on the temporary cover
to the desired position of the final faceplate
screw placement.
NOTE: DO NOT remove temporary cover
until installation of faceplate.
3. Slide stability flange onto Power Pipe.
NOTE: Product is supplied with a stability
flange to anchor fixture and aid in
installation.
Finished grade
8 3/4”
2 window
faceplate
shown
Finished grade
8 3/4”
LINE
12V
FIXTURE
COM
Remote
Transformer
COM
Optical opening on
faceplate will align with
alignment arrows on
temporary cover
Optical opening on
faceplate will align with
alignment arrows on
temporary cover
Stability flange
Rebar or stake (by others)
Pea gravel or sand
Finished grade
Concrete
Stability flange
Rebar or stake (by others)
Pea gravel or sand
Finished grade
Concrete
Finished grade
Concrete
Wire nuts must
clear opening
6”
min.
Finished grade
8 3/4”
2 window
faceplate
shown
Finished grade
8 3/4”
LINE
12V
FIXTURE
COM
Remote
Transformer
COM
Optical opening on
faceplate will align with
alignment arrows on
temporary cover
Optical opening on
faceplate will align with
alignment arrows on
temporary cover
Stability flange
Rebar or stake (by others)
Pea gravel or sand
Finished grade
Concrete
Stability flange
Rebar or stake (by others)
Pea gravel or sand
Finished grade
Concrete
Finished grade
Concrete
Wire nuts must
clear opening
6”
min.
1. Excavate trench according to designed
lighting plan 10” deep and 10” wide suitable
for the 8-3/4” fixture housing.
2. Supply low voltage wiring necessary for
installation (not included).
4. Loop 12” of low voltage wire inside Power Pipe.
Note:
DO NOT remove temporary cover!
Soil Prep
Conduit
trench
B. Dig hole 10” wide and 10” deep.
Conduit
Trench
Excavated
for Housing
C. Prep soil according to DIG-IT Guide.
Fixture Installation
A. Determine Soil Type by referencing DIG-IT
Guide. Prep soil according to DIG-IT Guide.
Flush Mount Installation
IMPORTANT SAFETY INFORMATION LISTED ON REVERSE
READ, FOLLOW, AND SAVE ALL SAFETY AND INSTALLATION INSTRUCTIONS


