background image

3

HYDROCLIMA 2 - User Manual

Installation

General installation rules

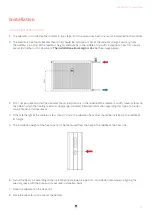
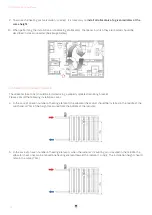
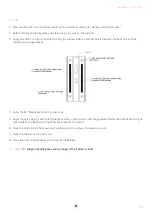
1.  The allocator is installed on the radiator in two steps. First the aluminium heat sink must be attached to the radiator.

2.  The electronic heat cost allocator (heat sink) should be installed at 75% of the radiator’s height, counting from 

the bottom. (i.e. at 3/4 of the radiator’s height) and exactly in the middle of its width. Exceptions from this rule are 

presented further in this document. 

The installation error margin is ±1 cm

. (See image below)

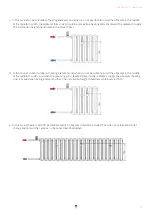
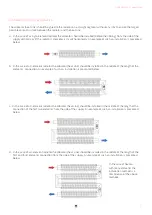
3.  If it is not possible to install the allocator (heat sink) precisely in the middle of the radiator’s width, move it closer to 

the side on which the heating medium supply pipe is located. Detailed information regarding this type of situation 

can be found in this document.

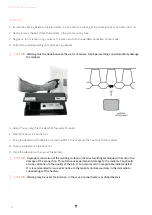
6.  Install the heat sink according to the installation technique (see point 4 – Installation techniques), aligning the 

special groove with the previously measured installation point. 

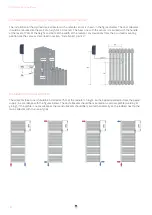
4.  If the total height of the radiator is less than 470 mm, the allocator (heat sink) should be installed in the middle of 

its height. 

7.  Place the allocator on the heat sink. 

8.  Close the allocator with a seal at the bottom. 

5.  The installation height of the heat sink must be measured from the hole in the middle of the heat sink.

Summary of Contents for HYDROCLIMA 2

Page 1: ...v 1 0...

Page 2: ...ries 1 Preliminary caution 1 Safety measurements 1 General information 2 Intended use 2 Packaging content 2 Installation 3 General installation rules 3 Installation on radiator heaters 4 Installation...

Page 3: ...lation may be only carried out by qualified and trained personnel keep batteries in a dry room do not heat up a battery up to temperatures exceeding 110 C and do not throw it into a fire do not cause...

Page 4: ...rature heat consumption and other statistics All data can be sent via Wireless M Bus protocol based on Bmetering software configuration The device is designed for the metering of central heating syste...

Page 5: ...all the allocator heat sink precisely in the middle of the radiator s width move it closer to the side on which the heating medium supply pipe is located Detailed information regarding this type of si...

Page 6: ...bottom of the radiator b In the case of an even number of heating elements when the radiator s mounting pin is located in the middle the allocator heat sink can be moved one heating element toward the...

Page 7: ...e 75 d In the case of an odd number of heating elements and when it is not possible to install the allocator in the middle of the radiator s width and when the mounting pin is located closer to the ra...

Page 8: ...evel of 75 of the height and 50 of the width of the radiator any deviations from the assumed mounting position are the same as described in section Installation point 2 The allocator heat sink should...

Page 9: ...zontally An example of such an installation is presented below b In the case of a 2 element radiator the allocator heat sink should be installed in the middle of the length of the elements connection...

Page 10: ...e mounting bracket between the ribs pipes of the radiator and finally tightening the screws securing the heat sink The tightening torque value should be sufficiently high to prevent the allocator from...

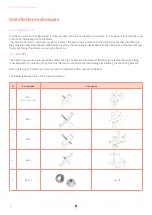
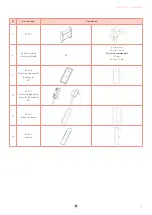
Page 11: ...RR 15 8 Studs for welding machine available M3 6 mm 8 mm 10 mm 12 mm 15 mm recommended 20 mm 25 mm 30 mm 9 BRR 26 Wall mounted cover of the allocator EXT 10 BRR 22 External temperature sensor for the...

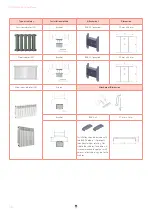
Page 12: ...m Steel radiator SR Bracket BRR 15 encased 50 mm x 46 mm Alluminium radiator SR Gluing Attachment Dimension Bracket BRR 3 x2 37 mm x 5 mm Installation should be made with two BRR3 holders it prevents...

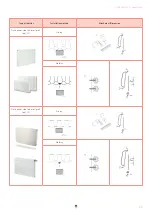
Page 13: ...11 HYDROCLIMA 2 User Manual Type of radiator Installation method Attachment Dimension Plate panel steel radiator profi led SP Gluing Welding Plate panel steel radiator profi led SP Gluing Welding...

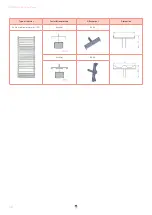
Page 14: ...12 HYDROCLIMA 2 User Manual Type of radiator Installation method Attachment Dimension Rail based towel warmer TW Bracket BRR 2 Bracket BRR 4...

Page 15: ...k and the radiator see image above 6 Place the heat sink on the measured installation point and press for about a minute 4 Apply the SF 7386 activator to the glue strips 7 Place the allocator on the h...

Page 16: ...the heat sink 9 Close the allocator with a seal at the bottom 5 Adjust the pin length to the depth of the water channels CAUTION Welding must be done between the water channels Improper welding can pe...

Page 17: ...procedure the BMetering software must be properly configured Configuration for the factory state of the allocator press the button for 1s for the allocator already configured press the button for 5s u...

Page 18: ...User Manual Contacts B METERS srl Via Friuli 3 Gonars 33050 UD ITALY Tel 39 0432 931415 Tel 39 0432 1690412 Fax 39 0432 992661 E mail sales info info bmeters com E mail support ticket bmeters com Web...

Reviews: