I N S - R B - M A T R Y X - S L A S _ E N I n s t r u c t i o n G u i d e
P a g e
5 | 7
3. VEHICLE PREPARATION
3.1 Read all the instructions carefully before installing the product.
3.2 Make sure you have enough space to work properly.
3.3 Make sure to have the required tools.
3.4 Refer to vehicle owner's manual for removal of various panels and other parts.
4. INSTRUCTIONS
Note: Unless differences occur between left hand (LH) and right hand (RH) sides, the procedures are shown for only one side of the
vehicle. Repeat for other side. Right and left sides are defined as when sitting on the vehicle.
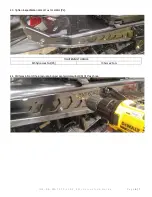
4.1 Slide rear bumper [P1] in position on vehicle as shown.
Note: If there are rivets at the bumper anchor points, remove them.
4.2 Locate rear bumper [P1] with M5 X 20 Torx T25 SCREW [P2] and M5X0.8 hexagonal nylon lock nut [P3]. Hand tighten only.
Note -1: Some screws require washer [P5] inside the tunel. (See exploded view)
Note -2: The direction of the last bumper screw is inwards. (See exploded view)


