background image


I N S - R B - M A T R Y X - S L A S _ E N   I n s t r u c t i o n   G u i d e  


P a g e  

7 | 7


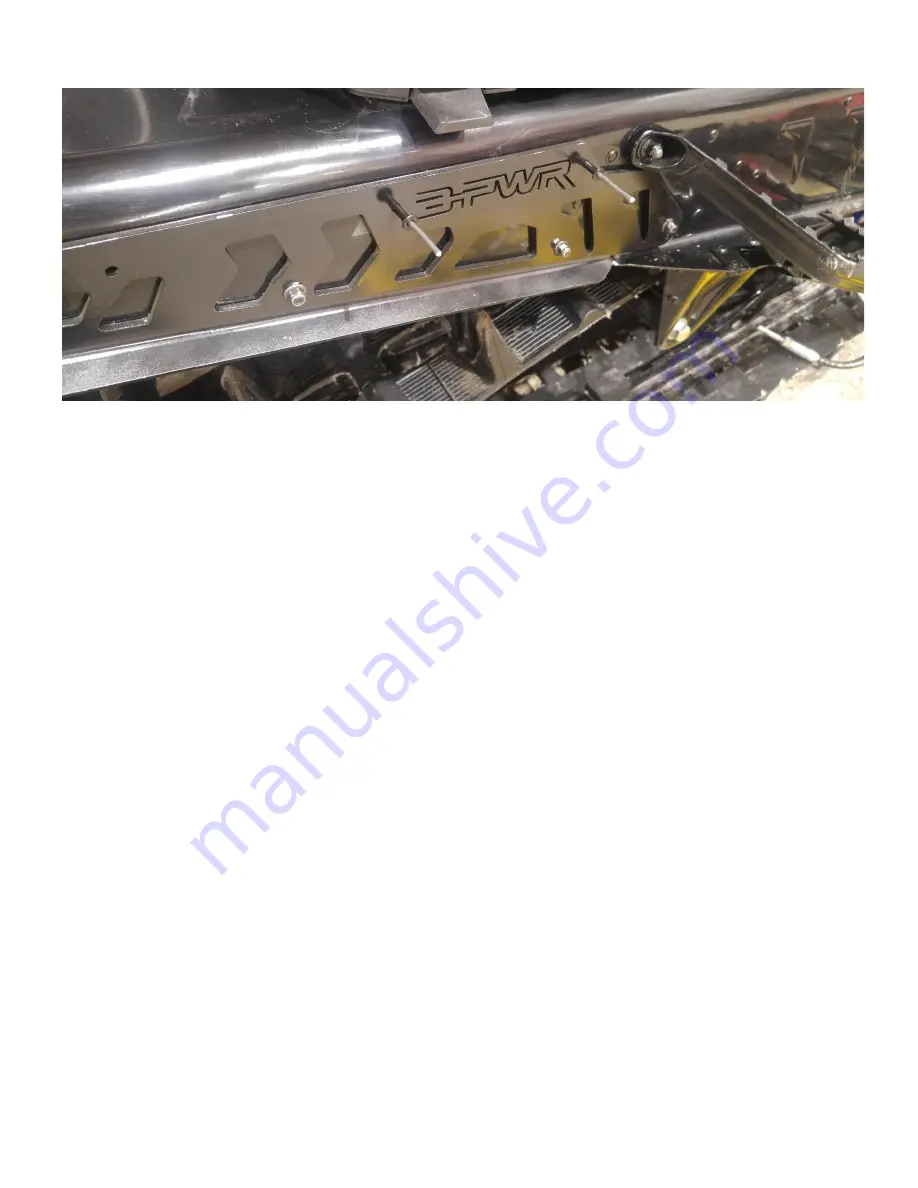
4.5 Secure front of bumper with 3/16" rivets [P4] in previously drilled holes as shown and using hand riveter.  


Summary of Contents for PMRB-SLASH-165

Page 1: ...lation of the product or any modifications made to adapt the product for use in a context other than that for which it was intended voids the warranty and may result in SERIOUS INJURIES B PWR and all...

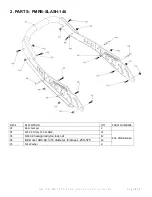
Page 2: ...n G u i d e P a g e 2 7 2 PARTS PMRB SLASH 146 PIECE DESCRIPTION QTY PARTS NUMBERS P1 Rear bumper 1 P2 M5 X 20 Torx T25 SCREW 12 K05 PMRB SLASH P3 M5X0 8 hexagonal nylon lock nut 12 P4 Blind rivet AB...

Page 3: ...t i o n G u i d e P a g e 3 7 PMRB SLASH 155 PIECE DESCRIPTION QTY PARTS NUMBERS P1 Rear bumper 1 P2 M5 X 20 Torx T25 SCREW 10 K05 PMRB SLASH P3 M5X0 8 hexagonal nylon lock nut 10 P4 Blind rivet AB6 6...

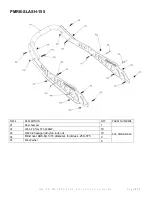
Page 4: ...t i o n G u i d e P a g e 4 7 PMRB SLASH 165 PIECE DESCRIPTION QTY PARTS NUMBERS P1 Rear bumper 1 P2 M5 X 20 Torx T25 SCREW 12 K05 PMRB SLASH P3 M5X0 8 hexagonal nylon lock nut 12 P4 Blind rivet AB6 6...

Page 5: ...nces occur between left hand LH and right hand RH sides the procedures are shown for only one side of the vehicle Repeat for other side Right and left sides are defined as when sitting on the vehicle...

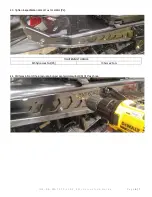
Page 6: ...n s t r u c t i o n G u i d e P a g e 6 7 4 3 Tighten to specification M5X20TorxT25SCREW P2 TIGHTENING TORQUE M5 Nylon Lock Nut P3 10 N m 2 N m 4 4 Drill holes in front of the tunnel using bumper as a...

Page 7: ...I N S R B M A T R Y X S L A S _ E N I n s t r u c t i o n G u i d e P a g e 7 7 4 5 Secure front of bumper with 3 16 rivets P4 in previously drilled holes as shown and using hand riveter...

Reviews: