background image


5.2.2 Recording 


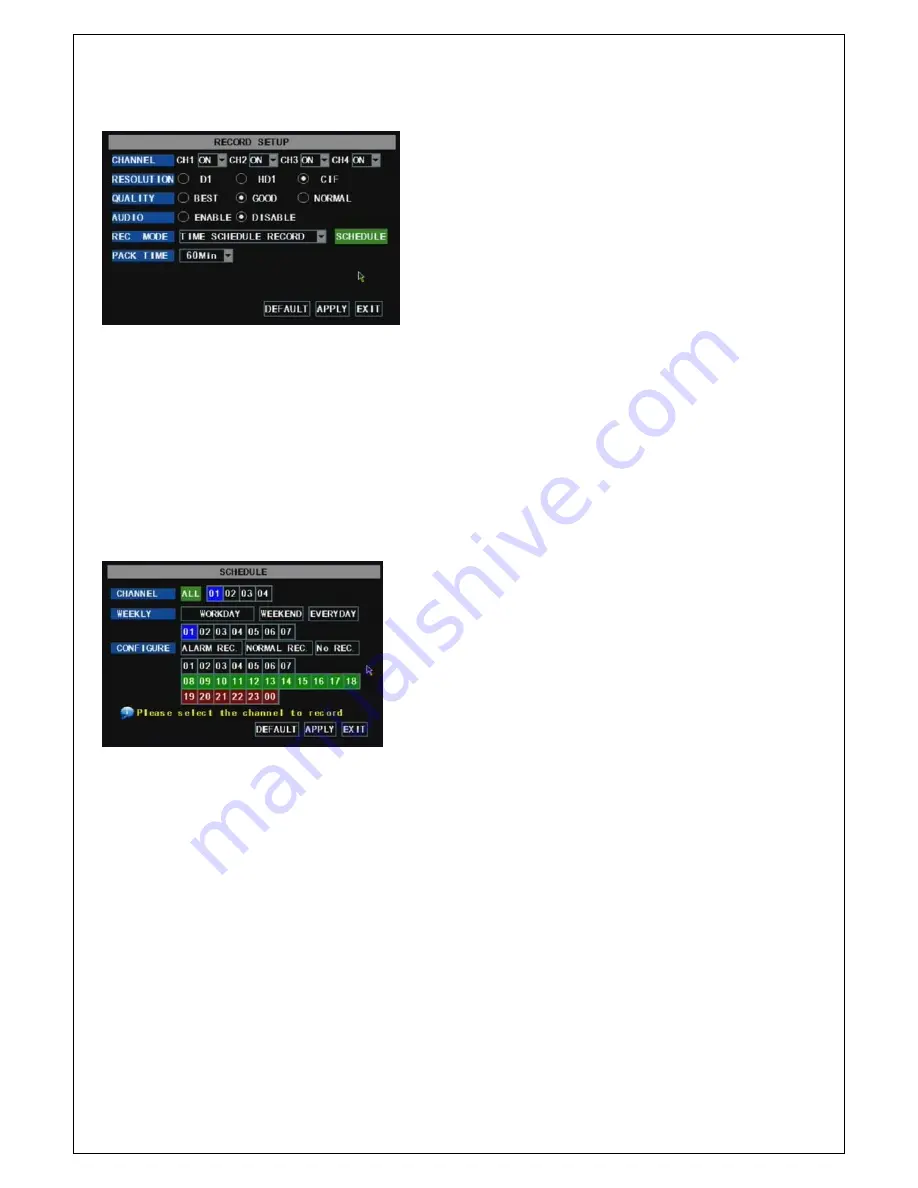
Picture 5-5 

The [Recording] menu allow you set up recording on/off status, also allows you setup recording details, image 

quality and audio on/off; at the same time, the menu allows you select recording mode ( Continuous recording and 
scheduled recording) and recording time. 

One channel is set to “on” means the channel could proceed recording, on the contrary, “off” means the channel 

be forbidden recording. 

Detail

 allows you select D1, HD1 and CIF; and 

Quality

 includes three levels- Perfect, Good 

and Normal. 

When Audio is set to “On”, system will also record audio signal and will exit audio output on playback mode; 

on the contrary, “off” means you could not record audio signal and will have no audio output on playback mode. 

If recording mode is set to scheduled recording, the menu interface shows as follows (picture 5-6): 


Picture 5-6 

You also could tick [All alarm recording], [All normal Recording] and [All not recording] button to set up your 

recording mode. System have defaulted the below parameter values: 

        Hr01:00 am-07:59 am : No recording 
    Hr08:00 am-18:59 pm : Normal recording 
        Hr 19:00 pm- 00:59 pm : Alarm recording 


Explanation: 

Under the recording Set menu and recording search menu, original color stand for no recording, 

“Red” stand for alarm recording, “Green” stand for normal recording and “Blue” stand for the channel and date you 
have selected. 

5.2.3 Network Set 

  Enter into [Main Menu Network Set] to proceed network set (Shown as picture 5-7): 


Recording channels include All, CH-1, CH-2, CH-3, CH-4 

respectively. Please click the channel you needed.(p.s.:    The “Blue” 
stand for the channel you have selected; and Grey stand for the 
channel you have not.).   

On scheduled recording mode, you could select “Working day”, 

“ Weekend” and “ Every day” or click some day on the bottom of 
windows to setup scheduled time (The “Blue” stand for the time you 
have selected; and Grey stand for the time you have not.). 

Click [Main Menu   Recording] to enter into 

[Recording] menu (Shown as Picture 5-5) 

Explanation


1.


The [Esc] button allows you come back to previous 
menu or main interface. 

2.


Recording time indicates maximum continuous time 
length of recording file (15

30

45

60). 


Summary of Contents for BQ-D9004 series

Page 1: ...0 ...

Page 2: ...stem Initialization 6 4 2 Main Interface 6 Pop up Menu 7 5 1 Main Menu Preview 7 5 2 Main Menu 8 5 2 1 Camera 8 5 2 2 Recording 9 5 2 3 Network Set 9 5 2 4 Recording Search 11 5 2 5 Device Management 13 5 2 6 System Function 17 5 3 Menu Locking 19 5 4 Recording Search 19 5 5 PTZ Control 19 5 6 Manual Recording 19 5 7 Stop recording 19 Chapter 6 NetViewer Program 20 6 1 Widget download and installa...

Page 3: ...act an authorized dealer or service center 8 Do not attempt to remove the top cover Warning You may be subjected to severe electrical shock if you remove the cover of the DVR 9 Handle DVR box carefully If you accidentally drop your DVR on any hard surface it may cause a malfunction If the DVR doesn t work properly due to physical damage contact an authorized dealer for repair or exchange 10 Use st...

Page 4: ...arm management and external alarm signal input Mouse Operation Support Mouse operation to more quickly setup system parameter PTZ Control Supports PTZ camera operations through RS 485 and PTZ Hot Point function List 1 1 DVR Features H 264 Video Compression Technology Friendly graphics operation technology and semi transparent Menu interface Support U flash disk removable disk and HDD backup Suppor...

Page 5: ...s 5 Channel Select CH1 CH2 CH3 CH4 Single Channel Select 6 QUAD Quad display On Live display or playback mode 7 REW Left direction key Rewind play 8 PAUSE Pause play frame by frame 9 PLAY Enter into pop up Menu Play 10 FWD Right direction key Forward play 11 STOP Stop Playback stop manual recording 12 REC Manual recording 13 MENU ESC Enter into main menu or exit menu 14 Up Up direction key 15 SEL ...

Page 6: ... 9 REW Rewind Focus 19 PTZ Enter Exit PTZ control 10 PAUSE Pause Dwell time key 2 2 Rear Panel 2 2 1 4 CH Rear Panel Details please refer to the real product 1 CH1 4 Video input 6 VGA port Optional 2 Video Output 7 USB port 3 Audio Input 8 Mouse port 4 Audio Output 9 RS 485 Sensor Alarm port 5 LAN LAN port 10 Power switch port 2 2 2 8 CH Rear Panel Details please refer to the real product 1 CH1 8 ...

Page 7: ...ght to left Pin 1 2 PTZ Control port Pin 1 RS 485A Pin 2 RS 485B Pin 3 4 Sensor 1 input Pin 5 6 Sensor 2 input Pin 7 8 Sensor 3 input Pin 9 10 Sensor 4 input Pin 11 12 Alarm Output 8 CH RS485 Sensor Alarm ports definition from right to left Pin 1 2 PTZ Control port Pin 1 RS 485A Pin 2 RS 485B Pin 3 4 Sensor 1 input Pin 4 5 Sensor 2 input Pin 6 7 Sensor 3 input Pin 7 8 Sensor 4 input Pin 9 10 Senso...

Page 8: ...ontrol bar Click left key of Mouse Clicking left key could select value when appear edit box or pull down menu and support Chinese word input special symbol numeric and character input replace Enter Backspace On live display mode clicking right key will appear pop up menu shown as Picture 5 1 Click right key of Mouse On Main menu or sub menu mode clicking right key will exit current menu Double cl...

Page 9: ...cover back carefully 3 2 Camera and Monitor Connection Connect camera signal to video input of DVR and video output of DVR to Monitor via BNC connector Refer to section2 2 Rear Panel or If the camera comes with PTZ control function you could connect RS485 A B to the according port of DVR respectively refer to system figuration on Chapter 8 3 3 Power Supply connection Please only use the power adap...

Page 10: ...ter finishing system initialization you are allowed to enter into main interface The below picture is the main interface faulted by system which is under no video input status Once there are any video inputs the interface will display live images accordingly for relative channels On main interface mode when double clicking live image of any channel the image will be maximized to full screen then d...

Page 11: ...arameter setting and control for Main Menu Menu lock Recording search PZT control and recording etc Main Menu Rec Search Search Playback Detail File Log Search File Backup Camera Recording HDD Management Alarm Setting PTZ Setting 3G Network Motion Color set System User password System Information Language Select System Maintenance Audio Video Setting Time Setting Device Management Network Area set...

Page 12: ...screen At this moment you could click main menu button on pop up menu to enter into Main menu interface Shown as below picture 5 3 On Main Menu mode you will be allowed to freely proceed device management setting such as Camera Recording Network Recording search HDD Alarm PTZ Control 3G Network motion detection etc also allowed to proceed system function setting such as Time setting User password ...

Page 13: ...stem have defaulted the below parameter values Hr01 00 am 07 59 am No recording Hr08 00 am 18 59 pm Normal recording Hr 19 00 pm 00 59 pm Alarm recording Explanation Under the recording Set menu and recording search menu original color stand for no recording Red stand for alarm recording Green stand for normal recording and Blue stand for the channel and date you have selected 5 2 3 Network Set En...

Page 14: ...Picture 5 8 When selecting manual allocation you need to setup IP address net mask gateway and web port shown as picture 5 9 Picture 5 9 If you apply for DDNS service and set up net parameter of DVR accordingly you could register domain name to visit DVR remotely via IE browser shown as picture 5 10 Picture 5 10 After selecting net mode such as DHCP PPPOE and manual allocation and setup web port y...

Page 15: ...une control bar When playback finished system will come back to previous menu Detailed file On the Recording search menu mode please click Detailed file to pop up below sub menu Picture 5 13 When selecting recording date and time you want to search and clicking Search button now you could playback the recordings during the period On basis of time search you also could further search one recording ...

Page 16: ...searched When you preview other pages clicking Last page button make you come back to Last page quickly Select All indicate you select all the events of current page Select Invert indicate you select other events of current page except of you have ticked Recording File Backup If you want to backup one recording from detailed file list you just only tick the recording and click Backup button When s...

Page 17: ...rm PTZ control 3G network Motion Detection etc Picture 5 16 5 2 5 1 HDD Management Click Main Menu Device Management HDD Management in turn to enter into HDD Management menu shown as Picture 5 17 Picture 5 17 When connected to HDD system will automatically detect if HDD is normal or not If HDD need to be formatted HDD status will be shown to Not format otherwise the HDD status will shown to Normal...

Page 18: ... Device Management Alarm Set to enter into Alarm set menu to proceed parameter setting of Alarm Set shown as Picture 5 19 Picture 5 19 I O Status Alarm Include Normal open Normal close and off When set to Normal open I O status alarm are available once sensor is connected set to Normal close I O status alarm are available once sensor is disconnected set to off I O status alarm are unavailable HDD ...

Page 19: ...2 5 4 3G Network Picture 5 21 Explanation When DVR is connected to network via Router you need to map port 554 of mobile phone into the router including the parameter setting of virtual server and special application program shown as Picture 5 22 Picture 5 23 Enter into Main menu Device Management PTZ Set to select the PTZ channel you want to control and set PTZ protocol Pelco D Pelco P Baud rate ...

Page 20: ...specified motion area The single channel is separated into the 12 15 trace When any object is moving on motion detection area the trace which the object located at will display in red The semi transparent part stand for motion detection of the area is off Picture 5 25 Click Main Device Management Motion Detection to enter into the Motion Detection menu for relative parameter setting The Motion det...

Page 21: ...enu System Time set in turn to enter into Time Set menu You could not only modify system date time and format but also set daylight saving time and mode The option allows you set the DVR code and set on or off for system password The modification to these parameter values will be available by clicking ok button When setting User password to ON firstly shown as Picture 5 29 your could set general u...

Page 22: ...start system Click Main Menu System System Info to enter into System Info menu for viewing system info including Device model Software version and MAC address etc The option allows you recover ex factory default update system software and set system auto maintenance Click Main menu System System Maintenance to enter into the System Maintenance menu shown as Picture 5 34 When opening auto maintenan...

Page 23: ...or out click F F keys to control focus function and click I I to adjust iris size Picture 5 33 5 6 Manual Recording When you want one channel to be on the status of recording Please click Rec button to start manual recording 5 7 Stop recording If you want to manual recording stopping please only click Stop Rec menu In consideration of system safety please click Menu Lock menu to lock system interf...

Page 24: ...o advanced 6 2 Log in Net viewer After finishing to install widget please select log in language Chinese or English and enter into password and click Log in button and now you could visit DVR remotely via Net viewer Please note default password is empty System allow Administrator set new password as per instruction of section 5 2 6 2 Password set menu Picture 6 1 After successful Log in to Net vie...

Page 25: ...tly please select the day channel and type and proceed searching and refreshing secondly select any event from search result list to playback Please note you could control playing speed by sliding playing control bar on the bottom of interface shown as Picture 6 4 Picture 6 4 Play button allows you convert to Play Pause function each other Stop button allows you stop play recording image F F butto...

Page 26: ...ngs are available The modification method to DVR via Net viewer is same as local adjustment of DVR 1 Recording Mode Enter into sub menu Recording Mode menu you could set on off for every channel and adjust recording parameters details quality audio video mode and Rec task remotely via Net viewer Picture 6 5 Click the Rec Task menu to enter into its sub menu shown as Picture 6 6 Picture 6 6 2 Alarm...

Page 27: ...TZ Control Click PTZ control to proceed PTZ setting Details setting methods are same as local DVR setting Please refer to Section 5 2 5 3 shown as Picture 5 9 Picture 6 9 4 Network Setting Click Network Setting to enter into Network Setting menu Relative parameters are same as local DVR Details please refer Section 5 2 3 Network Setting ...

Page 28: ...aving path The menu also allows you set user password on off daylight saving time etc Picture 6 11 6 Host Info Click Host Info to enter into the sub menu shown as Picture 6 12 Herein you could check Usage rate of HDD available recording time and software version and MAC address etc Picture 6 12 6 3 2 PTZ Control 2 PTZ control indicate focus zoom and iris control of PTZ 3 Setting the option allows ...

Page 29: ...web transmission Support 4 CH audio input and bind with video channel support Multiplex Operation Recording playback and web transmission and real time recording Multiple recording mode Manual continuous motion detection sensor triggered and scheduled recording Support recording list search and advanced time search Support video signal loss alarm and self password protection function to avoid any ...

Page 30: ...Q Why still have no video signal or wrong display when connection of DVR and camera is well A You could check if BNC interface of DVR is connected well BNC cable is aging You have select correct system NTCL or PAL 4 Q Which affect there are to DVR itself when DVR will dissipate heat on working mode A Yeah DVR will dissipate heat on working mode Please put DVR into some place which is well aeration...

Page 31: ...input signal is available 12 Q Why Buzzer is kept sounding A Please check if The relative setting is ready Motion detection is on and have detected motion I O alarm is set to Normal close You have set HDD alarm 8 2 Usage Maintenance 1 Please shut down DVR normally not directly unplug power especially when recording to avoid any damage to HDD 2 Please make sure DVR keep away from heating source 3 C...

Page 32: ...28 8 4 Accessory Optional Power Cord Power Adaptor User Manual CD Disk Remote Controller USB Cable ...

Page 33: ...ntee is given as to the correctness of its contents We do not undertake any responsibility for the harms cause by using our product The model of the products in the user s manual only for recognition but these names also perhaps are belong to other company s registered trademark or the copyright The product picture may differ from the actual product only for your reference The accessories will pro...

Reviews: