background image

16

Steaming with the pressure cooker

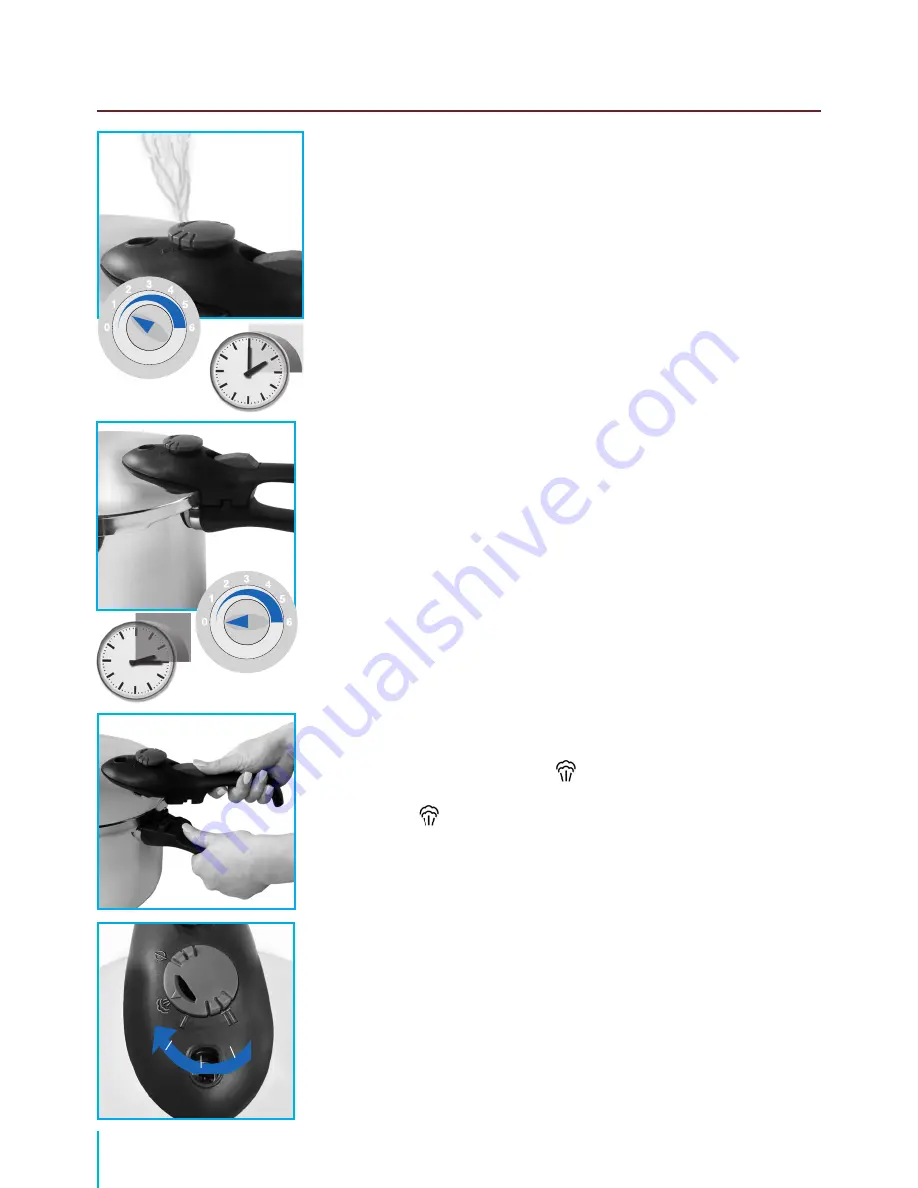
Depending  on  how  full  the  cooker  is,  it  will  take  several 

minutes until the preset cooking stage has been reached. 

This  is  the  case  as  soon  as  steam  starts  to  escape 

permanently from the pressure-regulation valve.

The actual cooking time only starts 

from this moment.

Only at this point should the source of heat be turned 

down to a lower stage.

In this way, you avoid unnecessary consumption of energy 

and the risk of the cooker boiling dry.

At the end of the cooking time ...

Switch off oven!

Now start slowly steam off step-by-step ...

Turn  the  pressure-regulation  valve  from  the  preselected 

pressure stage to stage     . Please note at pressure stage 

II: First turn down to stage I and then switch further to 

stage       after a couple of seconds.

Warning:

  :  The  escaping  steam  is  very  hot  –  protect 

yourself  from  burns  and  scalding  by  keeping  away  your 

face, body and arms from the steam.

(see pages 12/13).

Opening the pot

Wait until all steam has escaped, at which point you can 

switch off the pressure cooker. The lid may be removed.

WARNING:

 Never use force to open the lid.

Summary of Contents for Granat

Page 1: ...GRANAT INSTRUCTIONS FOR USE GRANAT Stainless Steel Pressure Cooker...

Page 2: ...s pressure cooker is not provided with a pressure indicator Please observe the steam emission from the pressure regulation valve this is the indicats successful pressure build up in the cooker 8 Never...

Page 3: ...n the Instructions for Use 16 When releasing the steam keep hands head and body out of the way of the steam 17 The pressure cooker s lid and other parts are not dishwasher safe 18 Exclusively use ORIG...

Page 4: ...d one over the other the pressure cooker is now closed 3 Fill in the food to be cooked observing the minimum amount of liquid of approx 3 8 litres see page 12 14 The minimum liquid and cooking materia...

Page 5: ...the pressure is relieved Do not directly switch from position II to position but first of all turn from position II to position I wait a couple of seconds and then switch to position You may directly...

Page 6: ...ure cooker Page 8 10 Notes on safety Page 11 13 Cooking with the pressure cooker Page 14 16 At the end of the cooking time Page 17 Cleaning and maintenance Page 18 19 Questions and answers Page 19 20...

Page 7: ...ins nutrients and minerals Your cooking will taste better By cooking without oxygen the flavour and natural colouring of your vegetables will to a very large extent be preserved You will cook more qui...

Page 8: ...Position fast cooking 100 kPa ca 120 C Position for gradual release of pressure Position for cleaning the valve Safety pressure amounts to 1 7 bar 170 kPa valve opens and releases pressure maximum per...

Page 9: ...steam as it should the valve will open in accordance with the prescribed values The sliding locking catch When the lid is closed the sliding locking catch clicks audibly into place The lid can then on...

Page 10: ...page 14 of these Instructions for Use The lid with sealing ring Sealing rings are subject to wear and tear and must be replaced when necessary Important You should only use our own original sealing ri...

Page 11: ...not be allowed to use it If you use this pressure cooker when children are in the vicinity please be particularly careful This pressure cooker may only be used for the purpose of fast cooking for whi...

Page 12: ...sed Under pressure the pressure cooker must never be used for roasting or frying using oil When preparing e g sausages with an artificial skin this must first be pierced If the skin is not pierced it...

Page 13: ...team Please use only the plastic handles to move the cooker and if necessary use oven gloves or other protective clothing You should only use original accessories and spare parts or lids and pans as d...

Page 14: ...lt to water which is already boiling and stir it gently Now put the lid on the cooker To do this place the lid on the cooker so that in such way that the locking markings are opposite each other and s...

Page 15: ...soups stews Cooking time table Page 21 22 Pressure cooking is so easy Select the desired cooking level with the help of the pressure regulation valve Set pressure stage 1 Gentle cooking 2 Fast cooking...

Page 16: ...the risk of the cooker boiling dry At the end of the cooking time Switch off oven Now start slowly steam off step by step Turn the pressure regulation valve from the preselected pressure stage to stag...

Page 17: ...or foods which are mushy or tend to foam 3 Quick release of pressure Hold the cooker under cold running water and let cold water slowly run over the lid not over the plastic parts until the red pin on...

Page 18: ...can also be tested clear by using a pointed object Cleaning the pressure regulator valve Remove the plastic top To do this press the valve down and turn it completely to the left position The valve ca...

Page 19: ...Whether the lid is properly closed Whether the sealing ring is properly fitted The condition of the sealing ring if necessary change it Cleanliness of the lid the safety valve and the pressure regula...

Page 20: ...ost deep frozen foods in advance It is sufficient to lengthen the cooking times slightly Soups and stews with braised meat Where cooking times of the different ingredients do not vary too much e g for...

Page 21: ...teiner 20 min 2 Serbian beef stew 8 10 min 2 VEGETABLES COOKING TIME GRADUAL COOK Cauliflower 3 7 min 1 Peas green 3 5 min 1 Carrots 3 7 min 1 Stuffed capsicum 6 8 min 1 Mushrooms 6 8 min 1 Beetroot 1...

Page 22: ...cessary liquid is then topped up on deglazing Pieces which are too large should be cut up and browned individually then laid over one another to complete cooking FISH COOKING TIME GRADUAL COOK Steamed...

Page 23: ...Notes 23...

Page 24: ...hen receive a new or repaired appliance free of charge After the warranty period has expired you have also the possibility to return the defective appliance to the address stated below for repair Repa...

Reviews: