PAGE 5 / 7
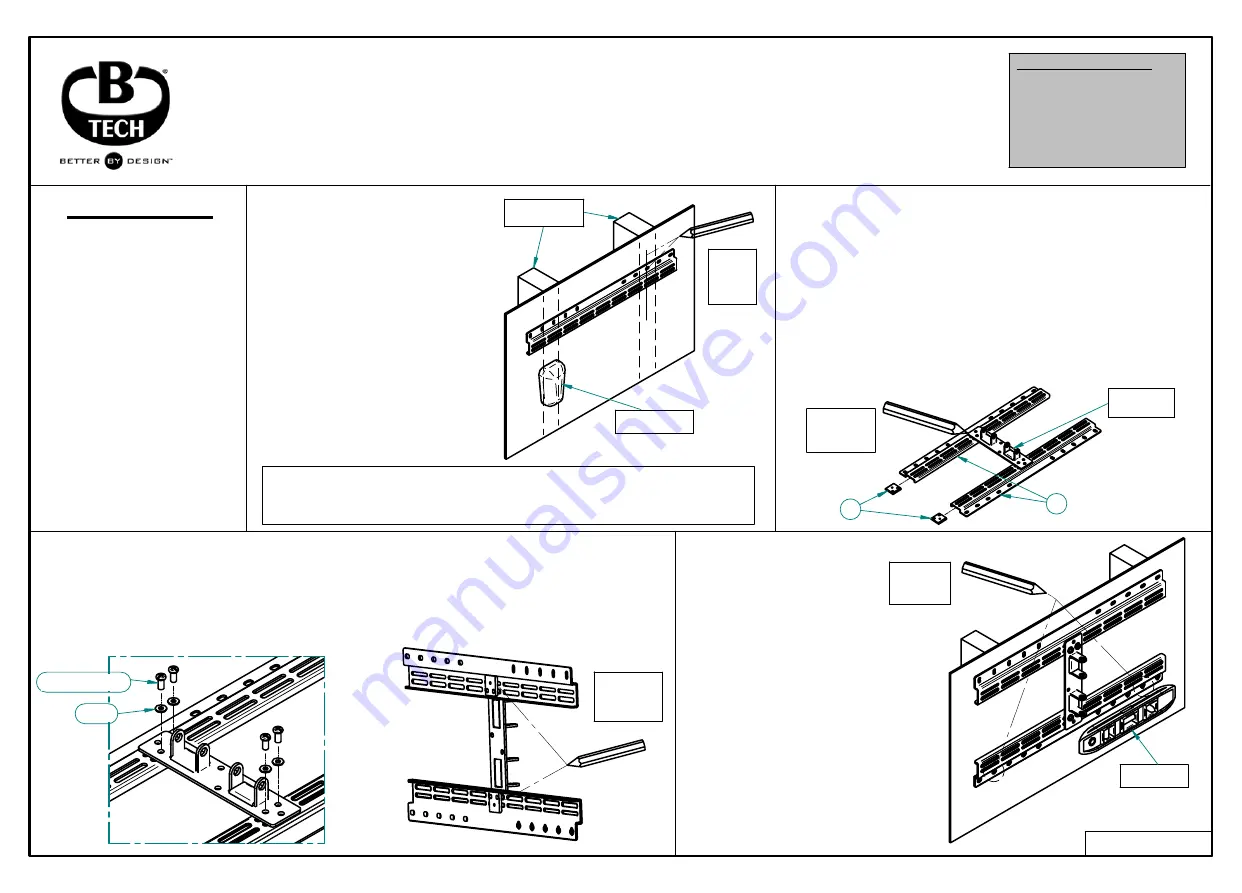
Please pay careful attention to where this mount is located. Some walls are not suitable for installation. If
you install this wall mount on drywall it must be anchored to a wooden stud, concrete block or brick behind
the drywall. Installing on drywall alone will not support the weight of the flat screen. When drilling holes it is
essential to avoid contact with electrical cables, water or gas pipes in the wall. It is important that all
mounting screws are used where possible.
2. Mark the wall plate position on
the rails
Set out the rails (Part 1) on the workbench, ensuring
they are mirrored as shown. Place your specific wall
plate onto the rails where it is to be mounted and
mark this position. Using a screwdriver or pencil slide
a clamp piece (Part 2) into each rail channel until they
line up with the mounting holes in wall plate.
4. Mark out
mounting hole
positions
Place the rails, with wall plate
attached, onto the wall and
realign the upper rail mounting
holes with your previous
pencil marks.
Using a spirit level ensure
both rails are Level and
parallel then mark the lower
rail mounting hole positions on
the wall.
1. Choose an area
and locate studs
.
Locate the hidden studs
using a suitable stud locator
and lightly mark their
centres. Each rail must fix to
at least two different studs.
Mark the height and location
for the upper most rail on
the wall so that the mounting
holes line up with the studs.
orientate as shown.
CONTINUED...
BT8006
INSTALLATION INSTRUCTIONS (1)
v.0408 OR1BX
Tools Required For Installation:
- Cross Head Screwdriver
- 13mm (1/2") Spanner
- Power Drill
- 10mm Masonry Bit or 6mm Wood Bit
depending on wall type
- Pencil
- Level
- Stud Locator
3. Attach your wall plate to the rails
For correct fixing screw selection consult the compatibility chart on Page 3, then
screw the wall plate into the clamp pieces as shown. Mark the positions of the clamp
pieces behind the rails for future reference.
READ FIRST
.
This is an example
installation showing how a
BT7535 can be mounted to
a stud wall using a BT8006.
Different products require
different lengths and
amounts of fixing screws.
See compitability chart on
Page 3 for details.
Depending on the size and
weight of your equipment
and if safe to do, one
person can install this
product.
Wooden
Studs
Stud Locator
Example
Wall Plate
2
Mark Clamp
Piece
Positions
Mark Wall
Plate
Position
1
Spirit Level
Mark lower
Mounting
Holes
5 / 6 / 7 / 8 / 9
10 / 11
Mark rail
position
and stud
centres


