background image

7

C3

C1

C2

ATTACH MOUNTING BRACKETS TO COLUMNS

i. Insert 4 x 

item C2

 into 

item C1

 and attach 

item C3

.  

   Screw two full turns to leave 

item C3

 at the end of

 item C2

   Repeat for all 4 mounting plates.

3.

C3

C2

C6

SLOTS

ii. Slide 2 x 

item C1

 down the front slots of each 

item A1

 and


space apart by 600mm.

    Once height is set tighten all 

items C2

.

C6

C2

C1

C1

A1

A1

C2

C3

M6 x 40mm

CSK HEX SCREW

B5

M6 x 30mm

CSK HEX SCREW

RECTANGLE

NUT

2.

ATTACH COLUMNS TO BASE

Mount 

items A1

 onto 

items B1 & B2

 and fix in place

using

 item B5

.

OPTIONAL: 

To level the stand,

adjust 

item B4 

using 

item B9.

B7

B5

B9

B4

 600mm 

A1

B2

B1

Summary of Contents for BT8709

Page 1: ...ND INSTALLATION GUIDE Recommended for screens up to 100 254cm Max load 100kg 220lbs Suitable for displays with fixings up to 972 x 800mm Stand dimensions H 1945 x W 1128 x D 757mm Integrated cable management SPECIFICATIONS www btechavmounts com B TECH AV mounts ...

Page 2: ...for advice and or to install this product for you Failure to mount this product correctly may cause serious injury or death both during installation and at any time thereafter Do not mount any AV equipment that exceeds the specific weight limit of the product you are installing This weight limit will be clearly stated on each product and its packaging and will vary from product to product Product ...

Page 3: ......

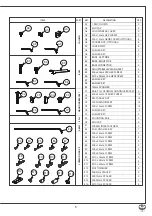
Page 4: ...BT8709 PARTS LIST PLEASE KEEP THIS FOR FUTURE REFERENCE 4 A3 A2 A1 B1 B4 B2 C1 D1 D2 E1 A7 B3 INSTALLATION TOOLS REQUIRED Pliers Cutter Crosshead screwdriver ...

Page 5: ... 12mm SCREW M6 x 40mm CSK HEX SCREW 5AF HEX KEY 4AF HEX KEY M8 SLIDING INSERT RECTANGLE NUT E1 E2 E3 E4 E5 E6 E7 E8 E9 E10 M6 x 25mm SCREW M6 x 16mm SCREW M8 x 16mm SCREW M6 x 40mm SCREW M8 x 40mm SCREW M8 x 25mm SCREW M10 x 25mm SCREW M10 x 16mm SCREW MULTIWASHER M10 x 40mm SCREW M8 13mm SPACER M8 5mm SPACER M8 24mm SPACER 4 4 4 4 4 4 4 4 4 4 4 4 4 2 1 SCREEN INTERFACE ARM 5AF LONG HEX KEY E11 E1...

Page 6: ...1 B6 B8 B3 B3 B6 ii Screw item B4 into items B1 B2 B4 B1 B6 M10 x 25mm HEX SCREW A6 A5 A6 A5 REAR REAR A2 A1 OPTIONAL FIX REAR COVERS TO COLUMNS Place item A2 into the back of item A1 Use items A5 A6 at the top and bottom of the column slot to secure rear cover A8 A6 A5 A2 A5 A6 SQUARE NUT M6 x 12mm GRUB SCREW B2 ...

Page 7: ...3 C2 C6 SLOTS ii Slide 2 x item C1 down the front slots of each item A1 and space apart by 600mm Once height is set tighten all items C2 C6 C2 C1 C1 A1 A1 C2 C3 M6 x 40mm CSK HEX SCREW B5 M6 x 30mm CSK HEX SCREW RECTANGLE NUT 2 ATTACH COLUMNS TO BASE Mount items A1 onto items B1 B2 and fix in place using item B5 OPTIONAL To level the stand adjust item B4 using item B9 B7 B5 B9 B4 600mm A1 B2 B1 ...

Page 8: ...2 x item C5 into item C4 in the top channel allow at least a 6mm gap so the rail can be hooked on to item C1 iii Hook items D1 onto items C1 and fix with in place with item C5 iv Attach item D2 to the ends of items D1 4 6mm 185mm D1 C4 C4 D1 A1 C1 C5 C5 C4 D1 185mm 321mm 155mm C4 C5 C7 C4 C5 C7 D2 D1 C7 C5 C4 C5 M8 x 12mm HEX SCREW M8 SLIDING INSERT ...

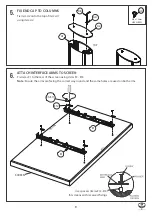
Page 9: ... INTERFACE ARMS TO SCREEN Fix items E1 to the rear of the screen using items E3 E16 Note Ensure the arms are facing the correct way round and the same holes are used on both arms T O P B O T T O M SCREEN Use spacers items E13 E16 for screens with recessed fixings E1 E1 E3 E11 E12 A4 M6 x 12mm HEX SCREW ...

Page 10: ...D1 Optional HEIGHT ADJUSTMENT SCREW SAFETY SCREW Note If necessary adjust the height adjustment screws on top of item E1 to level the screen E2 9 ATTACH STRIPS Insert item A7 to the front and back of items A1 Note Item A7 may have to be cut down to size to be able to fit into the front of item A1 Use pliers to cut item A7 to correct size SCREEN SCREEN SCREEN D1 E1 E2 A1 A7 A7 A7 A1 ...

Page 11: ...a guide only and B tTech accepts no liability for the accuracy of the information contained in this document 1005mm 30mm 45mm 395 6mm 360 9mm 79 5mm 5mm 1900mm 141 5mm 886mm 506mm 649 3mm 70mm 40mm 973mm 1029 1mm 756 5mm 1127 7mm 1078 5mm 800mm 600mm 400mm 300mm 200mm 24mm 60 8mm 120mm 180mm 326mm 71 5mm 10mm adjustment 1366 5mm 328 5mm ...

Page 12: ... All rights reserved B Tech AV Mounts is a division of B Tech International Design and Manufacturing Ltd B Tech AV Mounts and the B Tech logo are registered trade marks All other brands and product names are trademarks of their respective owners Photographs are for illustrative purposes only E OE CONTACT info btechavmounts com ...

Reviews: