background image

Installation, Operation & Maintenance Manual

INSTALLATION

5

Rev 09/17

1-1/2 inch Vinyl Handrail

Model(s): BHRVE15C-P

installation

Step 7 

Attach brackets to retainer using 1/4 inch machine screw, flat washers and standard 

nylon lock nut provided. Do not tighten until rail has been mounted in place and all 

brackets are secured to wall. 

Step 8 

Mount assembly to wall with the appropriate hardware according to wall construction. 

See Step 9 for splicing information. Finish tightening bracket to rail fasteners to 10 ft-lbs 

maximum torque.


Suggested wall mount hardware

•  Drywall

Toggler brand toggle bolts

•  Masonry

Plastic Alligator insert

Step 9 

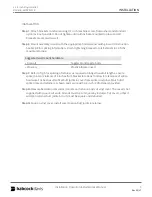
Refer to fig. 5 for splicing of retainer as required on longer handrail lengths. Locate 

splice joints a minimum of 4 inches from bracket locations to allow for clearance of splice 

hardware. For best results offset butt joints in cover from splice in retainer. Match drill 

splice plate and retainer as shown and secure with 1/4 inch - 20 fasteners provided. 

Step 10 

Measure between accessories (corners and returns) and cut vinyl cover. The cover is not 

supplied with square cut ends. All ends must be cut square by installer. Cut cover so that it 

will span retainer butt joints. All cuts must be square and deburred. 

Step 11 

Snap on vinyl cover. Install cover to span butt joints in retainer.

Summary of Contents for BHRVE15C-P

Page 1: ...INSTALLATION OPERATION MAINTENANCE MANUAL 1 1 2 inch Vinyl Handrail Model s BHRVE15C P ...

Page 2: ... be reproduced without the prior written consent of Babcock Davis Note The information in this document is subject to change without notice General Safety Precautions Improper selection installation or use can cause personal injury or property damage It is solely the responsibility of the user through its own analysis to select products suitable for their specific application requirements ensure t...

Page 3: ...years of safe building use Proper installation of the corner guards is critical to the product s performance The following are general instructions for installing maintaining and cleaning vinyl corner guards These are recommended general guidelines only Locally accepted installation practices and procedures should be followed to ensure a system that meets all local code requirements ...

Page 4: ... Layout retainer face up mark and drill bracket mounting hole locations Use groove in retainer to locate centerline for drilling see fig 2 Bracket mounting holes must be spaced Not to exceed 32 inches on center 1 1 2 inches to 6 inches from end of retainer at returns and corner accessories A minimum of 4 inches from end of retainer at splices to avoid interference with splice hardware shown in fig...

Page 5: ...are Drywall Toggler brand toggle bolts Masonry Plastic Alligator insert Step 9 Refer to fig 5 for splicing of retainer as required on longer handrail lengths Locate splice joints a minimum of 4 inches from bracket locations to allow for clearance of splice hardware For best results offset butt joints in cover from splice in retainer Match drill splice plate and retainer as shown and secure with 1 ...

Page 6: ...Installation Operation Maintenance Manual installation 6 Rev09 17 1 1 2 inch Vinyl Handrail Model s BHRVE15C P ...

Page 7: ...s BHRVE15C P cutting adjustment diagrams and schedule minimum layout configurations clearance with adjoining construction RETAINER COVER Return L 3 3 16 L 3 3 16 Outside Corner L 1 8 L 0 Inside Corner L 4 5 8 L 4 1 2 Important Install retainer and molded accessories before cutting the snap on cover ...

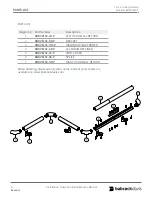
Page 8: ...er Description 1 BHRVE15C LR P LEFT HAND WALL RETURN 2 BHRVE15C BR P BRACKET 3 BHRVE15C IOC P INSIDE OUTSIDE CORNER 4 BHRVE15C AR P ALUMINUM RETAINER 5 BHRVE15C VC P VINYL COVER 6 BHRVE15C SK P SPLICE 7 BHRVE15C RR P RIGHT HAND WALL RETURN When ordering please specify color name Current color charts are available on www babcockdavis com ...

Page 9: ...y cleaning graffiti etc use a stronger cleaning agent such as Crown Anti Vandal Spray or the equivalent Follow the same procedures noted above always rinsing all areas thoroughly in clean water and drying completely Do not use water with extremely high temperature and do not use steam to clean vinyl because it may cause blistering and or warping Do not use abrasive cleaners or other cleaning imple...

Page 10: ...oduct fail to function in normal use within this period Babcock Davis shall furnish a replacement or new part at Babcock Davis s discretion Failure to use product in methods consistent with Babcock Davis product manuals shall relieve Babcock Davis of any liability Our liability under this warranty excludes installation or removal costs involved in the product replacement and excludes any responsib...

Page 11: ...ck Davis has been relied upon by building and construction professions for over 100 years and we pride ourselves in offering exceptional technical support Please do not return any product before discussing your application problem with a Babcock Davis representative and obtaining a Return Authorization Your Babcock Davis representative is eager to help you Please feel free to call your representat...

Page 12: ...ww BabcockDavis com for the latest version of this document and more information 9300 73RD AVENUE NORTH BROOKLYN PARK MN 55428 888 412 3726 888 312 3726 FAX WWW BABCOCKDAVIS COM Great Products Better Partners ...

Reviews: