background image

©2020 Babcock-Davis, Inc. 

REV 8/2020 


Roof Hatch, Smoke Vent and Floor Door Safety Railings 

Installation, Operation & Maintenance 


                                                                                         Model(s): BSRA/BSRV/BSRT


Review shop drawings for project specific detailed information. 

Corner Posts and Brackets 

(figure 1 - 2)


Before assembly, note the relative position of the door, hatch exit and 
the safety railing exit. Your roof hatch may be labeled “EXIT THIS SIDE”. 

1.


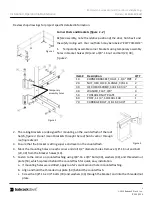
Temporarily assemble corner brackets using temporary assembly 

holes in bracket halves (10) and a 3/8”-16 nut and bolt (20, 30), 
 

figure 2


2.


The railing brackets are designed for mounting on the counterflash of the roof 
hatch, 

figure 3.


Do not mount brackets through the roof hatch curb or through 

roofing material.


3.


Ensure that the bracket is sitting square and level on the counterflash. 

4.


Mark the mounting holes on each corner and drill 1/2” diameter holes. Remove 3/8”-16 nut and bolt 
(20, 30) from the bracket halves (10). 

5.


Fasten to the corner on counterflashing using 3/8”-16 x 3/4” bolts (30), washers (40), and threaded nut 
plate (50), which is placed behind the counterflash for quick, easy installation. 
a.


If mounting holes were drilled, apply roofer’s caulk around hole in counterflashing. 

b.


Align and hold the threaded nut plate (50) behind the counterflash. 

c.


Screw the 3/8”-16 x 3/4” bolts (30) and washers (40) through the bracket and into the threaded nut 
plate. 

Item #  Description 

QTY 

10 

CORNER BRACKET, HALF, 1-1/4” PIPE  2 

20 

NUT, HEX, LOCK, FLANGE, 3/8-16 

30 

HEX HEAD SCREW, 3/8-16 X 3/4" 

40 

WASHER, FLAT, 3/8” 

50 

THREADED NUT PLATE 

60 

POST, 1-1/4”, SCHEDULE 40 

70 

CARRIAGE BOLT, 3/8-16 X 3.00” 

Figure 3 


Figure 2 


Temporary 

assembly holes 


Figure 1 


Summary of Contents for BSRA

Page 1: ...portation Storage o Inspect all shipments and materials for missing or damaged components and hardware o Railings may ship in multiple boxes depending on its size and exit configuration To help keep systems together the boxes will come banded together that form a full system o Material must be stored in a clean dry location Tools o Level o Marking Tool o Drill o 1 2 Drill Bit o Caulking o 3 16 All...

Page 2: ... that the bracket is sitting square and level on the counterflash 4 Mark the mounting holes on each corner and drill 1 2 diameter holes Remove 3 8 16 nut and bolt 20 30 from the bracket halves 10 5 Fasten to the corner on counterflashing using 3 8 16 x 3 4 bolts 30 washers 40 and threaded nut plate 50 which is placed behind the counterflash for quick easy installation a If mounting holes were dril...

Page 3: ... for example with corner brackets 2 Assemble top rail and center post Temporarily attach it to corner posts to verify location of center post bracket 3 Assure that the bracket is sitting square and level on the counter flashing 4 Mark the mounting holes on the counter flash and drill 1 2 diameter holes Remove 3 8 16 nut and bolt from bracket halves and top rail assembly 5 Fasten to the center of t...

Page 4: ...ghten the set screws 5 Position the mid rail 21 center to center from the top rail 6 If necessary install end cap on single upright post Exit Option Self Closing Gate figure 6 This option is intended for roof hatch and floor door applications 1 Railing packages include a chain If installing a gate the chain is not used 2 Remove provided hardware pouch attached to the safety gate 3 Install safety g...

Page 5: ...ion No Exit Two and Four Sided Rails This option is intended for smoke vents and equipment roof hatches when there is no required exit OPERATION Assure that all fasteners are tightened to the suggested torque The gate should fully open and close with no interference The roof hatch should operate without interfering with the safety railing MAINTENANCE o It is recommended that the springs in gate be...

Reviews: