background image

2

•  Read all instructions before assembling crib.

•  Keep instructions for future use.

•  Never use plastic shipping bags or other plastic film as mattress

  covers because they can cause suffocation.

•  Infants can suffocate in gaps between crib sides and a mattress that

  is too small.

•  CAUTION: Any mattress used in this crib shall be at least 27 1⁄4 in.

  (69 cm) by 51 5⁄8 in. (131cm) with a thickness not exceeding

  6 in. (15 cm).

•  The safest place for your baby to sleep is in a JPMA Certified crib.  

•  Pillows and Blankets have caused infants to suffocate, NEVER use 

  in a crib.

•  Read all warnings and follow all instructions.

•  Missing or broken parts, any questions? CALL Baby Delight, Inc.

•  NEVER place the crib near a window or any wall hangings.

•  Your baby should sleep on a firm mattress. 

•  DO NOT place any items in the crib.

•  Infants can suffocate on soft bedding. Never add a pillow or

  comforter. Never place additional padding under an infant.

•  Failure to follow these warnings and the assembly instructions could

  result in serious injury or death. DO NOT use this crib if you cannot

  exactly follow the accompanying instructions.

•  To reduce the risk of SIDS, pediatricians recommend healthy infants

  be placed on their backs to sleep, unless otherwise advised by your

 physician.

•  The crib, including side rails, must be fully erected and locked prior to

  use. : Make sure latches are secure/locked in place.

•  Check this product for damaged hardware, loose joints, loose bolts

  or other fasteners, missing parts, or sharp edges before and after

  assembly and frequently during use. Do not use crib if any parts

  are missing, damaged or broke. Contact Baby Delight, Inc. for

  replacement parts and instructional literature if needed. Do not

  substitute parts.

•  Never add an accessory such as a bassinet or changing table that

  extends over the sleeping area.

WARNING:

•  When child is able to pull to a standing position, remove bumper 

pads, large toys and other objects that could serve as steps for 

climbing out. 

•  Stop using crib when child begins to climb out or reaches a height of 

35in. (89cm), whichever occurs first. The child should be placed in a 

youth or regular bed.

FALL HAZARD

Summary of Contents for Horizon BD06210

Page 1: ...com BD06210 BD06190 BD06240 MADE IN CHINA Storage Bag Crib Frame with Cover Mattress Support A Rails left and right B Rails left and right C Rails left and right D Rails left and right E Rails left a...

Page 2: ...bly instructions could result in serious injury or death DO NOT use this crib if you cannot exactly follow the accompanying instructions To reduce the risk of SIDS pediatricians recommend healthy infa...

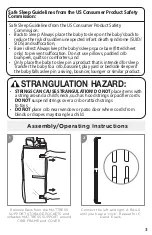
Page 3: ...space bare fitted sheet only to prevent suffocation Do not use pillows padded crib bumpers quilts or comforters and Only place the baby to sleep in a product that is intended for sleep Transfer the b...

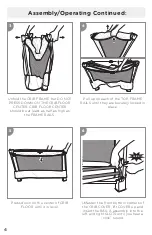
Page 4: ...AILS Press down on the center of CRIB FLOOR until it is level Pull up on each of the TOP FRAME RAILS until they are securely locked in place Unfasten the front bottom corners of the CRIB COVER lift CO...

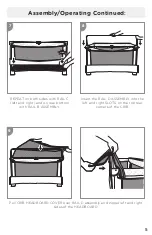
Page 5: ...ottom with RAIL B ASSEMBLY Insert the RAIL D ASSEMBLY into the left and right SLOTS on the top rear corners of the CRIB 9 Pull CRIB HEADBOARD COVER over RAIL D assembly and zipper left and right sides...

Page 6: ...the left and right SLOTS on the top front corners of the CRIB until you hear a click Fasten CRIB COVER HEADBOARD COVER with hook and loops on the left and right side Pull CRIB COVER over RAIL E assemb...

Page 7: ...til tight Place MATTRESS SUPPORT inside the crib with INSTRUCTION POCKET facing up 16 Store this INTRUCTION BOOKLET in this pocket for future reference and place MATTRESS not included see the followin...

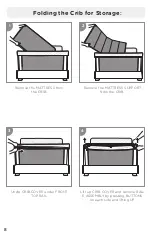
Page 8: ...ib for Storage 1 3 2 4 Remove the MATTRESS from the CRIB Unzip CRIB COVER under FRONT TOP RAIL Remove the MATTRESS SUPPORT from the CRIB Lift up CRIB COVER and remove RAIL E ASSEMBLY by pressing BUTTO...

Page 9: ...ght sides of the CRIB and B RAIL ASSEMBLY on the rear bottom of CRIB by pressing BUTTONS on each side and lifting up Unzip bottom of CRIB HEADBOARD COVER Un fasten CRIB HEADBOARD COVER on the left and...

Page 10: ...NTER of the CRIB FLOOR raised squeeze the CENTER BUTTONS on the underside of each of the FRONT SIDES AND BACK RAILS and push down one at a time on each RAIL DO NOT FORCE THE RAILS DOWN IF THEY DO NOT...

Page 11: ...to make sure it has been released WRAP the MATTRESS SUPPORT around the CRIB FRAME and secure with straps and pockets facing out Disconnect RAIL A B D and E RAIL ASSEMBLIES by pressing the button in t...

Page 12: ...uct at no cost to you This limited warranty does not cover claims resulting from misuse failure to follow the instructions on installation maintenance and use abuse alteration involvement in an accide...

Reviews: