Pg. 43
1-4 .
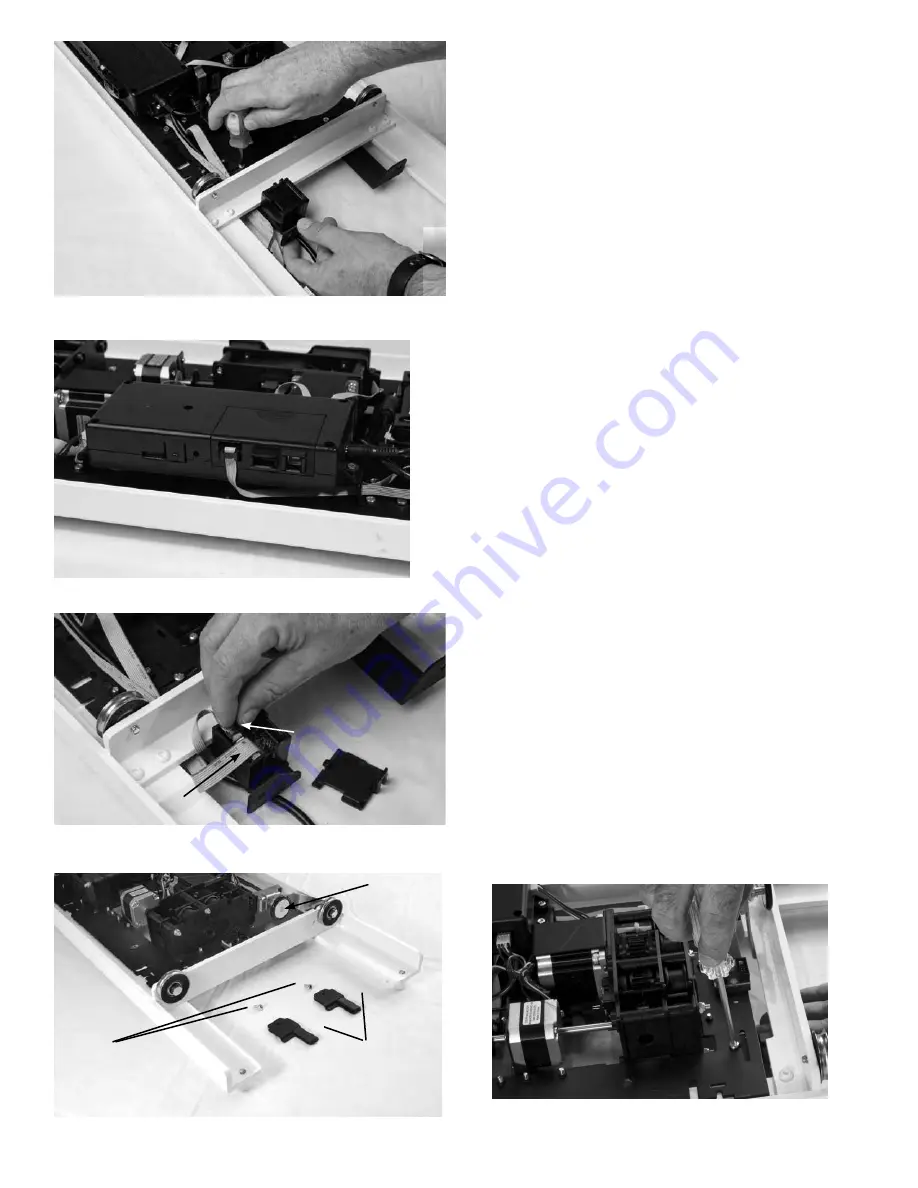
Attach the two (2) Power Strip Brackets to
the back of the QuiltMotion Plate by lining up
these brackets under the two slots of the motor
plate. Thread the two (2) M4 x 14mm Screws
down through the slots, and into the brackets
as shown in Fig. 1-D.
NOTE:
Before tightening
completely, be sure the plate is properly aligned
with the carriage.
1-5 .
There is a ribbon cable already installed
with one end plugged into the QuiltMotion plate
as shown in Fig. 1-E. This is the Sewing Ribbon
Cable. Remove the cover of the Power Strip
Bracket on the left and plug the other end of this
cable into the Adapter Box on the Power Strip
Bracket as shown in Fig. 1-F.
1-6 .
There is another ribbon cable already
installed on the QuiltMotion plate. This is the
Encoder Cable. Plug one end of this cable into the
Adapter Box on the Power Strip Bracket also, as
shown in Fig. 1-F.
1-7 .
Next, on the opposite end of the carriage
install your two (2) Length Adaptors, using two (2)
M4 x 14mm Screws, as shown in Fig. 1-G. Do not
replace the lid of the cable box in the Power Strip
Bracket yet, leave it off for now.
Attach the two (2) Length Adaptors to the
QuiltMotion Plate in the same manner as the
Power Strip Brackets in the previous step, by
threading the two (2) M4 x 14mm Screws down
through the slots of the QuiltMotion Plate, and into
the Length Adaptors, as shown in Fig. 1-H.
Fig. 1-D
Fig. 1-E
Fig. 1-F
Fig. 1-H
Length
Adaptor
M4 x 14mm
Phillips Head Screw
Encoder Lever
Fig. 1-G
underneath side
Sewing Ribbon Cable
Encoder Cable


