background image

5

EN

G

LIS

H

PREPARING FOR BOBBIN WORK

Required Materials

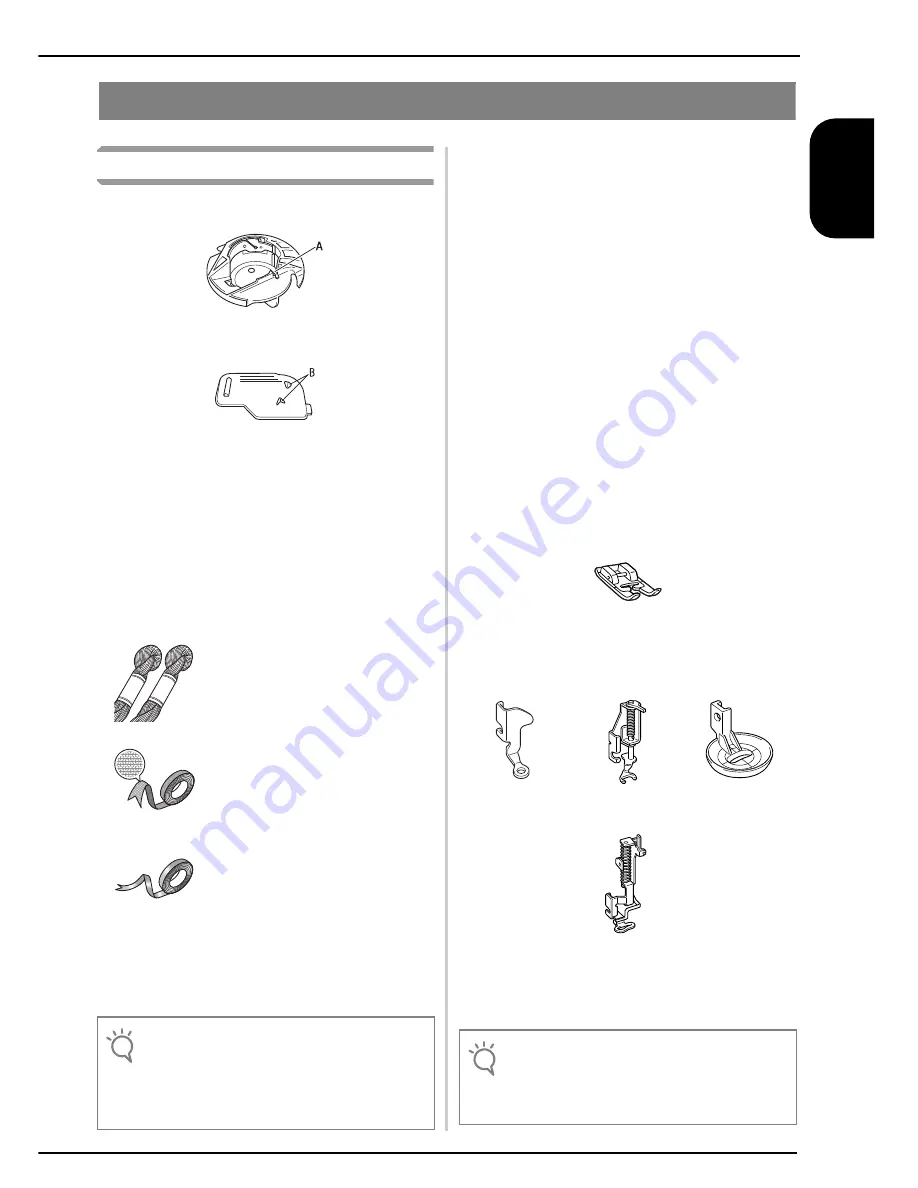
Bobbin case and bobbin cover

a

Bobbin case (gray)
There is a notch at the location indicated by the letter 
“A”.

b

Bobbin cover with tabs (for bobbin work)
There are two small v-shaped tabs on the back of the 
bobbin cover as indicated by the letter “B”.
The tabs help hold the bobbin in place so it does not lift 
up while thick thread is being pulled through.
This bobbin cover can also be used with normal 
sewing.

Lower thread

We recommend the following types of threads for 
bobbin work.

* When wide ribbon or heavy weight threads are being used, we 

recommend test sewing with and without bobbin case tension 
being applied to see which gives the best stitching results. 
If wide ribbon such as 3.5mm (approx. 1/8 inch) is to be used, 
we recommend that bobbin case tension not be applied. Refer 
to page 8 for more detailed instructions.

Upper thread

Upper thread choices can vary depending on the 
finished look you would like to achieve. By using 
sewing machine embroidery thread (polyester), 
multipurpose polyester thread, or monofilament 
(transparent nylon) thread the appearance of a single 
design can be changed many times just by choosing a 
different upper thread weight and/or color.
If you do not wish for the upper thread to be visible, we 
recommend using transparent nylon monofilament 
thread or polyester light weight thread (50wt. or above) 
that is the same color as the lower thread.

Needle

Use a needle appropriate for the upper thread and 
fabric being used. Refer to “Fabric/Thread/Needle 
Combinations” (in the chapter “CHANGING THE 
NEEDLE”) and “Embroidery Step by Step” in the 
machine’s Instruction and Reference Guide.

Presser foot

Utility stitches or decorative stitches: Monogramming 
foot “N”

Free motion sewing: Free motion quilting foot “C”, Free 
motion open toe quilting foot “O” or Free motion echo 
quilting foot “E”

Embroidery: Embroidery foot “W”

Fabric

Be sure to sew trial stitches on a piece of scrap fabric, 
which includes the same threads and fabric as what is 
being used in your project.

<Sewing/Embroidery>

No.5 or finer hand embroidery 
thread or decorative thread

Flexible woven ribbon
(When embroidering: approx. 2mm 
(approx. 5/64 inch) recommended)

<Sewing only>

Fine embroidery ribbon (silk or 
silk-like material) (3.5 mm (approx. 
1/8 inch) or less, recommended)

Note

• Do not use thread heavier than No.5 hand 

embroidery thread.

• Some threads may not be appropriate for bobbin 

work. Be sure to sew trial stitches before sewing on 
your project.

Note

• The sewing results may be affected by the type of 

fabric used. Before sewing your project, be sure to 
sew trial stitches on a piece of scrap fabric that is 
the same as the fabric used in the project.

Summary of Contents for Ellisimo BLSO-U

Page 1: ...To register your machine warranty and receive Baby Lock product updates and offers go to www babylock com profile...

Page 2: ...NG BOBBIN WORK SEWING 10 Positioning the Fabric and Sewing 10 Bobbin Work Free Motion Sewing 12 CREATING BOBBIN WORK EMBROIDERY 13 Selecting the Pattern 13 Start Embroidering 14 ADJUSTING THE THREAD T...

Page 3: ...bbin work are included allowing you to embroider the added bobbin work embroidery patterns or sew using decorative thread or ribbon too thick to flow freely through the needle page 5 Positioning of th...

Page 4: ...Chapter 1 How to Create Bobbin Work...

Page 5: ...ecorative thread or ribbon will stitch out on the underneath side of fabric while sewing with the fabric wrong side facing up Bobbin work is sewn using the special bobbin case gray and bobbin cover wi...

Page 6: ...t wish for the upper thread to be visible we recommend using transparent nylon monofilament thread or polyester light weight thread 50wt or above that is the same color as the lower thread Needle Use...

Page 7: ...ing in the machine s Instruction and Reference Guide Preparing the Bobbin Thread In order to create bobbin work the bobbin case must be replaced with the one for bobbin work Before creating bobbin wor...

Page 8: ...oving and cleaning the bobbin case gray and then reinstall the standard bobbin case black CAUTION Be sure to use the bobbin case gray when creating bobbin work Using any other bobbin case may result i...

Page 9: ...the right side and hold the end of the thread with your right hand m Pull out about 8 cm approx 3 inches of bobbin thread n Lightly hold the end of the upper thread while turning the handwheel toward...

Page 10: ...q Align the upper thread and bobbin thread and then pull out about 10 cm approx 4 inches of the threads and pass them under the presser foot toward the rear of the machine r Install the the bobbin co...

Page 11: ...iry type stitches Be sure to sew trial stitches using same fabric and threads as project in order to check the sewing results The bobbin thread may become tangled due to the type of pattern and thread...

Page 12: ...ar of the machine turn the handwheel to feed the needle into the fabric or punched hole again and then lower the presser foot lever o Press at lower right of LCD screen All keys and operation buttons...

Page 13: ...e motion sewing use the instructions for CREATING BOBBIN WORK SEWING on page 10 For information about using the free motion quilting foot C free motion open toe quilting foot O or free motion echo qui...

Page 14: ...PREPARING FOR BOBBIN WORK on page 5 Note For an estimated length of bobbin thread required for each pattern see page 26 Be sure to use a bobbin wound with enough thread If the bobbin runs out of threa...

Page 15: ...nd then press The embroidery frame moves to the beginning of stitching c Press Note Since bobbin work is sewn from the wrong side of the fabric the pattern shown in the screen appears as a mirror imag...

Page 16: ...re the threads l Start sewing again to finish the pattern m Raise the needle and presser foot remove the embroidery frame and then cut the upper thread and the bobbin thread When cutting the threads b...

Page 17: ...e tension of the bobbin thread and of the upper thread and then try sewing the pattern again For more details refer to ADJUSTING THE THREAD TENSION on page 17 a Right side of fabric b Wrong side of fa...

Page 18: ...llips screw b Adjust with a small screwdriver To increase the tension of the bobbin thread turn the slotted head screw 30 to 45 clockwise To decrease the tension of the bobbin thread turn the slotted...

Page 19: ...left side of presser foot Press the Thread Cutter button again The pattern is misaligned Refer to ADJUSTING THE THREAD TENSION and increase the upper thread tension If the pattern is still misaligned...

Page 20: ...Chapter 2 New Features and New Patterns...

Page 21: ...ry machine b Select the pattern and then press c Press d When the following message appears press The embroidery frame moves so the fabric can be scanned Note When the small embroidery frame is instal...

Page 22: ...d in the background disappears Whether the fabric disappears or remains displayed can be specified from page 8 8 of the Settings screen a Set to ON to leave the fabric displayed in the background b Wh...

Page 23: ...tioning sticker to the fabric within the area indicated by the red frame in the LCD and then press g When the following message appears remove the embroidery positioning sticker and then press The emb...

Page 24: ...ure to sew trial embroidery using same fabric and threads as project in order to check the sewing results Note This function cannot be used with alphabet character patterns frame patterns or border pa...

Page 25: ...Press to make the pattern more dense Note Depending on the pattern embroidering may not be possible at the appropriate thread density Before sewing on your project be sure to sew trial embroidery on...

Page 26: ...25 ENGLISH NEW PATTERNS Thumbnail List Utility embroidery patterns Alphabet character patterns Note Must be accessed through Embroidery mode not Embroidery Edit mode...

Page 27: ...d for bobbin work patterns They cannot be used for normal embroidering No 1 4 min a Time required for embroidering b Embroidery thread color c Embroidery thread color number d Embroidery size e Total...

Page 28: ...5 cm 1 6 m 1 0m 0 6 m 1 6 m 1 0m 0 6 m 1 1 m 0 5m 0 6 m No 10 No 11 No 12 1 min 2 min 3 min 405 030 328 7 5 cm 6 8 cm 12 6 cm 12 6 cm 22 4 cm 17 7 cm 1 0 m 0 4m 0 6 m 2 4 m 1 8m 0 6 m 3 5 m 2 9m 0 6 m...

Page 29: ...Pantone 117C KIT I Instruction and Reference Guide_tacony_ H1 4...

Reviews: