background image

2

Useful Functions

59

Useful Functions

Functions useful in improving sewing efficiency are described below.

Automatically sewing reverse/
reinforcement stitches

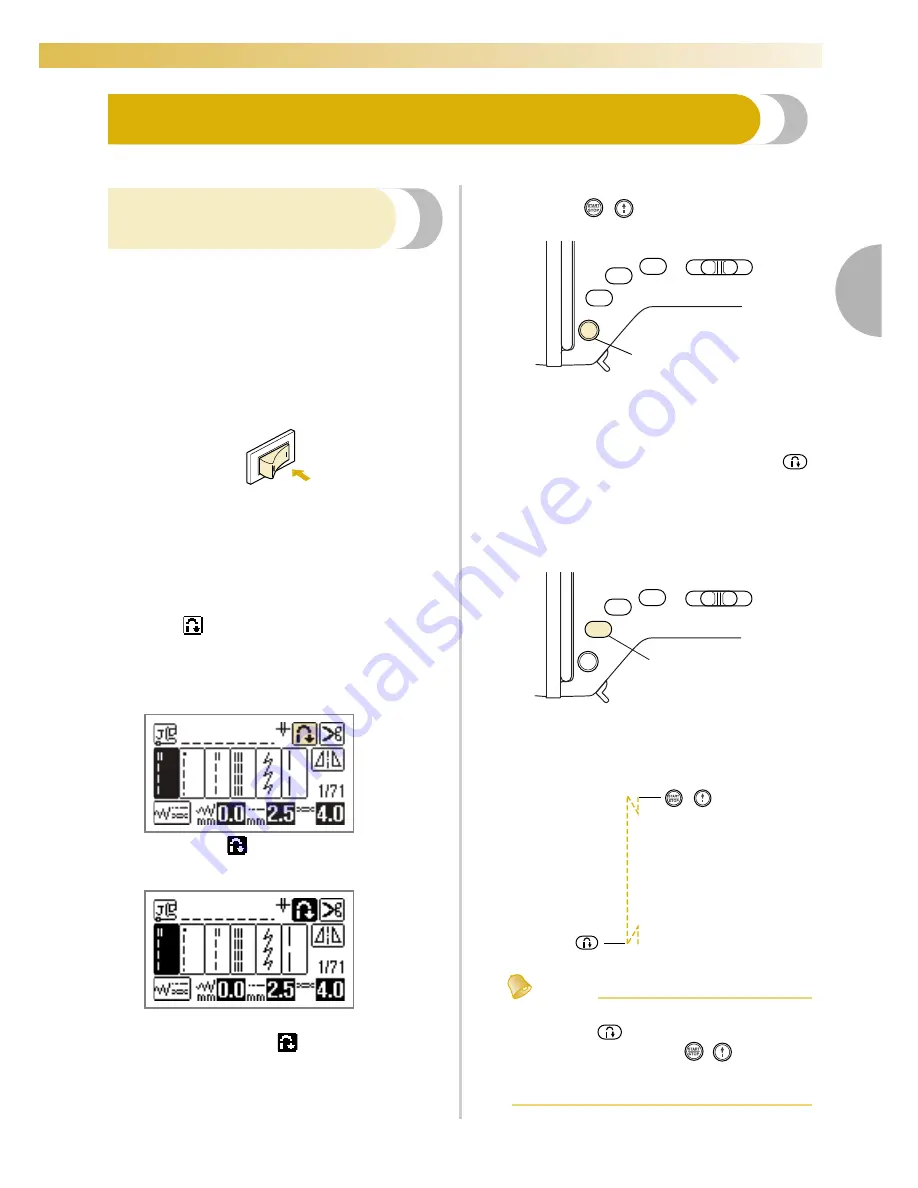
The sewing machine can be set to automatically sew 
reverse or reinforcement stitches at the beginning and 
end of the stitching. Whether reverse stitches or 
reinforcement stitches are sewn depends on the stitch 
that is selected. For details, refer to “Stitch Setting 
Chart” (page 68).

Turn on the sewing machine.

X

The LCD comes on.

Select a stitch.

• For details on selecting a stitch, refer to 

“Selecting stitching” (page 49).

Press 

 on the LCD. 

This step is not necessary if a stitch such as 
those for sewing buttonholes and bar tacks is 
selected where reinforcement stitches are 
automatically sewn.

X

It turns to 

, and the sewing machine is set 

for automatic reverse/reinforcement stitching.

• To turn automatic reverse/reinforcement 

stitching off, press 

.

• When the sewing machine is turned off, the 

automatic reverse/reinforcement stitching 
setting is cancelled.

Position the fabric under the presser foot, and 
then press 

/

 (“Start/Stop” button) 

once.

a

“Start/Stop” button

X

After reverse/reinforcement stitches are 
sewn, the machine starts sewing.

After reaching the end of the stitching, press 


(“Reverse/Reinforcement Stitch” button) once.

This step is not necessary if a stitch such as 
those for sewing buttonholes and bar tacks is 
selected where reinforcement stitches are 
automatically sewn.

a

“Reverse/Reinforcement Stitch” button

X

After reverse/reinforcement stitches are 
sewn, the sewing machine stops.

Memo

z

Reverse/reinforcement stitches 

WILL NOT

 be 

sewn until 

 (“Reverse/Reinforcement 

Stitch” button) is pressed. 

/

 (“Start/Stop” 

button) may be pressed to stop stitching when 
needed such as for pivoting corners.

1

1

/

Summary of Contents for Ellure PLUS BLR3

Page 1: ......

Page 2: ...hen storing this machine avoid direct sunlight and high humidity locations Do not use or store the machine near a space heater iron halogen lamp or other hot objects 2 Use only neutral soaps or deterg...

Page 3: ...ectrical or mechanical adjustment While the machine is stored or in use if you notice anything unusual such as an odor heat discoloration or deformation stop using the machine and immediately unplug t...

Page 4: ...ocations Do not use or store the machine near a space heater iron halogen lamp or other hot objects Use only neutral soaps or detergents to clean the case Benzene thinner and scouring powders can dama...

Page 5: ...3...

Page 6: ...talling the bobbin 27 Upper Threading 29 About the spool of thread 29 Threading the upper thread 30 Threading the needle 32 Threading the needle manually without using the needle threader 33 Using the...

Page 7: ...zag foot J 80 Sewing overcasting stitches using the optional side cutter 81 Basic Stitching 83 Basting 83 Basic stitching 83 Blind Hem Stitching 85 Buttonhole Stitching Button Sewing 87 Buttonhole sew...

Page 8: ...lecting Embroidery Patterns 153 Copyright information 153 Embroidery pattern types 153 LCD liquid crystal display operation 154 Selecting a Baby Lock Exclusive pattern embroidery pattern 156 Selecting...

Page 9: ...nd easily be wound with thread page 23 b Built in stitches You can select from the built in stitches available including utility stitches and decorative stitches page 68 c Quick set bobbin You can sta...

Page 10: ...e used on this machine model BLR3 z The screw for the presser foot holder is available through your authorized retailer Part code 132730 122 z The organized accessory tray is available through your au...

Page 11: ...ce guide XE6536 001 28 Embroidery foot Q XD0474 151 29 Embroidery set large H 18 cm u W 13 cm H 7 inches u W 5 inches EF84 Frame EF89 Embroidery sheet 30 Embroidery set multi position extra large H 30...

Page 12: ...g Operation panel From the operation panel stitch settings can be viewed and edited and operations for using the machine can be displayed page 13 h Knee lifter mounting slot Insert the knee lifter in...

Page 13: ...e when transporting the machine b Handwheel Turn the handwheel toward you to raise and lower the needle The handwheel should be turned towards you counterclockwise c Embroidery card slot Insert the em...

Page 14: ...e Position button to raise or lower the needle Pressing the button twice sews one stitch d Thread Cutter button Press the Thread Cutter button after sewing is stopped to cut both the upper and the bob...

Page 15: ...y Displays the next screen when there are items that are not displayed on the LCD e Memory key Press to enter character embroidery combined stitch patterns etc into the sewing machine memory f Utility...

Page 16: ...14...

Page 17: ...utions 23 Winding the bobbin 23 Installing the bobbin 27 Upper Threading 29 About the spool of thread 29 Threading the upper thread 30 Threading the needle 32 Threading the needle manually without usi...

Page 18: ...not operate correctly due to a bad connection or a disconnection During electrical storms Use only the power cord included with this machine Do not use extension cords or multi plug adapters with man...

Page 19: ...e is not sewing Press the left side of the main power switch on the right side of the machine to turn the machine off set it to X The sewing lamps and the LCD go off when the machine is turned off Unp...

Page 20: ...Number of the selected stitch i Number of stitches contained in the selected stitch type j Horizontal mirror image k Automatic thread cutting l Automatic reverse reinforcement m Single twin needle sew...

Page 21: ...s that are displayed only for embroidering mm INCH Embroidery tension Adjusts the thread tension for embroidering only for embroidering 8 to 8 Maxembroidery speed Specifies the maximum embroidering sp...

Page 22: ...ettings key on the operation panel X The settings screen appears Press the item to be set Switch screens using Previous page key and Next page key The items shown in reverse highlighting are the setti...

Page 23: ...achment embroidery foot attachment presser foot replacement on the LCD a Turn on the sewing machine X The LCD comes on b Press Sewing machine help key on the operation panel X The sewing machine help...

Page 24: ...you press Previous page key you return to the previous page Example Upper threading After you finish looking press Back key two times X The initial stitch screen appears again Note z For details on e...

Page 25: ...chine should be threaded for winding the bobbin is indicated by a broken line on the sewing machine Be sure to thread the machine as indicated Only use the Bobbin part code X52800 120 designed specifi...

Page 26: ...so that the spool is horizontal and the thread unwinds to the front at the bottom If the spool is not positioned so that the thread unwinds correctly the thread may become tangled around the spool pin...

Page 27: ...the upper thread will slightly increase Be sure to check the thread tension For details refer to Adjusting the thread tension page 57 a Spool net b Spool c Spool cap d Spool pin While holding the thr...

Page 28: ...ress Start Stop button once to start winding the bobbin a Start Stop button When the bobbin winding becomes slow press Start Stop button once to stop the machine CAUTION Use scissors to cut the end of...

Page 29: ...dicated Lightly hold down the bobbin with your right hand and then guide the thread as shown with your left hand CAUTION Use a bobbin that has been correctly wound with thread otherwise the needle may...

Page 30: ...ad a Tension adjusting spring Reattach the bobbin cover Insert the tab in the lower left corner of the bobbin cover and then lightly press down on the right side X The bobbin threading is finished Nex...

Page 31: ...f thread Information about the spools of thread is described below CAUTION When threading the upper thread carefully follow the instructions If the upper threading is not correct the thread may become...

Page 32: ...below Check the handwheel and if this mark is not at this position press Needle Position button until it is a Mark on handwheel Open the top cover Remove the spool cap that is inserted onto the spool...

Page 33: ...be threaded Be sure to raise the presser foot and open the shutter before threading the machine In addition before removing the upper thread be sure to raise the presser foot and open the shutter z Th...

Page 34: ...cutter on the left side of the machine a Thread cutter Note z If the thread is pulled through and cannot be cut correctly lower the presser foot so that the thread is held in place before cutting the...

Page 35: ...ure to press Needle Position button to raise the needle before using the needle threader Threading the needle manually without using the needle threader When using special thread thread with a thickne...

Page 36: ...the upper thread Pass the thread through the eye of the needle from the front The needle threader cannot be used with the twin needle If the needle threader is used with the twin needle the sewing ma...

Page 37: ...n the sewing machine and select a stitch For stitch selection see Selecting stitching page 49 See Stitch Setting Chart page 68 for stitches that use a twin needle Note z When using the pintuck foot so...

Page 38: ...to each other CAUTION When using the twin needle be sure to select the twin needle setting otherwise the needle may break or the machine may be damaged When changing the sewing direction press Needle...

Page 39: ...thread with your left hand with the needle in the up position press Needle Position button twice to lower and raise the needle a Needle Position button X The bobbin thread is looped around the upper...

Page 40: ...needle Failure to observe these precautions is extremely dangerous for example if the needle breaks and fragments are dispersed Be sure to read and carefully follow the instructions below CAUTION Only...

Page 41: ...chased CAUTION Fabric Type Application Thread Size of Needle Type Weight Medium weight fabrics Broadcloth Cotton thread 60 80 75 11 90 14 Taffeta Synthetic thread Flannel Gabardine Silk thread 50 Thin...

Page 42: ...e needle Press Needle Position button once or twice to raise the needle a Needle Position button Turn off the sewing machine CAUTION Place fabric or paper under the presser foot to cover the hole in t...

Page 43: ...of the sewing machine may be damaged With the flat side of the needle toward the rear of the machine insert the needle until it touches the needle stopper a Needle stopper While holding the needle wi...

Page 44: ...ser foot is raised Press the black button at the back of the presser foot holder a Black button b Presser foot holder X The presser foot holder releases the presser foot Use the presser foot appropria...

Page 45: ...ttached Raise the presser foot lever to check that the presser foot is securely attached Note z When a stitch is selected the icon for the presser foot that should be used appears in the screen Check...

Page 46: ...efer to Replacing the presser foot page 42 Use the screwdriver to loosen the presser foot holder screw a Screwdriver b Presser foot holder c Presser foot holder screw Attaching the presser foot holder...

Page 47: ...cuffs and pant legs Pull the flat bed attachment off to the left X With the flat bed attachment removed free arm sewing is possible Slide the part that you wish to sew onto the arm and then sew from t...

Page 48: ...GETTING READY 46...

Page 49: ...titch length 57 Adjusting the thread tension 57 Useful Functions 59 Automatically sewing reverse reinforcement stitches 59 Automatically cutting the thread 60 Mirroring stitches 61 Useful Sewing Tips...

Page 50: ...etails on turning on the machine refer to Turning on the machine page 17 2 Select the stitch Select the stitch appropriate for the area to be sewn For details on selecting a stitch refer to Selecting...

Page 51: ...titch number and settings are displayed If necessary specify the setting for automatic reverse reinforcement stitching and adjust the stitch length etc Memo z Uses of stitches and other stitch selecti...

Page 52: ...n button Place the fabric under the presser foot If the seam allowance is positioned on the right side sewing in a straight line is easier and the extra fabric does not get in the way While holding th...

Page 53: ...art Stop button X The machine starts sewing If you continue to hold the Start Stop button pressed immediately after the sewing starts the machine will sew at a slow speed When the end of the stitching...

Page 54: ...machine starts sewing When the end of the stitching is reached completely release the foot controller X The machine stops sewing with the needle lowered in the fabric When you have finished sewing pre...

Page 55: ...tch button Keep Reverse Reinforcement Stitch button held down until you reach the beginning of the stitching The machine sews at a slow speed when Reverse Reinforcement Stitch button is held down a Re...

Page 56: ...o automatically sew reverse or reinforcement stitches at the beginning and end of the stitching For details refer to Automatically sewing reverse reinforcement stitches page 59 Cutting the thread When...

Page 57: ...to cut the threads When you wish to finish the stitching and the sewing machine is stopped press Needle Position button once to raise the needle a Needle Position button X The needle is raised Raise t...

Page 58: ...g width can be adjusted to make the stitch wider or narrower Each press of makes the zigzag stitch narrower Each press of makes the zigzag stitch wider Memo z Press to return the setting to its defaul...

Page 59: ...Only the upper thread should be visible from the right side of the fabric and only the bobbin thread should be visible from the wrong side of the fabric a Wrong side of fabric b Right side of fabric c...

Page 60: ...pper thread is visible from the wrong side of the fabric Each press of makes the thread tension tighter Memo z Press to return the setting to its default Note z If the upper thread is not threaded cor...

Page 61: ...ewing machine is set for automatic reverse reinforcement stitching To turn automatic reverse reinforcement stitching off press When the sewing machine is turned off the automatic reverse reinforcement...

Page 62: ...d press Start Stop button once a Start Stop button X Stitching starts after reverse stitching or reinforcement stitching Once you have reached the end of the stitching press Reverse Reinforcement Stit...

Page 63: ...tch For details on selecting a stitch refer to Selecting stitching page 49 Press on the screen X It turns to and the pattern displayed at the top of the screen is mirrored To turn the mirrored stitchi...

Page 64: ...ill be used with your project Changing the sewing direction When the stitching reaches a corner stop the sewing machine Leave the needle lowered in the fabric If the needle remained up when the machin...

Page 65: ...ic does not feed at the beginning of stitching Zigzag foot J is equipped with a feature that keeps the presser foot level a Sewing direction When you encounter a seam that is too thick to feed under t...

Page 66: ...nyl fabrics When sewing the fabrics that may stick to the presser foot such as leathers or coated fabrics change the presser foot to the non stick foot a Leather Sewing an even seam allowance To sew a...

Page 67: ...h 3 5 mm a Seam b Presser foot c Inches d Bobbin cover with mark e 16 mm 5 8 inch Hands free raising and lowering of the presser foot Using the knee lifter you can raise and lower the presser foot wit...

Page 68: ...press the knee lifter to the right Keep the knee lifter pressed to the right X The presser foot is raised Release the knee lifter X The presser foot is lowered CAUTION While sewing keep your knee awa...

Page 69: ...entered zipper 99 Inserting a piping 100 Sewing Stretch Fabrics and Elastic Tape 101 Stretch stitching 101 Elastic attaching 101 Appliqu Patchwork and Quilt Stitching 103 Appliqu stitching 104 Patchwo...

Page 70: ...nt No Zigzag stitch Center 7 J Overcasting and attaching appliqu s 3 5 1 8 0 0 7 0 0 1 4 1 4 1 16 0 0 4 0 0 3 16 Yes J Reverse No Right 8 J Beginning sewing from the right needle position 3 5 1 8 2 5...

Page 71: ...d stitching stippling 7 0 1 4 1 0 7 0 1 16 1 4 1 6 1 16 1 0 4 0 1 16 3 16 No Reinforcement No Satin scallop stitch 27 N Scallop stitching 5 0 3 16 2 5 7 0 3 32 1 4 0 5 1 32 0 1 1 0 1 64 1 16 Yes J Rei...

Page 72: ...ching etc 5 0 3 16 1 5 7 0 1 16 1 4 3 0 1 8 1 5 4 0 1 16 3 16 Yes J Reinforcement No 46 N Decorative stitching smocking stitching heirloom stitching etc 6 0 15 64 1 5 7 0 1 16 1 4 1 6 1 16 1 0 4 0 1 1...

Page 73: ...Automatic reinforcement No Side cutter 63 S Sewing straight stitches while cutting the fabric 0 0 0 0 0 2 5 0 3 32 2 5 3 32 0 2 5 0 1 64 3 16 No Reinforcement No 64 S Sewing zigzag stitches while cutt...

Page 74: ...24 25 26 27 28 29 30 31 32 33 34 35 36 37 38 39 40 41 42 43 44 45 46 47 48 49 50 51 Satin stitches 1 2 3 4 5 6 7 8 9 10 N Yes Not possible Large No Yes Not possible Yes Not possible 11 12 13 14 15 16...

Page 75: ...36 37 38 39 40 41 42 43 44 45 46 47 48 49 50 51 52 53 54 55 56 57 58 59 60 61 62 63 64 65 66 67 68 69 70 71 72 73 74 75 76 77 78 79 80 81 82 83 84 85 86 87 88 89 90 91 92 93 94 95 96 97 Character stit...

Page 76: ...7 28 29 30 31 32 33 34 35 36 37 38 39 40 41 42 43 44 45 46 47 48 49 50 51 52 53 54 55 56 57 58 59 60 61 62 63 64 65 66 67 68 69 70 71 72 73 74 75 76 77 78 79 80 81 82 83 84 85 86 87 88 89 90 91 92 93...

Page 77: ...mbols and numbers in the outline style e Decorative stitches Can be combined You can select from 51 decorative stitches including leaves flowers and hearts You can sew combinations of multiple decorat...

Page 78: ...begin on page 79 Note z When a stitch is selected the icon for the presser foot that should be used appears on the screen Check that the correct presser foot is attached before starting to sew If the...

Page 79: ...specific settings for a stitch so that they can be used later press after changing the settings to save the new settings with the selected stitch This feature can be used only with utility stitches To...

Page 80: ...cement stitching etc are saved not just the setting that was changed When the same stitch pattern is selected the last settings saved are displayed even if the machine was turned off If the settings a...

Page 81: ...ch For details refer to Selecting stitching page 49 Position the fabric with the edge of the fabric against the guide of the presser foot and then lower the presser foot lever a Guide Sew with the edg...

Page 82: ...g fraying center baseline reverse stitching 3 5 1 8 0 0 7 0 0 1 4 1 4 1 16 0 0 4 0 0 3 16 J Zigzag stitch right needle position 8 Preventing fraying right baseline reinforcement stitching 3 5 1 8 2 5...

Page 83: ...d with the notch in the presser foot holder and then slowly lower the presser foot lever a Notch in presser foot holder b Pin X The side cutter is attached Stitch Name Pattern Application Stitch Width...

Page 84: ...bric should be positioned over the guide plate of the side cutter a Guide plate If the fabric is not positioned correctly the fabric will not be cut Lower the presser foot lever and then start sewing...

Page 85: ...e into the fabric at the beginning of the stitching Stitch Name Pattern Application Stitch Width mm inch Stitch Length mm inch Presser Foot Auto Manual Auto Manual Basting stitch 6 Temporarily securin...

Page 86: ...needle position When the stitch width of the straight stitch left needle position is set to its standard setting 0 0 mm the distance from the needle position to the right side of the presser foot is 1...

Page 87: ...wrong side facing up a Wrong side of fabric b Basting Attach blind hem foot R For details refer to Replacing the presser foot page 42 Select a stitch For details refer to Selecting stitching page 49 P...

Page 88: ...width so that the needle slightly catches the fold of the hem a Wrong side of fabric b Right side of fabric If the needle does not catch the hem fold The needle is too far to the right Press to incre...

Page 89: ...brics 5 0 3 16 3 0 5 0 1 8 3 16 0 4 1 64 0 2 1 0 1 64 1 16 51 Buttonholes with bar tacks on both ends for stabilized fabrics 5 0 3 16 3 0 5 0 1 8 3 16 0 4 1 64 0 2 1 0 1 64 1 16 52 Buttonholes for str...

Page 90: ...itching The names of parts of buttonhole foot A which is used for sewing buttonholes are indicated below a Button guide plate b Presser foot scale c Pin d Marks on buttonhole foot e 5 mm 3 16 inch Use...

Page 91: ...on guide plate should be set to 25 mm 1 inch on the scale a 10 mm 3 8 inch b 15 mm 9 16 inch X The size of the buttonhole is set Attach buttonhole foot A For details refer to Replacing the presser foo...

Page 92: ...one bar tack at the end of the buttonhole stitching to prevent the stitching from being cut a Pin Use the seam ripper to cut towards the pin and open the buttonhole a Seam ripper For keyhole buttonho...

Page 93: ...a scrap piece of fabric Sewing buttonholes on stretch fabrics When sewing buttonholes on stretch fabrics use a gimp thread Hook the gimp thread onto the part of buttonhole foot A shown in the illustra...

Page 94: ...t M For details refer to Replacing the presser foot page 42 Select stitch 61 For details refer to Selecting stitching page 49 Since the end of the thread will be tied off later do not set the sewing m...

Page 95: ...thread When you are finished attaching the button slide the drop feed lever to to the right as seen from the rear of the machine to raise the feed dogs Memo z The feed dog position switch is normally...

Page 96: ...of the fabric facing each other sew reverse stitches after reaching the zipper opening For details refer to Basic stitching page 83 Using a basting stitch continue sewing to the edge of the fabric a B...

Page 97: ...page 42 Select stitch 3 For details refer to Selecting stitching page 49 CAUTION Topstitch around the zipper a Stitching b Right side of fabric c Basting stitching d End of zipper opening CAUTION Remo...

Page 98: ...bric a Basting stitching b Reverse stitches c Wrong side of fabric d End of zipper opening Press open the seam allowance from the wrong side of the fabric a Wrong side of fabric Press the seam allowan...

Page 99: ...de of the zipper to the fabric a Basting stitching Attach the presser foot holder to the other pin of zipper foot I If the presser foot holder was attached to the right pin in step change it to the le...

Page 100: ...c Reverse stitches d Beginning of stitching e Basting stitching CAUTION When you are about 5 cm 2 inches from the end of the zipper stop the sewing machine with the needle lowered in the fabric raise...

Page 101: ...he screw that holds the presser foot If the screw is loose the needle may break and cause injures Select stitch 1 Loosen the positioning screw on the back of the presser foot a Positioning screw Slide...

Page 102: ...nside out as shown below a Fabric b Piping c Fabric Refer to the steps of attaching the adjustable zipper piping foot on the previous page Sew along the piping After sewing turn fabric pieces After ad...

Page 103: ...ssary that a suitable length of the elastic tape be used Pin the elastic tape to the wrong side of the fabric Pin the elastic tape to the fabric at a few points to make sure that the tape is uniformly...

Page 104: ...lastic tape to the fabric while stretching the tape so that it is the same length as the fabric While pulling the fabric behind the presser foot with your left hand pull the fabric at the pin nearest...

Page 105: ...5 3 32 1 6 4 0 1 16 3 16 25 Attaching appliqu s and binding 1 5 1 16 0 5 3 5 1 32 1 8 1 8 1 16 1 0 4 0 1 16 3 16 Piecing straight stitch 21 Piecing straight stitching with a seam allowance of 6 5 mm...

Page 106: ...the fabric that it will be attached to a Basting stitching Attach the open toe foot For details refer to Replacing the presser foot page 42 Select a stitch For details refer to Selecting stitching pa...

Page 107: ...7 mm 1 4 inch from either the right side or the left side of the presser foot Baste or pin along the seam allowance of the fabric that you wish to piece together Attach zigzag foot J For details refe...

Page 108: ...lting foot For details refer to Replacing the presser foot page 42 Select stitch 3 Align the mark at the upper edge of the 1 4 inch quilting foot with the upper edge of the fabric Align the right edge...

Page 109: ...older screw and then tighten the screw with the screwdriver a Presser foot holder screw X The walking foot is attached CAUTION Select a stitch For details refer to Selecting stitching page 49 Place on...

Page 110: ...lower the feed dogs using the drop feed lever so that the fabric can be moved freely in any direction When free motion quilting use the following instructions with the optional quilting foot Remove t...

Page 111: ...oller A decorative stitch can be sewn by changing the stitch width of a satin stitch If the sewing machine is set so that the stitch width can be adjusted using the sewing speed controller the stitch...

Page 112: ...to make the width narrower Slide the controller to the right to make the width wider Adjust the sewing speed with the foot controller When you are finished sewing set the stitch width control setting...

Page 113: ...ed length of the bar tack Set the button guide plate on buttonhole foot A to the desired length The distance between the markings on the presser foot scale is 5 mm 3 16 inch a Presser foot scale b Len...

Page 114: ...e the bar tack will not be sewn with the correct size a Do not reduce the gap Pull down the buttonhole lever as far as possible a Buttonhole lever The buttonhole lever is positioned behind the bracket...

Page 115: ...between the markings on the presser foot scale is 5 mm 3 16 inch a Presser foot scale b Length of darning c 5 mm 3 16 inch d 7 mm 1 4 inch Attach buttonhole foot A For details refer to Replacing the...

Page 116: ...ositioned behind the bracket on the buttonhole foot a Buttonhole lever b Bracket Gently hold the end of the upper thread in your left hand and then start sewing X Once sewing is completed the machine...

Page 117: ...f the stitching and then lower the presser foot lever Start sewing X Once sewing is completed the machine automatically sews reinforcement stitches then stops Use the eyelet punch to cut a hole in the...

Page 118: ...e beginning of the stitching and then start sewing Lower the needle at the upper right corner X The fabric is fed toward the back of the machine as usual After you have sewn to the corner stop the sew...

Page 119: ...the corner stop the sewing machine and then select stitch 69 Start sewing X The fabric is fed to the left After you have sewn to the corner stop the sewing machine and then select stitch 1 again After...

Page 120: ...king stitch 31 Smocking fabrics to add texture and elasticity 5 0 3 16 0 0 7 0 0 1 4 1 6 1 16 1 0 4 0 1 16 3 16 32 5 0 3 16 0 0 7 0 0 1 4 2 5 3 32 1 0 4 0 1 16 3 16 33 5 0 3 16 2 5 7 0 3 32 1 4 2 5 3...

Page 121: ...details refer to Selecting stitching page 49 Set the stitch width to 7 0 mm 1 4 inch For details refer to Adjusting the stitch width page 56 Sew with the center of the presser foot aligned along the c...

Page 122: ...by stitching or embroidering over gathers is called smocking It is used to decorate the front of blouses or cuffs The smocking stitch adds texture and elasticity to fabric Attach zigzag foot J For det...

Page 123: ...tching The gathers that look like shells are called shell tucks They are used to decorate trims the front of blouses or cuffs made of thin fabrics Fold the fabric along the bias Attach zigzag foot J F...

Page 124: ...zy quilt Attach zigzag foot J For details refer to Replacing the presser foot page 42 Sew together the right sides of the two pieces of fabric and then open up the seam allowances a Wrong side of fabr...

Page 125: ...e eye of the needle from the front to the back For details refer to Threading the needle manually without using the needle threader page 33 Attach monogramming foot N For details refer to Replacing th...

Page 126: ...amming foot N For details refer to Replacing the presser foot page 42 Select stitch 39 For details refer to Selecting stitching page 49 With the right side of the fabric facing up sew along the right...

Page 127: ...s of the fabric separated by an unfrayed section of about 4 mm 3 16 inch a 4 mm 3 16 inch Attach monogramming foot N For details refer to Replacing the presser foot page 42 Select stitch 42 For detail...

Page 128: ...being sewn and whether or not stabilizer material is used the desired result may not be achieved Be sure to sew a trial piece of fabric before sewing your project In addition while sewing be sure to g...

Page 129: ...is the default If the small pattern size is selected small patterns can be combined and connected z If multiple patterns have been combined the size of each selected pattern can be specified Changing...

Page 130: ...th for one satin stitch can be changed in five gradations Press Utility stitch key on the operation panel and select Satin stitch Select a satin stitch pattern Press X It turns to and the pattern is l...

Page 131: ...move the stitch pattern to the left by half the width of the stitch pattern Select once to move the stitch pattern to the right by half the width of the stitch pattern As an example the procedure for...

Page 132: ...ombinations of stitches from character stitches decorative stitches satin stitches combined utility stitches decorative satin stitches and cross stitches a Touch Utility stitch key on the operation pa...

Page 133: ...ected patterns displayed in the LCD have been sewn To repeatedly sew the combined pattern refer to Repeating patterns z The combined pattern can be saved for later use For details refer to Saving patt...

Page 134: ...pattern When the specified pattern is not displayed on the screen check the pattern using the following steps Press X The screen for checking the pattern is displayed Press and confirm the pattern Pre...

Page 135: ...is saved the initial screen appears again Do not turn off the sewing machine while the pattern is being saved otherwise the pattern data may be lost Retrieving a pattern Press Retrieve the saved patt...

Page 136: ...Press X The saved pattern and the pocket are deleted Realigning the pattern The pattern may not be sewn correctly depending on the type of fabric being sewn or the sewing speed If this occurs adjust t...

Page 137: ...tion If the pattern appears as shown below the stitching is misaligned in the horizontal direction If the pattern is not sewn correctly follow the steps below to adjust the sewing Press Settings key o...

Page 138: ...rizontal space in the design Press to decrease the horizontal space in the design Press Back key X It returns to the screen for adjusting the pattern Select once again start the sewing machine and che...

Page 139: ...he embroidery frame 152 Selecting Embroidery Patterns 153 Copyright information 153 Embroidery pattern types 153 LCD liquid crystal display operation 154 Selecting a Baby Lock Exclusive pattern embroi...

Page 140: ...ch as towels corduroy and pique knit There are many types of backing and topping stabilizers with various weights for the various fabrics that you may be sewing Visit your local retailer to find the s...

Page 141: ...g machine is purchased z When replacing the needle refer to Replacing the needle page 40 CAUTION Other Embroidery frames small and medium are optional For details refer to Optional accessories page 9...

Page 142: ...r the bobbin thread wind embroidery bobbin thread and set it in place For details on setting up the bobbin thread refer to Winding Installing the Bobbin page 23 6 Fabric preparation Attach a stabilize...

Page 143: ...up Turn off the sewing machine CAUTION Raise the presser foot lever a Presser foot lever X The presser foot is raised At the time of purchase the presser foot lever is up Press and hold the black but...

Page 144: ...esser foot bar a Embroidery foot bar b Needle clamp screw Secure the embroidery foot with the presser foot holder screw Set the embroidery foot perpendicular Firmly tighten the presser foot holder scr...

Page 145: ...machine Raise the presser foot lever a Presser foot lever X The presser foot is raised While pressing in the lever at the back of the embroidery foot with your finger loosen the presser foot holder sc...

Page 146: ...ove it It may cause malfunctions Attaching the embroidery unit Get the included embroidery unit ready Turn off the sewing machine Pull the flat bed attachment off to the left Slide the tab on the cove...

Page 147: ...he screen with your finger X The carriage moves to its initial position a Carriage CAUTION Note z If the machine is initialized with hands or objects near the carriage the screen may return to the ini...

Page 148: ...riage moves into a position where it can be stored Turn off the sewing machine CAUTION Hold the release button on the bottom left of the embroidery unit and slowly pull the embroidery unit to the left...

Page 149: ...act CAUTION a a Prepare stabilizer material that is larger than the embroidery frame being used a Fabric b Size of embroidery frame c Stabilizer material b If you are using iron on stabilizers place t...

Page 150: ...nches can be sewn This is used for letters and other small embroidery There are patterns for which embroidery frame small cannot be used Embroidery frame multi position extra large Embroidery can be d...

Page 151: ...right side d Stabilizer material e Ledge of outer frame Press down firmly until the inner frame is securely pressed against the ledge of the outer frame Tighten the adjustment screw while removing any...

Page 152: ...r to page 148 Remove the embroidery sheet Embroidery on fabrics that cannot be stretched on an embroidery frame When small pieces of fabric that cannot be stretched on an embroidery frame or thin piec...

Page 153: ...ign the two pins on the embroidery frame holder with the mounting brackets on the frame and then press the frame into the embroidery frame holder until a click is heard After pressing the front mounti...

Page 154: ...frame holder to the left lift the embroidery frame up to remove it Remove the back mounting bracket from the pin and then remove the front mounting bracket from the pin a Lever a Mounting brackets b P...

Page 155: ...For details refer to Selecting a Baby Lock Exclusive pattern embroidery pattern page 156 Alphabet patterns There are 6 types of characters European characters upper case lower case numbers symbols For...

Page 156: ...ADEIRA POLY THREAD MADEIRA RAYON THREAD SULKY THREAD ROBISON ANTON POLY THREAD DISPLAY UNIT The measurement units that are displayed can be selected mm inch EMBROIDERY TENSION The thread tension for e...

Page 157: ...ter patterns only Press this key to adjust the pattern Press this key when you want to change the color character by character in character embroidery Since the sewing machine stops at the end of each...

Page 158: ...creen is displayed Select the pattern Switch the screen using Previous page key and Next page key When is pressed the display of patterns moves forward or backward in increments of 10 designs X When a...

Page 159: ...cters If a wrong character was selected press To enter a space press _ Example Welcome Memo z The character pattern that you created can be saved for later use For details refer to Saving patterns pag...

Page 160: ...pes and stitches Press the frame pattern X The frame shape selection screen is displayed Select the frame shape Switch the screen using Previous page key Next page key and select from the ten types X...

Page 161: ...age cases z Use only embroidery cards manufactured for this machine Using unauthorized cards may cause your machine to operate incorrectly z Embroidery cards purchased in foreign countries may not wor...

Page 162: ...bobbin case no color on the screw when a tighter bobbin tension is needed For replacing the bobbin case refer to Cleaning the race page 180 a Alternate bobbin case no color on the screw Note z The bo...

Page 163: ...the fabric hang over the table Otherwise the embroidery unit cannot move freely and the pattern may not turn out as planned Embroidering a pattern Embroidery patterns are embroidered with a change of...

Page 164: ...r foot lever Press Start Stop button a Start Stop button After progressing 5 6 stitches press Start Stop button to stop the machine Use scissors to cut the thread at the beginning of the stitching Cut...

Page 165: ...refer to LCD liquid crystal display operation page 154 Appliqu ing Prepare the base fabric and the appliqu fabric appliqu piece Press Settings key and set the thread color display to NAME OF COLOR so...

Page 166: ...position for the appliqu is stitched and the sewing machine stops a Appliqu position b Base fabric X APPLIQUE will be displayed on the screen Apply a thin layer of fabric glue or spray adhesive to th...

Page 167: ...b Available embroidery frames c Display unit cm INCH d Change position keys e Size key f Layout key g Rotation key h Horizontal mirror image key i Distance from the center j Embroidery size k Startin...

Page 168: ...ates the pattern 1 degree to the left Rotates the pattern 1 degree to the right Returns the pattern to its original position Horizontal mirror image key Mirrors the pattern left and right Starting poi...

Page 169: ...fabric to check the adjustment of the thread tension etc To adjust the thread tension press Settings key Press to weaken the thread tension Press to tighten the thread tension Correct thread tension T...

Page 170: ...g side of fabric a Right side b Wrong side Bobbin thread is too loose Bobbin thread appears slightly on the right side of fabric a Right side b Wrong side If this occurs turn the slotted screw clockwi...

Page 171: ...up the correct color for the upper thread Press Start Stop button to continue the design Thread runs out partway through a design When the upper thread or the bobbin thread runs out while sewing the s...

Page 172: ...current needle count on the screen and make a note of it If the needle count is not displayed press Settings key and then use to display the following screen Press Back key to return to the embroider...

Page 173: ...e beginning of the color you want to embroider Press Forward one stitch to increase the needle count If is pressed continuously it moves forward 1 9 30 stitches Move forward to about 10 stitches befor...

Page 174: ...USB media equipped with an access indicator the access indicator will begin flashing after the media is inserted into your computer or machine and may take about 5 to 6 seconds before the media is rec...

Page 175: ...s rotated 90 degrees a message appears asking if you wish to rotate the pattern 90 degrees pes files saved with the number of stitches the number of colors and the number of combined patterns exceedin...

Page 176: ...while the pattern is being saved otherwise the pattern data may be lost Retrieving a pattern Press X The saved patterns are displayed Select the pattern you wish to retrieve Switch screens using Previ...

Page 177: ...ary within the designs themselves it may not be possible to transfer an embroidery pattern to the machine even if there are less than 200 embroidery patterns that have been saved on the USB media If t...

Page 178: ...machine and then repeat procedures starting from step Memo z The pattern file names appear in alphabetical order z Only the names of dst files are displayed Select the pattern you wish to retrieve Swi...

Page 179: ...ing the Memory Function 177 4 Press X The saved pattern is retrieved X The embroidery screen appears and you can embroider the retrieved pattern Adjust the pattern as desired and then begin embroideri...

Page 180: ...178 EMBROIDERY...

Page 181: ...pter Care and Maintenance 180 Cleaning the machine surface 180 Cleaning the race 180 Cleaning the bobbin case 181 Troubleshooting 182 Error messages 187 Adjusting the LCD 190 Operation beep 190 Cancel...

Page 182: ...m the power supply jack on the right side of the sewing machine CAUTION Remove the flat bed attachment or the embroidery unit if either is attached Grasp both sides of the needle plate cover and then...

Page 183: ...ss slide the paper between the tension plate base and the tension spring and also slide the paper behind the notch of the spring to remove any dirt or dust a Tension plate base b Notch c Paper e g bus...

Page 184: ...bric thread and needle is not correct Select a thread and needle that are appropriate for the type of fabric being sewn page 39 The presser foot that is used is not appropriate for the type of stitch...

Page 185: ...installed Correctly install the needle The area around the hole in the needle plate is scratched or has a burr on it Replace the needle plate Contact your retailer or the nearest authorized service c...

Page 186: ...t holder is incorrectly installed Correctly install the presser foot holder page 44 The thread tension is incorrect Adjust the tension of the upper thread page 57 A bobbin designed specifically for th...

Page 187: ...thread does not pass through the eye of the needle The needle has not been raised to the correct position Press the Needle Position button page 32 The needle is incorrectly installed Correctly instal...

Page 188: ...c is plugged up Remove the tangled thread When the bobbin case is plugged up clean the race and the bobbin case page 180 page 181 The thread tension is incorrect Adjust the tension of the upper thread...

Page 189: ...th the twin needle is selected Press to cancel the twin needle setting If the twin needle is installed replace it with a single needle Then select the pattern again Press to return to the previous scr...

Page 190: ...eedle was down The machine is turned on while the needle is lowered and the embroidery unit is attached This message is displayed when the embroidery unit is trying to initialize while the embroidery...

Page 191: ...ttern from the card An embroidery pattern incompatible with this machine was selected The utility stitch or character stitch key was pressed while the embroidery unit is attached You try to retrieve a...

Page 192: ...the sewing machine then turn it on again Operation beep Each time a key is pressed you will hear one beep If an incorrect operation is performed you will hear two or four beeps If a key is pressed cor...

Page 193: ...essed This setting can be changed so that the machine does not beep Turn on the sewing machine X The LCD comes on Press Settings key on the operation panel X The settings screen appears Press Next pag...

Page 194: ...f character and decorative stitches are erased However saved embroidery patterns are not erased Press and hold the Settings key while turning on the machine X The following screen appears Insert the U...

Page 195: ...direction 62 character stitches 75 126 character storage 174 characters retrieving 174 checking needle 40 cleaning bobbin case 180 cleaning brush 9 cleaning machine surface 180 combining patterns 130...

Page 196: ...12 needle position changing 84 needle replacement 40 needle set 9 needle threader 32 needle threader lever 10 needle threading 32 needle types sizes uses 39 needles 38 next page key 13 non stick foot...

Page 197: ...25 spool of thread 29 spool pin 9 stabilizer material 147 start stop button 12 51 step pattern 129 stippling 103 stitch density 127 stitch guide foot 9 64 stitch length adjustment 57 stitch selection...

Page 198: ......

Page 199: ......

Page 200: ...English 885 U03 XE6534 001 Printed in China...

Reviews: