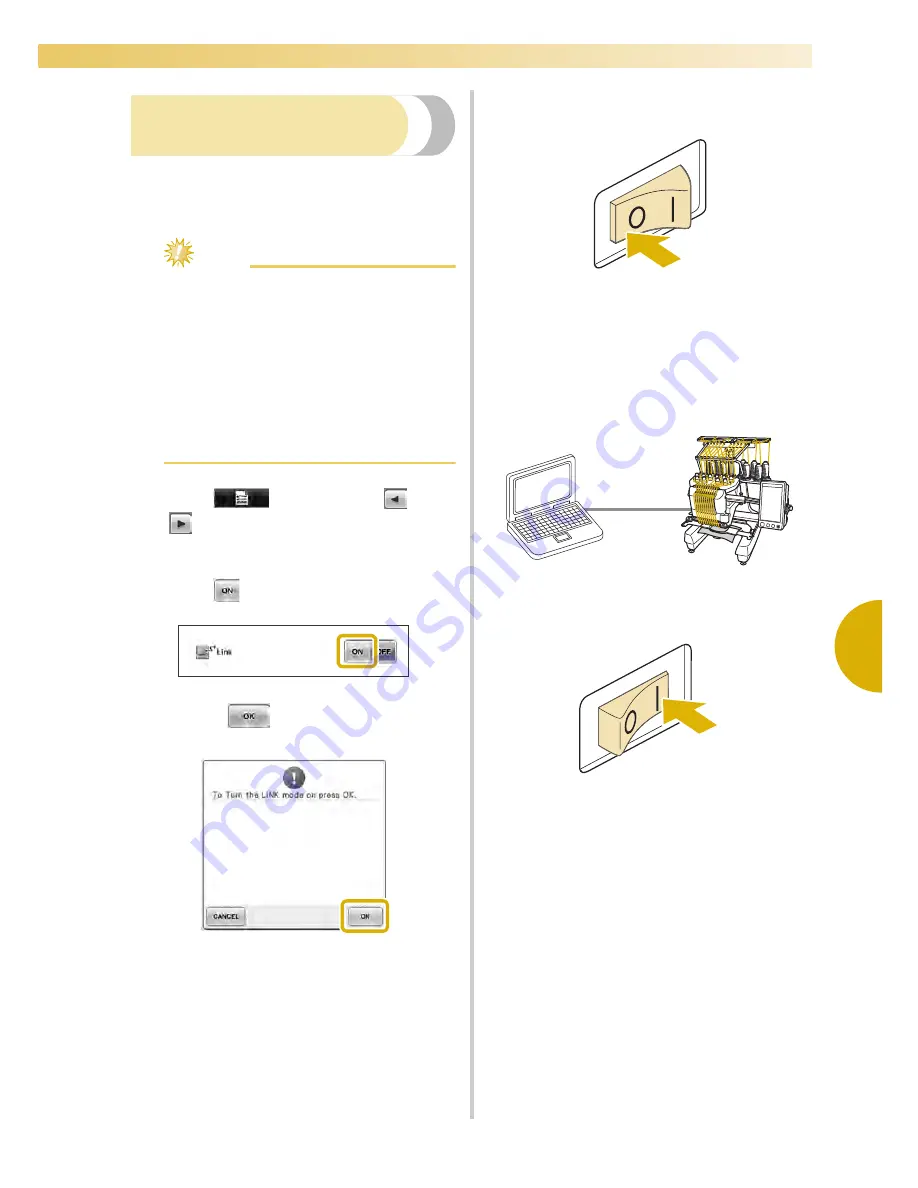
Sending Embroidery Patterns From a Computer to the Machine (Link Function)
175
—————————————————————————————————————————————————————————————————————————————————————
5
Embroidering using
the Link function
First, use the embroidery editing software to create
the embroidery pattern to be sent to the embroidery
machine.
Note
●
Only embroidery data in the PES format
(.pes) can be embroidered using the Link
function.
●
The Link function cannot be used with
large-size (split) embroidery patterns or
embroidery patterns for the jumbo frame
(optional).
●
Attach to the embroidery machine the
embroidery frame for the size of the
pattern to be sent.
1
Touch
, and then touch
and
to display page 5/5 of the settings
screen.
2
Touch
to enable the Link function.
X
When the following message appears,
touch .
3
Turn off the machine.
4
Use the included USB cable to connect the
embroidery machine to the computer.
• When connecting the embroidery machine
to the computer, be sure to use the
included USB cord clamps. For details on
using the USB cord clamps, refer to
page 170.
5
Turn on the machine.
6
Using the embroidery editing software
provided with the Link function, such as
Palette 9 or later from a computer, will
allow you to send the embroidery pattern(s)
to the machine in the Link mode.
Summary of Contents for Enterprise BNT10L
Page 1: ......
Page 150: ...EMBROIDERING SETTINGS 148...
Page 216: ...SELECTING EDITING SAVING PATTERNS 214...
Page 302: ...APPENDIX 300 If any of the following messages appear consult your nearest Baby Lock retailer...
Page 303: ...Troubleshooting 301 7...
Page 308: ...APPENDIX 306...
Page 312: ...English 884 T11 XF0036 001 Printed in Taiwan...


