background image

LCD SCREEN

GET

T

ING REA

D

Y

15

1

Touch the LCD screen or a key with your finger or the 
included touch pen to select a machine function.

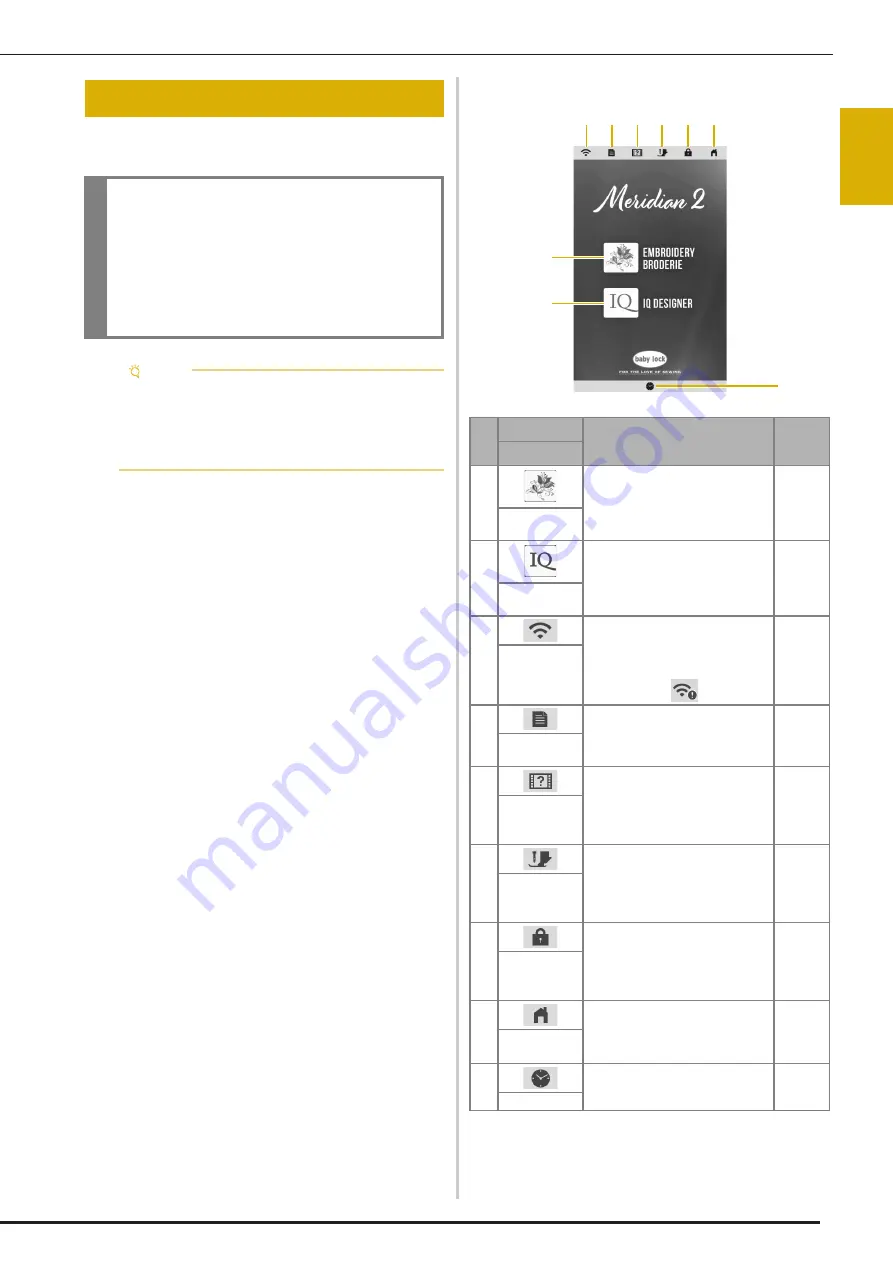
Home Page Screen

LCD SCREEN

IMPORTANT

• Only touch the screen with your finger or the 

touch pen (stylus) included with the machine. 
Do not use a mechanical pencil, screwdriver 
or any other hard or sharp object. In addition, 
do not press the screen with extreme pressure. 
Otherwise the screen may be damaged.

Note

• All or part of the screen may sometimes become 

darker or lighter due to changes in the surrounding 
temperature or other changes in the environment. 
This is not a sign of a malfunction. If the screen is 
difficult to read, adjust its brightness.

No.

Display

Explanation

Page

Name

1

Select an embroidery pattern.

33

Embroidery 
key

2

Create an original embroidery 
pattern.

91

IQ Designer 
key

3

Shows the machine’s signal 
strength. Touch this key to specify 
the wireless settings.
If there is a new update file, the 

key appears as 

.

17, 22

Wireless LAN 
key

4

Change the needle stop position, 
adjust the pattern or screen, and 
change other machine settings.

16

Machine 
settings key

5

See explanations on how to use 
the machine. You can see the 
tutorial videos and also MP4 
movie files that you have saved on 
USB media.

19

Machine help 
key

6

Touch this key before changing 
the needle, the presser foot, etc. 
This key locks all key and button 
functions to prevent operation of 
the machine.

27, 31

Presser foot/
Needle 
exchange key

7

Lock the screen. When the screen 
is locked, you can still embroider, 
but cannot change any of the 
screen functions. Touch this key 
again to unlock the screen.

Screen lock 
key

8

Return to the home page screen at 
any time and select a different 
category - [Embroidery] or [IQ 
Designer].

Home page 
screen key

9

Set the time/date.

14

Time/Date key

1

2

9

3 4 5 6 7 8

Summary of Contents for Meridian 2

Page 1: ......

Page 2: ......

Page 3: ...u have contact a qualified electrician This machine is approved for use in the country of purchase only 4Never operate this machine if it has a damaged cord or plug if it is not working properly has b...

Page 4: ...ct installation 9For repair or adjustment If the light unit is damaged it must be replaced by an authorized Baby Lock retailer In the event a malfunction occurs or adjustment is required first follow...

Page 5: ...ence to radio communications However there is no guarantee that interference will not occur in a particular installation If this equipment does cause harmful interference to radio or television recept...

Page 6: ...NG By downloading copying installing or using the software you agree to this license If you do not agree to this license do not download install copy or use the software Intel License Agreement For Op...

Page 7: ...5 Make sure you use a router or firewall when connecting your machine to the Internet to protect it against unauthorized access from the Internet PRECAUTION FOR WIRELESS CONNECTION...

Page 8: ...E 2 POINT EMBROIDERY POSITIONING FUNCTION 63 EMBROIDERING A PATTERN 67 Embroidering Attractive Finishes 67 Embroidering Patterns 67 Using Appliqu s 69 ADJUSTMENTS DURING THE EMBROIDERY PROCESS 70 If t...

Page 9: ...in the Bobbin Case Area 112 Changing Embroidery Foot W with LED Pointer 113 BEFORE LENDING OR DISPOSING OF THE PRODUCT 114 ADJUSTING THE SCREEN 114 Touch Panel is Malfunctioning 114 TROUBLESHOOTING 1...

Page 10: ...CONTENTS 8...

Page 11: ...ir vent The air vent allows the air surrounding the motor to circulate Do not cover the air vent while the machine is being used H Main power switch page 13 I Power cord receptacle page 14 J USB port...

Page 12: ...raise the presser foot 5 Automatic threading button Use the automatic threading button to automatically thread the needle Included Accessories After opening the box check that the following accessori...

Page 13: ...chine X57045 051 Part Name Part Code 19 Spool net 2 XA5523 050 20 Embroidery needle plate cover XE5131 001 21 Touch pen stylus XA9940 051 22 Bobbin case on machine XC8167 651 23 Bobbin cover on machin...

Page 14: ...set 30 cm H 20 cm W approx 12 inches H 8 inches W EF92 Frame EF94 Embroidery sheet 2 Embroidery frame with decal set 24 cm H 24 cm W approx 9 1 2 inches H 9 1 2 inches W EF97S Frame EF98 Embroidery sh...

Page 15: ...tacle on the machine Otherwise a fire or electric shock may result Turn the main power to OFF and remove the plug in the following circumstances When you are away from the machine After using the mach...

Page 16: ...YY month MM and date DD 4 Select whether 24h or 12h setting will display 5 Set the current time The clock starts from 0 second of the time you set d The following message about a wireless LAN connecti...

Page 17: ...tern 91 IQ Designer key 3 Shows the machine s signal strength Touch this key to specify the wireless settings If there is a new update file the key appears as 17 22 Wireless LAN key 4 Change the needl...

Page 18: ...u can save the current settings screen image in a USB media by touching this key when the USB media is inserted into the USB port The files are saved in a folder labeled bPocket 9 Reset settings on th...

Page 19: ...s setting is available if embroidery foot W with LED pointer has been attached page 60 Wireless LAN Settings 1 Enable Disable the wireless LAN function page 22 2 Shows the connected SSID 3 Set the mac...

Page 20: ...ging the Screen Saver Image Instead of the default image you can select your own personal images for the screen saver of your machine Before changing the screen saver image prepare the image on USB me...

Page 21: ...oring The machine s embroidering status can be monitored from your smart device For details refer to IQ INTUITION MONITORING APP on page 108 IQ Intuition Positioning You can position your embroidery d...

Page 22: ...n be saved to the machine so that a tutorial video on creating a project for example can be viewed at any time For details on supported file extensions refer to SPECIFICATIONS on page 121 a Touch b To...

Page 23: ...achine Wirelessly transfer an embroidery pattern from your computer to the machine by using the dedicated Windows application Design Database Transfer The application can be downloaded from the follow...

Page 24: ...of available SSIDs appears c Touch beside the SSID that was noted The screen for entering the network key password appears SSID Network Key Password Memo The wireless network connection cannot be set...

Page 25: ...editing software Palette version 11 or later or Design Database Transfer in order to transfer files Using the Others Menu to Set Up the Wireless Network Connection The Others menu contains the followi...

Page 26: ...obbin 2 Spring on the bobbin winder shaft c Place the spool of thread for the bobbin and the spool cap onto the supplemental spool pin Slide the spool onto the supplemental spool pin so that the threa...

Page 27: ...ee spool cap sizes are available allowing you to choose a spool cap that best fits the size of spool being used If the spool cap is too small for the spool being used the thread may catch on the slit...

Page 28: ...Remove the spool cap and place the spool of thread for the bobbin onto the spool pin Slide the spool onto the spool pin so that the thread unwinds to the front from the bottom 1 Spool pin 2 Spool cap...

Page 29: ...cover c Insert the bobbin into the bobbin case so that the thread unwinds to the left d Lightly hold down the bobbin with your right hand and then guide the end of the thread around the tab of the nee...

Page 30: ...hread shutter opens so the machine can be threaded 1 Upper thread shutter 1 Slit Memo By pulling the thread in this way the thread will enter the tension spring of the bobbin case to apply the appropr...

Page 31: ...efore using the automatic needle threader Otherwise the needle may not thread correctly and the needle threader may be damaged CAUTION Choose a spool cap that best fits the size of spool being used Fo...

Page 32: ...gh the eye of the needle If a loop was formed in the thread passed through the eye of the needle carefully pull on the loop of thread through to the back of the needle o Raise the presser foot lever a...

Page 33: ...dle from the front 1 Bobbin winder shaft 2 Vertical spool pin 1 Spool felt 2 Thread spool Memo When setting the thread spool set it so that the thread winds off from the front of the spool This method...

Page 34: ...e needle stopper viewing window in the needle clamp Use the disc shaped screwdriver to securely tighten the needle clamp screw 1 Needle stopper 2 Hole for inserting the needle 3 Flat side of the needl...

Page 35: ...chine with the embroidery unit attached The embroidery unit could fall off and cause injury IMPORTANT Keep your hands and foreign objects away from the embroidery carriage and frame when the machine i...

Page 36: ...n position Removing the Embroidery Unit a Remove the embroidery frame For details on removing the embroidery frame refer to Removing the Embroidery Frame on page 59 b Touch then touch The carriage wil...

Page 37: ...tterns sold separately 1 Baby Lock Exclusives 2 Embroidery patterns 3 Character patterns 4 Decorative alphabet patterns 5 Frame patterns 6 Utility embroidery patterns 7 Couching patterns page 86 8 Pat...

Page 38: ...ight thread colors to get a clearer image The pattern is designated with a red box around it on the edit screen d Touch to edit the selected pattern page 41 e Touch The embroidery screen appears f Tou...

Page 39: ...er touch to display and then select the character The size of the selected character is changed Size key 3 Change the configuration of the character patterns To arrange the character patterns on an ar...

Page 40: ...acters are input Right alignment Left alignment Center alignment Alignment key 6 Change the font of the characters Depending on the font that was selected it may not be possible to change the font To...

Page 41: ...the characters Characters can also be moved by directly dragging them with your finger or the touch pen h Touch i Touch to change the color of the characters page 50 j Touch k When all editing is fini...

Page 42: ...a red box Grouping Patterns If the multiple patterns are grouped they can be edited as a single pattern a Select patterns you want to group page 40 b Touch The selected patterns are grouped To ungroup...

Page 43: ...attern vertically Decrease the pattern horizontally Enlarge the pattern proportionately Stretch the pattern vertically Stretch the pattern horizontally Change the size of the character patterns Reset...

Page 44: ...at the end of each character the upper thread can be changed as you embroider Multi color key G Proceed to the embroidery screen Embroidery key H Save a pattern in the machine s memory or USB media Th...

Page 45: ...With this function the pattern will be enlarged or reduced at a larger ratio than with normal pattern resizing a Touch and then touch b Select in the size window Change the pattern size while maintain...

Page 46: ...the patterns a Touch and then touch b Select the direction in which the pattern will be repeated Repeat the pattern above Repeat the pattern below Delete above pattern Delete below pattern Vertical di...

Page 47: ...Every time the key is pressed the pattern is automatically re laid out d Touch e Touch Repeating One Element of a Repeated Pattern You can select one element of a repeated pattern and repeat only tha...

Page 48: ...colors in combined border embroidery patterns so that the same color can be continuously embroidered This allows you to continue embroidering without repeatedly changing the upper thread or changing...

Page 49: ...c Touch to select the thread mark to be sewn d Touch Embroidering the Pattern Repeatedly After creating the repeated pattern rehoop the embroidery frame and keep embroidering for the next pattern a Se...

Page 50: ...g The deselect region setting which specifies that a thread color will not be embroidered can be applied to a part of the pattern with a specific color a Touch in the embroidering edit screen Note Adj...

Page 51: ...fying the desired settings touch f Touch and then touch to check an enlarged image of the finished embroidery After deselecting a region check the image to be sure no previously hidden stitches are vi...

Page 52: ...elected thread color image c Select a new color from the thread color palette and then touch To return to the original color touch If multiple colors have been changed this command will return all col...

Page 53: ...1 Thread brand for colors 2 Number of colors to be used d Select the desired effect 1 Effects for schemes If you select Random or Gradient the color specifying screen will appear If you select Vivid o...

Page 54: ...Display the other color schemes Select the displayed color scheme The thread color palette screen will appear Thread Color Sorting This function allows you to embroider while replacing the thread spoo...

Page 55: ...time already spent embroidering the pattern not including time for changing and automatically trimming the thread 6 The number of colors in the pattern and the number of the color currently being embr...

Page 56: ...c thread cutting function and the thread trimming function can be used The icons of the spool of thread are grayed out Uninterrupted embroidery key A Touch this key to rearrange the stitching sequence...

Page 57: ...ght in the embroidery settings screen Touch and use and in the Embroidery Foot Height in the embroidery settings screen Adjust the presser foot height for thick or puffy fabrics To increase the space...

Page 58: ...y frame use stabilizer material as a base After lightly ironing the fabric to the stabilizer material hoop it in the embroidery frame If stabilizer material cannot be ironed onto the fabric attach it...

Page 59: ...de frames are even before you start embroidering 1 Outer frame 2 Inner frame 3 Fabric f Tighten the frame adjustment screw to keep the fabric from loosening while stitching g Return the frame adjustme...

Page 60: ...ht edge of the embroidery frame holder 1 Embroidery frame holder 2 Embroidery frame guide c Slide the embroidery frame into the holder making sure to align the embroidery frame s with the holder s 1 A...

Page 61: ...point Before adjusting the LED pointer mark the actual needle drop point on the fabric to be embroidered and attach the embroidery frame a Touch The settings screen appears b Touch The embroidery set...

Page 62: ...und Image on the Screen of the Machine a Select the pattern page 35 b Photograph the fabric in the frame with the easy mode of the application and then transfer it to the machine For a detailed proced...

Page 63: ...e larger circle in the embroidery positioning sticker 1 Center of the larger circle in the embroidery positioning sticker e Touch The position of the background image is calibrated Aligning the Embroi...

Page 64: ...hecking the Pattern Position The carriage moves and shows the pattern position Watch the embroidery frame closely to make sure the pattern will be embroidered in the right place a Touch b From touch t...

Page 65: ...ence points shown in the screen select the point to be used for aligning the pattern For this example select the point in the lower left corner of the pattern THE 2 POINT EMBROIDERY POSITIONING FUNCTI...

Page 66: ...precision alignment touch a frame movement speed key for a slower speed 1 Positioning keys 2 Frame movement speed keys 3 Center of the first mark 4 Light of the LED pointer l Touch m Touch the positi...

Page 67: ...uch to display the embroidery screen e Touch and then touch 1 Switch on off the 2 point embroidery positioning function with a LED pointer f If a message appears indicating that the move and rotate se...

Page 68: ...oidery frame until the position of the LED pointer and the center of the first mark are aligned 1 Positioning keys 2 Frame movement speed keys 3 Center of the first mark 4 Light of the LED pointer l T...

Page 69: ...the two projections on the underside of the cover into the notches on the needle plate as shown below To remove the embroidery needle plate cover place your fingernail in the groove and lift the plate...

Page 70: ...the excess thread at the beginning of the pattern If the excess thread tail is under the embroidery foot raise the embroidery foot then trim the excess thread If there is thread left over from the beg...

Page 71: ...hen attach it to the base fabric within the outline of the position sewn in step b of 2 Sewing the Appliqu Position on the Base Fabric Note Refer to Embroidery Design Guide to review the recommended m...

Page 72: ...s almost empty or broken touch of the displayed message remove the embroidery frame and then replace the bobbin b Touch c Touch or to move the needle back the correct number of stitches before the are...

Page 73: ...ser foot and press the Start Stop button to continue embroidering Resuming Embroidery after Turning off the Power The current color and stitch number are saved when embroidery is stopped The next time...

Page 74: ...ADJUSTMENTS DURING THE EMBROIDERY PROCESS 72...

Page 75: ...o the beginning of the embroidering order e Press the Start Stop button to start embroidering f When embroidering is finished remove the basting stitching Chapter 3 ADVANCED EMBROIDERY VARIOUS EMBROID...

Page 76: ...ric used lighter weight fabrics may cause the stitching to appear smaller For best results be sure to use stabilizer material for embroidering When making appliqu pieces do not use the optional border...

Page 77: ...material 3 Appliqu stitching When setting the Thread color to 123 thread number in the settings screen the following screen is displayed Note An appliqu piece cannot be created if the pattern is too...

Page 78: ...e the appliqu outline o Soak the appliqu piece in water to dissolve the water soluble stabilizer p Dry the appliqu piece and then iron it if necessary Note If water soluble stabilizer is used it is no...

Page 79: ...ric Touch in to weaken the upper thread tension The tension number will decrease MAKING EMBROIDERY ADJUSTMENTS Memo If the thread tension is changed from the default setting the new setting will remai...

Page 80: ...the upper thread tension Loosen the upper thread tension e Touch Adjusting the Bobbin Case The bobbin case can be easily adjusted when bobbin tension changes are required to accommodate different bobb...

Page 81: ...nction OFF touch and then This setting returns to its default when the machine is turned off a Touch b Touch to turn off the automatic thread cutting function The key will display as When one color th...

Page 82: ...ple Touch to select 25 mm approx 1 inch and the machine will not trim a jump stitch of 25 mm or less before moving to the next stitching Adjusting the Embroidery Speed a Touch The settings screen appe...

Page 83: ...f Touch Aligning the Pattern and the Needle Example Aligning the lower left side of a pattern and the needle a Mark the embroidery start position on the fabric as shown b Touch c Touch 1 Start positio...

Page 84: ...stitch of the next character pattern F d Touch e Touch f Touch to turn off the thread cutting function and then touch g Press the Start Stop button h After the characters are embroidered cut the threa...

Page 85: ...save is in the embroidering screen b When saving the embroidery pattern in a USB media insert the USB media into the USB port on the machine c Touch the desired destination to start saving 1 Save to t...

Page 86: ...Transfer 1 Retrieve from the machine s memory 2 Retrieve from a USB media 3 Retrieve the pattern via the wireless network connection For detailed procedures refer to Palette manual Version 11 or later...

Page 87: ...the appliqu piece created in step a Attach the appliqu to the base fabric matching the shapes d Select the satin stitch frame pattern of the same shape as the appliqu Embroider over the fabric for the...

Page 88: ...e fabric from the embroidery frame to cut it Also do not pull or push on the fabric Otherwise the fabric may loosen in the frame CAUTION When using yarn we recommend selecting yarn of weight 4 MEDIUM...

Page 89: ...to the left After making adjustments rotate the handwheel and check that the needle does not touch the presser foot i Attach the spool stand sold separately to the machine At this time do not raise th...

Page 90: ...h a hole through the fabric with an awl or tapestry needle and then use the yarn threader to pull the excess yarn to the wrong side of the fabric g Tie the end of the yarn so it cannot be pulled out a...

Page 91: ...within the area of the selected frame size If the pattern is larger than the selected frame size the area indicating the frame size will appear in gray and stippling will not be added 2 Specify the di...

Page 92: ...broidery instructions refer to the Instruction guide included with Palette Ver 7 or later a Insert the USB media containing the created split embroidery pattern and then select the split embroidery pa...

Page 93: ...DESIGNER ABOUT IQ DESIGNER PATTERN DRAWING SCREEN Memo The actual dimension of the pattern area is the size of the embroidery frame which is shown in the pattern preview area The pattern you drew may...

Page 94: ...the pattern drawing area The picked up color is shown as the currently selected region color in the color bar and the Region Property screen 94 Brush tool key 3 L 5 6 G 8 0 B D K J I H F 4 7 9 A C E 9...

Page 95: ...raw lines Setting the Line Types Stitch Types and Colors You can set or change the line types stitch types and colors anytime You can also specify the line types stitch types and colors before drawing...

Page 96: ...ctivate the paint brush color Brush shapes sizes Fill stitch types Zigzag stitch Running stitch Triple stitch Candlewicking stitch Chain stitch E stitch V stitch Select motif stitches Displays motif s...

Page 97: ...d stamp shape 1 Stamp shapes 2 Stamp types 3 Saved outlines 4 Frame embroidering areas Stamp shapes Stamp types Only for Basic shapes Select the outline fill stitch or outline and fill stitch of a bas...

Page 98: ...ailable only after you select the part a Touch b Select the area you want to edit Drag to create the red box around your selected area to be edited c Edit the design with available keys Refer to Key F...

Page 99: ...tif stitch Region Settings 1 Select the region to be changed 2 Shows the stitch type and color for the selected region 3 Shows the stitch settings for the selected region STITCH SETTINGS SCREEN Zigzag...

Page 100: ...llow steps b through d in Specifying Individual Stitch Settings on page 97 to change the settings c Touch to create the embroidery pattern Direction Specifies the embroidering direction Select to chan...

Page 101: ...Check an enlarged view of the pattern 2 Save the embroidery data Loading the Background Image Prepare the data file of your favorite picture so that you can create an embroidery pattern Load the image...

Page 102: ...media Recommended line drawings for Line Conversion Line drawings must be drawn clearly using lines with approximately 1 mm thickness Line drawings should be drawn in a strong contrast If the lines a...

Page 103: ...ay Scale Detection level again if necessary 1 The settings for the lines to be embroidered appear If you do not know how the settings should be changed first continue the operation without specifying...

Page 104: ...a to c Select the data and then touch d When loading is finished specify the necessary settings in the loaded image confirmation screen Change the settings to adjust the image so it can easily be conv...

Page 105: ...hanges to Touch to check that the image is as desired h Touch The pattern drawing screen appears i If necessary edit the loaded image After the loaded image is converted to stitching it appears as a b...

Page 106: ...104 Basic Stippling with IQ Designer Create a stippling design with the basic procedure Example a Touch b Select the square shape and then touch c Touch d Select the heart shape and then touch e Touch...

Page 107: ...en select the stitch color Touch after setting the color i Select the region you want to set stippling effect 1 Select this region j Touch k Adjust the stippling stitch settings to create the desired...

Page 108: ...the pattern that decorative stitching will be added around and then touch in the embroidery edit screen The outline of the pattern is displayed b Set the distance and touch A message appears and the...

Page 109: ...Touch to load the embroidered fabric Refer to Loading the Background Image on page 99 for details j Touch touch to recall the stamp shape registered in step b and then arrange it over the loaded patt...

Page 110: ...rt device and the machine and smart device connected to the same wireless network you can check the operating status of the machine In addition you can receive notifications when the machine stops Ins...

Page 111: ...signs on the fabric by capturing image of the hooped fabric and sending the image to your machine Installing the IQ Intuition Positioning App a Use your smart device to scan the appropriate QR code be...

Page 112: ...IQ INTUITION POSITIONING APP 110...

Page 113: ...sed to extreme temperature changes Exposed to high humidity or steam Near a flame heater or air conditioner Outdoors or exposed to direct sunlight Exposed to extremely dusty or oily environments Clean...

Page 114: ...de the paper behind the notch of the spring to remove any dirt or dust 1 Tension plate base 2 Notch 3 Paper e g business card type 4 Tension spring c Use the cleaning brush to remove any lint and dust...

Page 115: ...resser foot appears on the LCD screen touch to continue c Raise the presser foot lever d Remove the connector of the embroidery foot W with LED pointer from the connector on the back of the machine e...

Page 116: ...fferent operation follow the steps below to make the proper adjustments a Holding your finger on the screen turn the main power switch to OFF and back to ON The touch panel adjustment screen appears b...

Page 117: ...rvice If the reference page is contact your authorized Baby Lock retailer Getting Ready TROUBLESHOOTING 1 Thread 2 Bobbin winder seat CAUTION Do not remove the bobbin winder seat even if the thread be...

Page 118: ...W with LED pointer does not indicate the position correctly With thick elastic fabric the position will be misaligned only at raised parts in the fabric 59 With fabric having a very uneven surface th...

Page 119: ...chine is threaded incorrectly 28 Symptom Cause solution Reference Using improper needle thread or the fabric prepared insufficiently for embroidering 31 55 67 Needle is turned bent or the point is dul...

Page 120: ...e heavy side and keep it level Fabric is hanging off the table If the fabric is hanging off the table during embroidery the embroidery unit will not move freely Place the fabric so that it does not ha...

Page 121: ...r of stitches when it was turned off Follow the procedure described in If the Thread Breaks or the Bobbin Runs out of Thread During Embroidering on page 70 to align the needle position and embroider t...

Page 122: ...n on again If the message continues to appear the machine may be damaged Contact your nearest authorized Baby Lock retailer 19 There is no needle plate cover Attach a needle plate cover This message i...

Page 123: ...b Maximum embroidery speed 1050 stitches per minute Interfaces Wireless LAN 1 Memory Embroidery patterns 10 MB IQ Designer 100 MB Data Types Embroidery patterns 2 pes phc phx dst Data that can be load...

Page 124: ...er than our original patterns the thread or needle may break when embroidering with a stitch density that is too fine or when embroidering three or more overlapping stitches In that case use one of ou...

Page 125: ...ectly to the machine using this network For details on the wireless LAN connection refer to page 22 a Display page 7 of the settings screen b Touch The machine starts to download the update file if th...

Page 126: ...OUR MACHINE S SOFTWARE 124 d Touch e Touch to update the machine Do not turn off the machine during the update Memo If there are changes or additions to functions manuals available on the machine may...

Page 127: ...functions 41 repeated patterns 44 Embroidery foot W with LED pointer 113 Embroidery frames attaching 58 inserting fabric 56 removing 59 types 56 using the embroidery sheet 57 Embroidery needle plate c...

Page 128: ...de 18 Speaker 16 Specifications 121 Spool cap 9 Spool net 29 Spool pin 9 Stabilizer 55 Start Stop button 10 Starting point key 81 Stippling 89 Supplemental spool pin 9 24 T Thread thread tension 77 Th...

Page 129: ......

Page 130: ......

Page 131: ......

Page 132: ...D02M4U 001 English 882 W84...

Reviews: