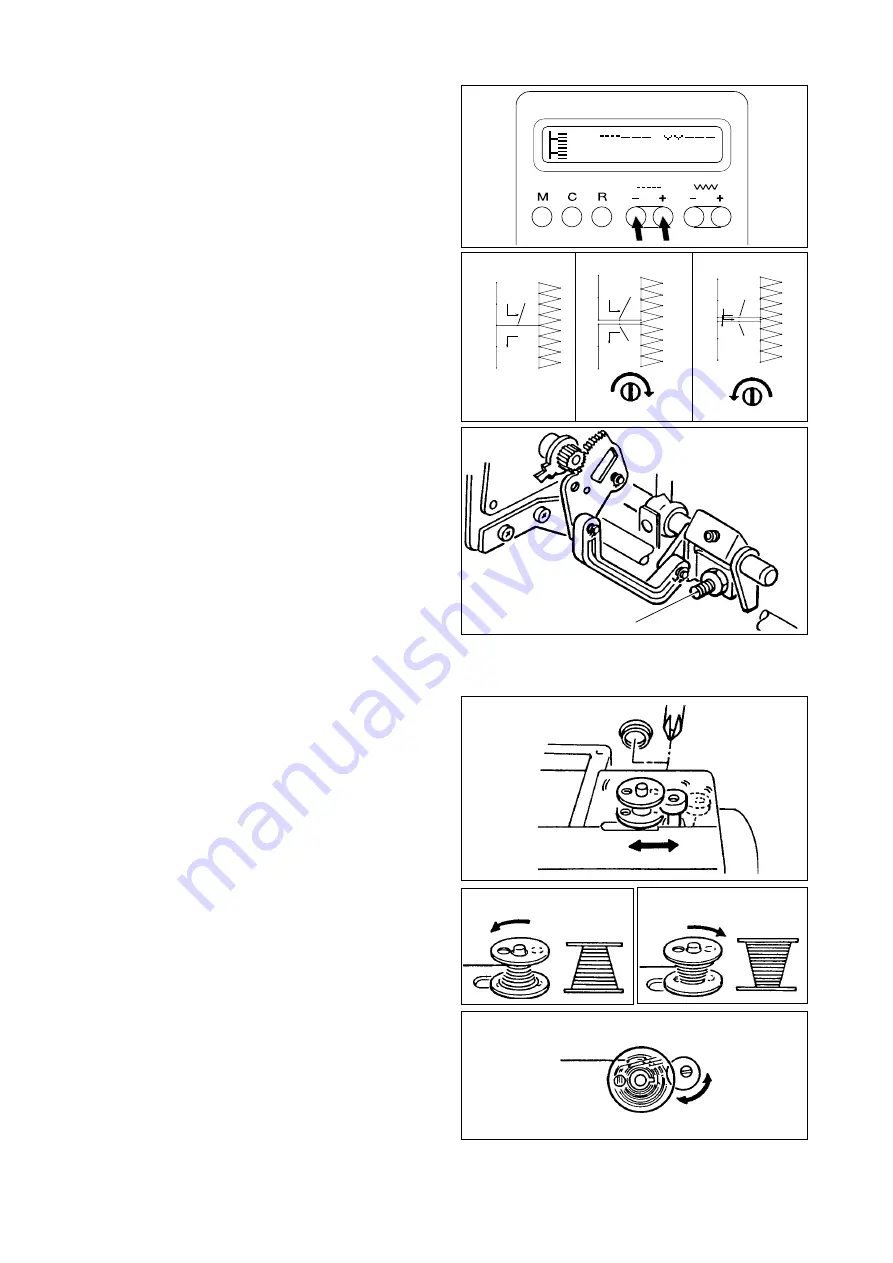
fig. 7-1
fig. 7-2
a
b
c
fig. 7-3
d
fig. 8-1
fig. 8-2
fig. 8-3
fig. 8-4
A,B
A
B
A
B
- 10 -
7. ADJUSTING THE FORWARD
AND REVERSE STITCH
When stretch stitch sewing, the lengths of the forward and
reverse stitches should be the same. check as follows:
1. Set the forward-reverse adjusting knob to the center “-”
mark.
2. Turn on the power switch with pressing the both of
stitch legth button (+ & -).
Machine will select the pattern to check the stretch
stitch. (fig. 7-1)
Attach the regular foot and set a sheet of paper under
the foot. Set the speed control button to maximum.
Start the machine and check the hole on the paper.
If the hole (A) and (B) are not at one, adjust as follows.
(fig. 7-2)
3. Tilt the machine backward and remove the base.
4. The forward-reverse sitich length is adjusted by turning
the screw (d). (fig. 7-3)
- If the forward stitch is finer than the reverse stitch,
turn the screw to the right. (fig.7-2-b)
- If the reverse stitch is finer than the forward stitch,
turn the screw to the left. (fig. 7-2-c)
NOTE: Do not loosen the nut out of the screw.
8. BOBBIN WINDER
If bobbin winds unevenly, adjust as follows:
1. Remove the cap on backside of arm.
2. Loosen (not remove) the screw which is holding the
bobbin winder. (fig. 8-1)
- If bobbin winds as shown on fig. 8-2, tilt the bobbin
winder slightly to the left.
- If bobbin winds as shown on fig. 8-3, tilt the bobbin
winder slightly to the right.
3. Tighten the screw securely and re-set the cap.
If the bobbin thread is wound too little or too much, adjust
as follows.
4. Loosen the center screw of bobbin winder stop. (fig. 8-
4)
- If the bobbin thread is wound too little, turn the bobbin
winder stop slightly counter-clockwise.
- If the bobbin thread is wound too much, turn the
bobbin winder stop slightly clockwise.
5. Tighten the screw.


