


KEY FUNCTIONS
39
Em
br
oi
d
er
y St
ep
b
y S
te
p
1
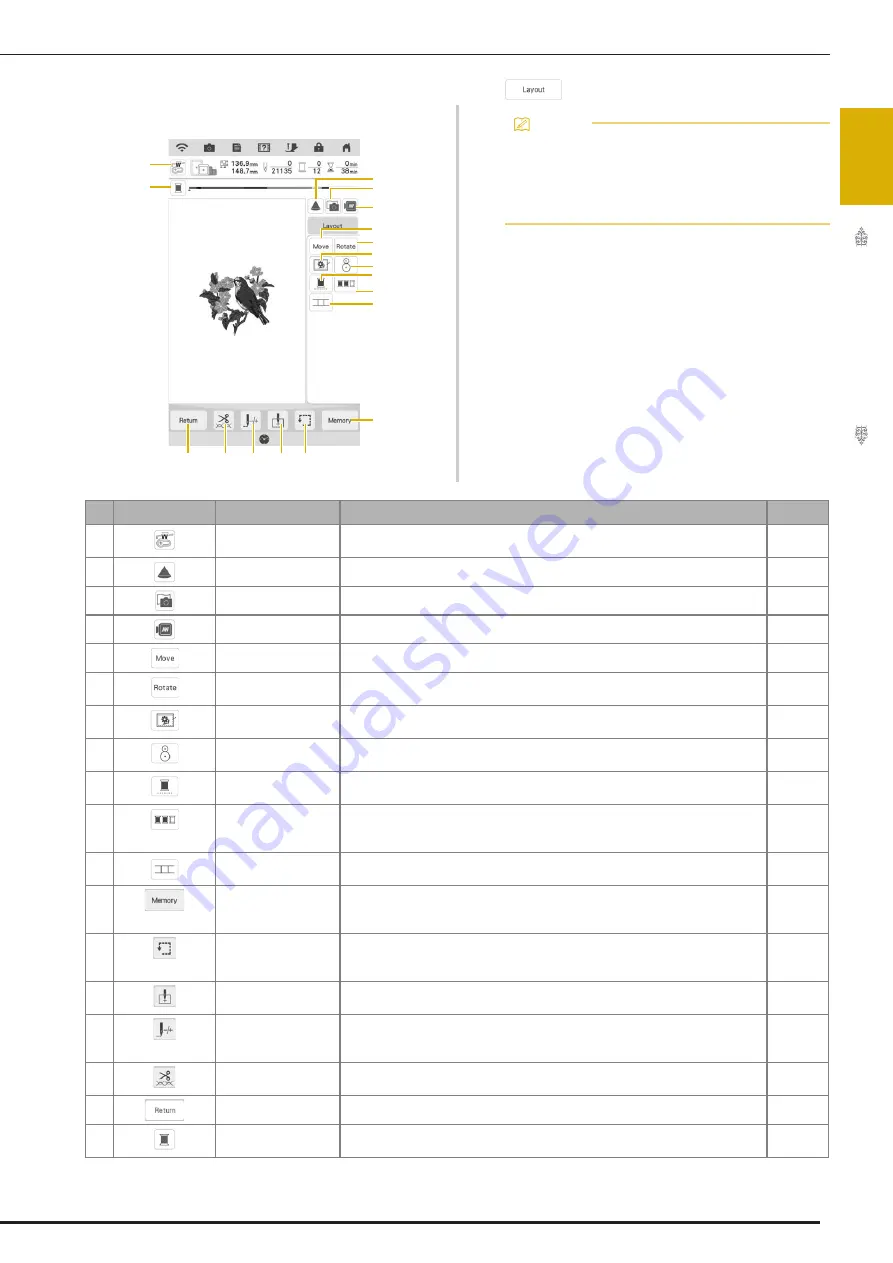
Using these keys, you can move or rotate pattern, etc. Touch
to display the editing window.
e
b
f
l
r
m
n
p
o
d
c
g
h
i
j
k
a
q
Memo
• Some operations or functions are not
available for certain patterns. If the key
appears in light gray, you cannot use that
function or operation with the selected
pattern.
No.
Display
Key Name
Explanation
Page
a
Needle point check
key
Touch this key to check the needle drop point with the projector.
43
b
Projector key
Touch this key to use the projector to project the pattern.
42
c
Fabric scan key
Touch this key to scan the fabric to align the embroidery position.
86
d
Image key
Touch this key for a preview of the embroidered image.
58
e
Move key
Touch this key to display the pattern moving window.
59
f
Rotate key
Touch this key to rotate the pattern. You can rotate a pattern 0.1 degree, 1
degree, 10 degrees or 90 degrees at a time.
59
g
Basting key
Touch this key to add the basting stitch to the pattern. You can set the desired
basting distance.
90
h
Embroidery
positioning key
Touch this key to align the embroidering position using the built-in camera and
embroidery positioning sticker.
45
i
Uninterrupted
embroidery key
Touch this key to embroider the selected pattern with a single color
(monochrome).
86
j
Color sorting key
Touch this key to reduce the number of thread color changes by rearranging
the embroidering order for the selected pattern to combine parts of the same
thread color.
79
k
Pattern connect key
Touch this key to start pattern connecting embroidering. You can connect the
patterns accurately using the built-in camera.
140
l
Memory key
Touch this key to save a pattern in the machine’s memory, USB media or an SD
card. The pattern can also be transferred to a computer via a wireless network
connection.
101
m
Trial key
Touch this key to check the position of the pattern.The carriage moves to the
desired position so you can check that there is enough space to embroider the
pattern.
47
n
Starting point key
Touch this key to move the needle start position to align the needle with the
pattern position.
98, 99
o
Forward/Back key
Touch this key to move the needle forward or back in the pattern; useful if the
thread breaks while embroidering or if you want to start again from the
beginning.
53, 54
p
Cut/Tension key
Touch this key to specify automatic thread cutting, thread trimming or the
thread tension.
92 - 93,
95, 96
q
Return key
Touch this key to return to the previous screen.
—
r
Progress bar
switching key
Touch this key to switch the progress bar (which shows the embroidering
progress) between showing only one color or all colors.
—
Summary of Contents for Solaris VISION BLSA3
Page 1: ......
Page 2: ......
Page 6: ...CONTENTS 4 ...
Page 7: ...Chapter 1 Embroidery Step by Step ...
Page 59: ...Chapter 2 Basic Editing ...
Page 87: ...Chapter 3 Advanced Editing ...
Page 150: ...USING THE CAMERA TO CONNECT PATTERNS 148 ...
Page 151: ...Chapter 4 IQ Designer ...
Page 192: ...IQ INTUITION POSITIONING APP 190 ...
Page 193: ...Chapter 5 Appendix ...
Page 204: ...English 882 W34 Version 0 ...


