SEWING THE STITCHES
S-64
e
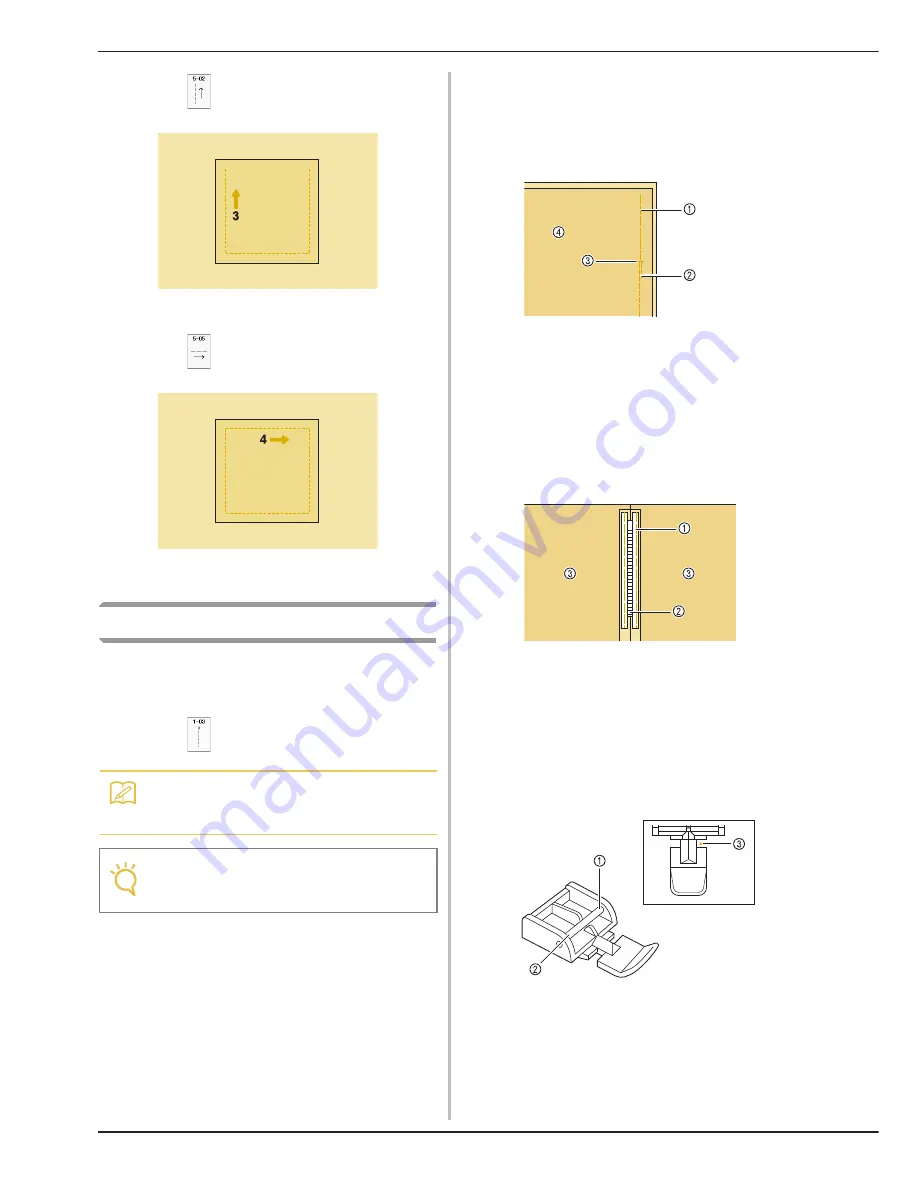
Select
and sew seam “3” as shown.
→
The fabric feeds forward while stitching backward.
f
Select
and sew seam “4” as shown.
→
The seam will be connected to the starting point of
seam 1.
Zipper Insertion
■
Centered Zipper
Use for bags and other such applications.
a
Select .
b
Attach presser foot “J” and sew straight
stitches up to the zipper opening. Change to
a basting stitch (see page S-28) and sew to
the top of the fabric.
a
Basting stitches
b
Reverse stitches
c
End of zipper opening
d
Wrong side
c
Press the seam allowance open and attach
the zipper with a basting stitch in the
middle of each side of the zipper tape.
a
Basting stitches
b
Zipper
c
Wrong side
d
Remove presser foot “J”. Align the right
side of the pin in zipper foot “I” with the
presser foot holder, and attach the zipper
foot.
a
Right
b
Left
c
Needle drop position
Memo
• For details on each stitch, refer to the
“STITCH SETTING CHART” on page S-68.
Note
• Make sure you sew using the middle needle
position.
Summary of Contents for Urity BLTY
Page 1: ......
Page 109: ...USEFUL FUNCTIONS Sewing Basics Sewing S 19 S 1...
Page 193: ...USING THE MEMORY FUNCTION Character Decorative Stitches Sewing S 103 S 3...
Page 206: ...TROUBLESHOOTING S 116...
Page 224: ...ATTACHING THE EMBROIDERY FRAME E 18 b Pull the embroidery frame toward you...
Page 304: ...TROUBLESHOOTING E 98...
Page 331: ......
Page 332: ...English 882 C41 Printed in Taiwan XF3648 001...


