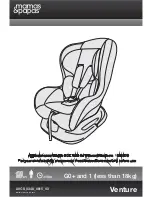


Important! Keep for future reference Suitable for children from birth to
approximately 9-12 months 13kg(29LBS).
1.This is a”Universail” child restraint; it is approved to E24 Regulation R44 for general use in
vehicles and will fit iost, but not all vehicle seats.
2.Acorrect fit is likely if the vehicle manufacturer has declared in the vehicle handbook that the
vehicle is capable of accepting a “Universal” hild restraint for this group.
3.This child restraint has been declared “Universal” under more stringent conditions
than those applied to earlier designs which do not carry this notice.
4.If in doubt, consult either the child restraint manufacturer or the retailer.
Only suitable if the vehicle is fitted with 3-point static,3-point retractor safety belts,
approved to E24 Regulation or other equivalent standards.
WARNING!
DO NOT place rear-facing child seat on front seats with airbags.
Please read this instruction carefully before using baby car seat for first time.
You risk endangering your child’s life if you use the product incorrectly.
The baby car seat is suitable for weight categories 0+, (Not older than approx. 12 months).
A.Grupo 0+: Birth - 13 kg
DO NOT place this baby seat on seats with front airbags.
Only suitable if the vehicle is fitted with 3-point static, 3-point retractor safety belts,
approved toE24 Regulation or other equivalent standards.
a:DIAGONAL BELT b:LAP BELT
Please invest a few minutes in your child’s safety to read these instructions,
Many injuries, which are easily avoidable, are caused by carelessness and incorrect use.
● The instructions can be retained with baby car seat for its life period in the case of built-in restraints.
● DO NOT place this baby seat on seats with front airbags.
● The baby car seat must be instralled rearwards facing
(in the direction pooosite the one in which you are traveling).
● This baby carseat can only be installed using a 3-point vehicle belt.
● Before each journey check whether the baby car seat is instralled firmly.
● DO NOT changethe the baby seat in any way.
● DO NOT leave your baby unattended in the seat at any time.
● Never use theseat as shopping bag or as a means for transporting something.
● Protect the baby seats ystem against direct sun light otherwise the high teemperature will hurt your child.
● Ensure that all parts are locked in place correctly and not trapped in the adjustable seats or door.
● Luggage or otherobjects liable to cause injuries in the event of a collision should br properly secured.
● The baby seat must not be used without the seat cover.
● The seat cover should not be raplacedewith any other than the one recommended by the manufacturer.
● Periodically inspect the harness, pay particular attention to attachment points,
stitching and adjusting devices. Check forewear and tear or demage.
● Do not continue to use the baby seat if parts have become damaged or have loosened after an accident.
● The handle of the baby seat has to reat against the back of the vehicle seat.
If necessary, adjust the head rest of the vehicle seat.
● When you drive without ababy in the baby seat, always secure the system with the adult belt.
● Do not use any load bearing contact points other than those described in the instructions
and marked in the baby seat.
● We recommend using the baby seat on the back seat of the car.
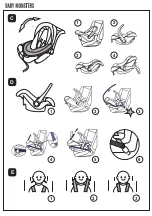
B.Parts and interior epuipment
a:Harness b:Buckle
c:Handle d:Shell e:Shoulder belt slot
f:Handle release g:Chest pad h:Lap belt guide
i:Harness adjuster lever j:Harness adjuster strap
k:Digonal belt guide l:Shoulder belt slot
C.General use
-The handle for the babyseat can be placed into 4 positions.
-To adjust the handke, please press the red button og handle on oth side at the same time.
-Now it can be rotated,
1.Installed in the car.
This position(only this position) is suitable for the baby car seat instralled on the vehicle seat.
2.Upright for carrying.
3.Handle positioned back to intitate the rocking feature.
4.Handle positioned fully down for a more upright sitting position.
WARNING:
Always ensure that the baby is secured correctly in the harness.
Always ensure that the handle is locked correctly in position.
D.Securing the infant carrier
-Please red the operating handbook in your vehicle to inform yourself about the basics concerning
children’s seats in vehicles.
-DO NOT place this baby seat on seats with front airbags.
-This baby car sezt can only be installed using a 3-pointcehicle belt.
-The baby car seat must be installed reawards facing
(in the direction opposite the one in which you are traveling).
1.Adjust the handle to the forward position.
2.Place the infant carrier in the seat of car. Ensure handle is in upright position.
3.Slide the lap belt of the vehicle’s 3-point seatbelt through both Lap belt guides.
Let the tongue plate snap in the belt lock with aclearly audible “ click. Pill the shoulder belt in narrow
direction to tighten the lap belt. Check to make sure the tongue plate is looked by pulling on the belt.
4.Place the diagonal belt in the digonal belt guide at the back of the seat.
5.Tighten the vehicle’s own 3-poiny seatbelt by pulling hard on the positions showed in Fig 4 and Fig 5.
To release your baby car seat following the aboves instructions in reverse order.
Make sure all th belts’ position is right and they has not become twisted.
Also check that the cover is not impeding the movement or fit of the belt webbing in any way.
6.The satisfactory position of adult safety-belt buckle relative to the child car seat is as the Fig 6.
You can contact the child car seat manufacturer if in doubt about this point.
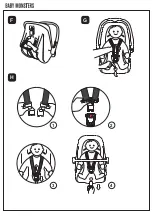
E.Securing your baby
Adjusting the shoulder belt height
● Check whether the shoulder belts are set at the right height for your child.
The shoulder belts should be fed into the belt slots that lie at shoulder height or just above.
1.NO -Too low 2.NO -Too high 3.YES-Corect
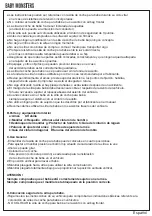
F.If the height of your shoulder belts do not fit your child,
then adjust the height of the shoulder helts as follows.
1.Loosen the shoulder harness(G).
2.Pull out the buckle tongues from the chest pad and the slots on the cover and the shell,
then thread them unto the corresponding belt slodts.
● Ensure that both of the shoulder belt go throught slots at the same height,and not twised.
G.Loosening the shoulder straps
●Te shoulder straps is slack ened by pressing the lever (under the seat coner) on the front of the seat.
● Press down on the label marked ”Press” as you grip the two shoulder straps with your other hand.
Pull the shoulder straps towards you to loosen it.
H.Securing the baby with the harness
Warning:Your child must be fastened in the safety harness at all times
when using the infant carrier.
Firstly, adjust the shoulder straps height(F), proceed as follows:
● Loosen the harness(G), openthe buckle, and place them down sideways.
● Put the two metal sections ofthe buckle connectors together (1).
Slot the buckle connoctors into theslot the top of the buckle until they “click”into place.
Check the harness is correctly locked bu pulling the shoulder straps upwards(3).
● Pull the shoulder straps upwards to remove the whole harness then pull the adjuster strap
until the harness is fully tightened(4).
The harness should be adjucted as tightly as possible withoyt causing discomfort to your child.
To release the harness (E), press the red button on thebuckle downnwards.
I.Fitting infant carrier to pushcsair foruese as travel systrm
Engage the buckle
-Fit car seat adaptors to pushichair.Attach the infant carrier to the adaptors on the chassis
and push down to lock until the“click” isheard.
Caution! ever try to attach the infant carrier to the pushchair in a forward-facing position.
-Plaese ensure that the eseat until is securely attached to the pushchair before use.
To remove infant carrier from pushchair
-PushT the buttomns iewards on each side,
releaes frm the fixantion slots and lift the infrant carrier firom the frame.
Caution!K eep a firm grip on the infant carrier at tines while removing from pushchair.
The chid car seat must be replaced whin it has been subject to violent sresses in accident.
● To remove cover,first loosen the shoulder straps (F) ,
then open the buckle (G).
● Then pull out the harness from the seat.
● Loosen the elestic, you can remove the cover from the shell
Use only neatral detergent and warm water to wash
Do not wash by machine, Spin-dry or tumble-dry are not recommended.
Manuale di istruzioni
Idoneità
Istruzioni di sicurezza
Importante! Conservare per future consultazioni
Concepito per bambini dalla nascita fino a circa 9-12 mesi e 13 kg
1.Questo è un dispositivo di ritenuta per bambini “universale”, approvato dalla Normativa E24 e
R44 per l’utilizzo generale sui veicoli e si adatta alla maggioranza,
sebbene non alla totalità, dei sedili di veicoli.
2.Per una corretta installazione, il fabbricante del veicolo deve avere dichiarato
nel manuale che il veicolo è compatibile con un dispositivo di ritenuta
per bambini universale per questo gruppo.
3.Questo dispositivo di ritenuta è stato dichiarato “universale” in base a delle condizioni più ampie
rispetto a quelle applicate per i modelli precedenti, i quali non riportano questo avviso.
4.In caso di dubbio, consultare il fabbricante o il punto vendita in merito ai dettagli
del dispositivo di ritenuta per bambini.
Questo dispositivo è adeguato soltanto se il veicolo è dotato di cinture di sicurezza statiche a 3 punti e 3
punti di tipo retrattile, approvate dalla normativa E24 o da altra normativa equivalente.
AVVERTENZA
Non collocare il seggiolino auto in direzione opposta al senso di marcia su
un sedile anteriore dotato di airbag.
La preghiamo di leggere questo manuale con attenzione prima di utilizzare il seggiolino auto per
neonati per la prima volta. L’utilizzo incorretto del prodotto potrebbe mettere in pericolo la vita del
suo bambino.
Il seggiolino auto per neonati è adeguato al peso della categoria 0+
(non per bambini di età maggiore ai 12 mesi circa).
A.Gruppo 0+: dalla nascita fino ai 13 kg
NON POSIZIONARE questo seggiolino auto per neonati su sedili dotati di airbag frontale.
Questo dispositivo è adeguato soltanto se il veicolo è dotato di cinture di sicurezza
statiche a 3 punti e 3 punti di tipo retrattile,
approvate dalla normativa E24 o da altra normativa equivalente.
a:Cintura diagonale b:Cintura subaddominale
La invitiamo a investire alcuni minuti del suo tempo nella lettura di queste istruzioni
per la sicurezza del suo bambino. Molte lesioni, facilmente evitabili, sono causate da un uso
negligente o incorretto.
● Le istruzioni possono essere conservate insieme al seggiolino auto per neonati durante
il suo ciclo vitale nel caso di sistemi di ritenuta incorporati.
● Non collocare questo seggiolino su un sedile con airbag frontale.
● Il seggiolino auto per neonati deve essere installato in direzione opposta al senso di marcia.
● Questo seggiolino può essere collocato utilizzando esclusivamente la cintura di sicurezza a 3 punti.
● Prima di ogni viaggio verificare che il seggiolino sia ben ancorato al sedile.
● Non apportare alcuna modifica al seggiolino auto per nessun motivo.
● Non lasciare mai il bambino da solo sul seggiolino.
● Non usare il seggiolino come borsa per la spesa o come mezzo per trasportare oggetti.
● Proteggere il seggiolino dalla luce diretta del sole,
le alte temperature potrebbero arrecare danno al bambino.
● Assicurarsi che tutti i componenti siano assemblati correttamente e che nessuno
di essi resti incastrato nei sedili o nelle portiere.
● Bagagli o altri oggetti che possono provocare lesioni in caso
di incidente devono essere riposti correttamente.
● Il seggiolino auto per neonati può essere utilizzato senza la sua fodera.
● La fodera del seggiolino non deve essere sostituita con un’altra che non sia raccomandata dal fabbricante.
● Controllare periodicamente le cinture, prestando attenzione ai punti di ancoraggio,
fibbie e dispositivi di regolazione. Verificare la presenza di usura o rottura.
● Non utilizzare il seggiolino se presenta degli elementi danneggiati o mancanti in seguito a un incidente.
● Il manico del seggiolino auto per neonati deve poggiare sulla spalliera del sedile del veicolo.
Se necessario, regolare il poggiatesta del sedile.
● Durante la guida, anche in assenza del bambino,
il seggiolino auto deve essere sempre assicurato con la cintura di sicurezza.
● Non utilizzare punti di ancoraggio diversi da quelli indicati dal fabbricante nel manuale.
● Si raccomanda di utilizzare il seggiolino auto per neonati sul sedile posteriore del veicolo.
B.Elementi e componenti interni
a:Imbracatura b:Fibbia
c:Maniglione d:Spalliera e:Fessura della cintura delle spalle
f:Sistema di sblocco del maniglione g:Protettore delle spalle
h:Guida della cintura subaddominale
i:Leva di regolazione dell’imbracatura j:Cinghia di regolazione dell’imbracatura
k:Guida della cintura diagonale l:Fessure della cintura delle spalle
C.Uso generale
-Il maniglione del seggiolino auto per neonati può essere regolato in quattro posizioni.
-Per regolare il maniglione premere contemporaneamente i pulsanti rossi situati su
entrambi i lati del seggiolino. Adesso è possibile farlo ruotare.
1.Installato in auto.
Questa posizione (solo questa) è adatta all’installazione del seggiolino sul veicolo.
2.In posizione verticale per trasportare il bambino.
3.Maniglione rivolto verso dietro per utilizzare il seggiolino come dondolo.
4. Maniglione rivolto interamente verso il basso per permettere la posizione verticale da seduti.
ATTENZIONE:
Verificare sempre di aver allacciato correttamente l’imbracatura sul bambino.
Verificare sempre che il maniglione sia bloccato nella posizione corretta.
D.Installazione sicura del seggiolino auto per neonati
-La invitiamo a leggere le istruzioni del suo veicolo per verificare le indicazioni di base relative
all’installazione di seggiolini auto per neonati su di essi.
-NON COLLOCARE il seggiolino auto per neonati su un sedile dotato di airbag frontale.
-Questo seggiolino può essere installato utilizzando esclusivamente la cintura di sicurezza a 3 punti.
-Il seggiolino auto per neonati deve essere installato in direzione opposta a quella del conducente.
1.Regolare il maniglione nella seguente posizione.
2. Collocare il seggiolino sul sedile dell’automobile. Assicurarsi che il maniglione sia in posizione sollevata.
3.Far passare la cintura subaddominale a 3 punti dell’auto attraverso le due guide.
Inserire la linguetta metallica nella fibbia fino a udire un “clic”.
Tirare la cintura verso le spalle per regolarla. Verificare la chiusura tirando la cintura.
4. Fa passare la cintura diagonale attraverso l’apposita guida nella parte posteriore del seggiolino.
5.Tendere bene la cintura a 3 punti per far sì che il seggiolino sia ben fermo,
come indicato in Fig. 4 e Fig.5 Per rimuovere il seggiolino eseguire queste istruzioni in ordine inverso.
Verificare che tutte le cinture siano posizionate correttamente e che non si siano attorcigliate.
Verificare inoltre che la fodera non impedisca il movimento o la regolazione della cintura.
6.La posizione adeguata della fibbia della cintura di sicurezza per adulti nel seggiolino corrisponde
a quella illustrata nella Fig. 6.
E.Collocazione sicura del bambino
Regolare l’altezza della cintura delle spalle
● Verificare che la cintura delle spalle si trovi a un’altezza adeguata per il bambino. Le cinture delle spalle
devono passare attraverso la fessura che si trova all’altezza delle spalle o appena sopra.
1.NO - troppo basso 2.NO - troppo alto 3.SÌ - corrett
F.Se l’altezza della cintura delle spalle non è adatta al bambino,
è possibile regolarla seguendo le seguenti indicazioni.
1. Rilasciare le cinture delle spalle(G).
2.Rimuovere le linguette della fibbia delle cinture delle spalle facendole uscire dalle fessure presenti nella
fodera e nella spalliera del seggiolino e reinserirle nelle fessure disposte all’altezza corretta.
● Verificare che le due cinture delle spalle passino attraverso le fessure alla stessa altezza
e che non si attorciglino.
G.Slacciare le cinture delle spalle
● Le cinture delle spalle possono essere slacciate premendo la leva (sotto la fodera)
nella parte frontale del seggiolino.
● Premere l’etichetta che riporta la scritta “Press” e tenere con l’altra mano le due cinture delle spalle.
Tirare le due cinture verso avanti fino a liberarle.
H.Imbracare il bambino.
AVVERTENZA: Il bambino deve indossare l’imbracatura ben salda per tutto il tempo
in cui si trova sul seggiolino auto.
Per prima cosa, regolare l’altezza delle cinture delle spalle (F) e continuare nel seguente modo:
● Slacciare l’imbracatura (G), aprire la fibbia e collocare le cinture ai lati.
Collocare il bambino sul seggiolino auto per neonati. Far passare le cinture sopra le spalle.
● Unire le due parti metalliche dei connettori della fibbia (1), inserirli nella parte superiore della fibbia
fino a udire un “clic” (2). Assicurarsi che le cinture sia ben allacciate tirandole verso l’alto ( 3).
● Tirare le cinghie delle spalle verso l’alto per rimuovere la parte in eccesso e tirare il nastro
di regolazione fino a che l’imbracatura non sia ben stretta. L’imbracatura deve essere più stretta
possibile ma senza arrecare fastidio al bambino.
Per slacciare l’imbracatura (E), premere il pulsante rosso sulla fibbia verso il basso.
I.Montaggio del seggiolino auto per neonati nel telaio come sistema di viaggio
Inserire il freno
-Collocare gli adattatori del seggiolino sul telaio.
-Inserire il seggiolino negli adattatori sul telaio fino a udire un “clic”.
ATTENZIONE! Non installare mai il seggiolino auto per neonati nel senso di marcia.
-La preghiamo si verificare che il seggiolino sia installato correttamente prima dell’utilizzo.
Rimuovere il seggiolino auto per neonati dal telaio
-Premere i pulsanti su entrambi i lati del telaio verso la parte interna,
rimuovere dalle fessure di ancoraggio, quindi rimuovere dal telaio.
ATTENZIONE! Prestare la massima attenzione al seggiolino durante tutto il processo di rimozione
dal telaio.
● Il seggiolino auto per neonati deve essere sostituito se è stato sottoposto a urti violenti
in seguito a un incidente.
● Per rimuovere la fodera, anzitutto slacciare le cinture delle spalle (F), quindi aprire la fibbia (G).
● Rimuovere l’imbracatura dal seggiolino.
● Liberare gli elastici, quindi rimuovere la fodera dal corpo del seggiolino.
● Utilizzare solo detergenti naturali e acqua tiepida per la pulizia.
● Non lavare in lavatrice, si sconsiglia l’utilizzo di centrifuga e asciugatrice.
Italian
Avviso
Summary of Contents for Luna
Page 1: ......
Page 2: ...A B a b a b c d e f g h i j k l...
Page 3: ...C D E cl 1 1 4 1 2 3 5 2 3 6 2 3 4...
Page 4: ...F H G 1 2 3 4...