background image

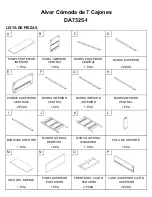
LISTA DE PIEZAS 

Q

R

S

T

U

V

W

X

Y

Z

AA

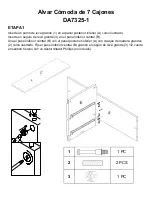
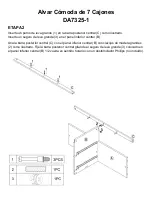
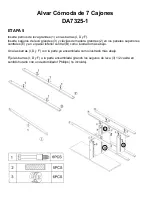
Alvar Cómoda de 7 Cajones

DA7325-1

LADO DERECHO CAJÓN

 SUPERIOR 

FONDO DEL CAJÓN 

PEQUEÑO

LADO POSTERIOR DEL

  CAJÓN PEQUEÑO

FRENTE CAJÓN 

CENTRAL

3 PZAS

2 PZAS

2 PZAS

1 PZA

FONDO CAJÓN

 CENTRAL 

LADO POSTERIOR 

CAJÓN CENTRAL 

FRENTE CAJÓN 

GRANDE 

LADO IZQUIERDO CAJÓN

 GRANDE 

4 PZAS

4 PZAS

4 PZAS

1 PZA

1 PZA

4 PZAS

4 PZAS

LADO DERECHO CAJÓN

 GRANDE 

FONDO CAJÓN

 GRANDE 

LADO POSTERIOR 

CAJÓN GRANDE 

Summary of Contents for DA7325-1

Page 1: ...TURE REFERENCE THIS INSTRUCTION BOOKLET 0 65857 17231 7 INSTRUCTION MANUAL DA7325 1 Walnut Alvar 7 Drawer Dresser DO NOT RETURN PRODUCT TO THE STORE If a part is missing or damaged contact our custome...

Page 2: ...umber color and a detailed description of the part CARE AND CLEANING Assembly will require two people Estimated assembly time 60 minutes To avoid unnecessary damage when levelers have been extended DO...

Page 3: ...1 4 X 25mm 8 X 30mm LARGE CAM LOCK 34 PCS LARGE WOOD DOWEL 37 PCS 1 4 x 35mm LARGE CAM BOLT 34 PCS HANDLE 4 PCS ALLEN KEY 1 PC LARGE BOLT 1 PC SCREW 34 PCS 6 X 20mm SMALL WOOD DOWEL 22 PCS 3 X 15mm SC...

Page 4: ...MIDDLE RAIL TOP RAIL 2 PCS BOTTOM MIDDLE PANEL Alvar 7 Drawer Dresser DA7325 1 1 PC 1 PC 2 PCS 3 PCS TOP PANEL FRONT MIDDLE RAIL FRONT BOTTOM RAIL SUPPORT LEG FRONT MIDDLE RAIL 1 PC LEFT SIDE PANEL 1...

Page 5: ...M LARGE DRAWER BACK 4 PCS 4 PCS 4 PCS MEDIUM DRAWER BOTTOM MEDIUM DRAWER BACK LARGE DRAWER FRONT LARGE DRAWER LEFT SIDE 1 PC 1 PC 4 PCS 4 PCS 3 PCS 2 PCS 2 PCS 1 PC Alvar 7 Drawer Dresser DA7325 1 TOP...

Page 6: ...wn Insert large cam locks 3 into the bottom middle panel B Attach bottom middle panel B to back bottom panel A with large wood dowels 2 as shown Secure the bottom middle panel B by rotating the large...

Page 7: ...wn Insert large cam locks 3 into the bottom middle panel B Attach back middle rail C to the bottom middle panel B with large wood dowel 2 as shown Secure the back middle rail by rotating the large cam...

Page 8: ...rt large cam locks 3 into the top middle panels E Attach top middle panels E to the top rail D with large wood dowels 2 as shown Secure top middle panels E to the top rail D by rotating the large cam...

Page 9: ...iddle panels E Attach top middle panels E to the back middle rail C with large wood dowels 2 as shown Secure top middle panels E to the back middle rail C by rotating the large cam locks 3 on top midd...

Page 10: ...owels 2 into the top middle panels E and bottom middle panel B as shown below Alvar 7 Drawer Dresser DA7325 1 Attach rails I D F to the assembled Secure rails I D F to the assembled unit by rotating t...

Page 11: ...STEP 6 Alvar 7 Drawer Dresser DA7325 1 Insert large cam bolts 1 into front bottom rail G mid bottom rail H as shown...

Page 12: ...d large cam locks 3 into the bottom middle panel B Alvar 7 Drawer Dresser DA7325 1 Attach rails G H to the assembled unit as shown Secure rails G H to the assembled unit by rotating the large cam lock...

Page 13: ...STEP 8 Alvar 7 Drawer Dresser DA7325 1 Insert large cam bolts 1 into the right left side panels J K as shown...

Page 14: ...ge cam locks 3 1 2 turn clockwise using a Phillips head screwdriver not included Alvar 7 Drawer Dresser DA7325 1 Insert large wood dowels 2 and large cam locks 3 into the rails G I H F C and D and bac...

Page 15: ...large wood dowels 2 as shown Use Allen key 5 to tighten the bolts NOTE The support leg L and side frames J K are equipped with adjustable levelers Once assembly is complete and the unit is in the desi...

Page 16: ...STEP 11 Alvar 7 Drawer Dresser DA7325 1 Insert large cam bolts 1 into the top panel M as shown...

Page 17: ...large cam locks 3 into the left side panel K and right side panel J as shown Place top panel M on the assembled unit Secure top panel M to the assembled unit with screw 6 and by rotating large cam loc...

Page 18: ...STEP 13 Alvar 7 Drawer Dresser DA7325 1 Attach back top panel N to the assembled unit with screws 7 as shown Use a Phillips head screwdriver not included to tighten the screws...

Page 19: ...mall wood dowels 9 into the small drawer front O Attach drawer left and right sides P Q to small drawer front O Secure the drawer sides by rotating small cam locks 10 1 2 turn clockwise using a Philli...

Page 20: ...resser DA7325 1 Attach small drawer back S to the top drawer left and right sides P Q with screws 6 Attach knob 12 to the small drawer front O with small small bolts 11 Use a Phillips head screwdriver...

Page 21: ...d dowels 9 into the medium drawer front T Attach top drawer left and right sides P Q to the medium drawer front T Secure the drawer sides by rotating small cam locks 10 1 2 turn clockwise using a Phil...

Page 22: ...ten the screws Alvar 7 Drawer Dresser DA7325 1 Attach medium drawer back V to the top drawer left and right sides P Q with screws 6 Attach knob 12 to the medium drawer front T with small bolt 11 Use a...

Page 23: ...ront W Alvar 7 Drawer Dresser DA7325 1 Attach large drawer left and right sides X Y to the large drawer front W Secure the drawer sides by rotating small cam locks 10 1 2 turn clockwise using a Philli...

Page 24: ...ch handle 13 to drawer front W with small bolts 11 Use a Phillips head screwdriver not included to tighten the bolts Repeat steps 18 and 19 to assemble the other large drawers Attach large drawer back...

Page 25: ...STEP 20 Insert all the drawers into the assembled unit Alvar 7 Drawer Dresser DA7325 1...

Page 26: ...e injury Alvar 7 Drawer Dresser DA7325 1 DO NOT RETURN PRODUCT TO THE STORE If a part is missing or damaged contact our customer service department We will replace the part FREE of charge Tel 1 800 29...

Page 27: ...r Service Fax Number 514 353 7819 Request Date Name Shipping Address Street Number City State Zip Code Day Time Phone Number including area code Date Place of Purchase Part s description and quantity...

Page 28: ...HE FURNITURE USING THE SHORT SCREW D THROUGH THE SMALLER HOLE Step 2 LOCATE THE OTHER MOUNTING BRACKET A ON THE WALL OVER A WALL STUD AND 2 INCHES BELOW THE MOUNTING BRACKET SECURED TO THE BACK OF YOU...

Page 29: ...GO UPC 0 65857 17231 7 NOTA TOMADO DEL CARTON _____________________________________ Fecha de compra _______ _______ _______ NEED HELP CALL US FOR ASSISTANC 1 800 295 1980 DO NOT RETURN PRODUC NO DEVUE...

Page 30: ...e este producto a menos que est espec ficamente dise ado para ese uso Nunca permitir que los ni os trepen sobre los cajones puertas o estantes o se cuelguen de ellos Nunca abrir m s de un caj n a la v...

Page 31: ...PZAS Alvar C moda de 7 Cajones DA7325 1 8 X 30mm 1 4 x 35mm 4 X 25mm PERNO GRANDE 1 PZA LLAVE ALLEN 1 PZA TORNILLO 34 PZAS SEGURO DE LEVA PEQUE O 28 PZAS PERNO PEQUE O 11 PZAS POMO 3 PZAS 3 X 15mm 6...

Page 32: ...1 PZA 1 PZA 1 PZA 2 PZAS PANELE SUPERIORE CENTRALE BARRA INFERIOR CENTRAL BARRA INFERIOR ANTERIOR BARRA INFERIOR CENTRAL 2 PZAS 1 PZA 1 PZA 1 PZA BARRA DE SOPORTE MARCO LATERAL DERECHO MARCO LATERAL I...

Page 33: ...CAJ N PEQUE O LADO POSTERIOR DEL CAJ N PEQUE O FRENTE CAJ N CENTRAL 3 PZAS 2 PZAS 2 PZAS 1 PZA FONDO CAJ N CENTRAL LADO POSTERIOR CAJ N CENTRAL FRENTE CAJ N GRANDE LADO IZQUIERDO CAJ N GRANDE 4 PZAS 4...

Page 34: ...trado Inserte un seguro de leva grande 3 en el panel inferior central B Una el panel inferior central B con el panel posterior inferior A con clavijas de madera grandes 2 como ilustrado Fije el panel...

Page 35: ...de leva grande 3 en el panel inferior central B Una la barra posterior central C con el panel inferior central B con clavijas de madera grandes 2 como ilustrado Fije la barra posterior central girand...

Page 36: ...es superiores centrales E Una los paneles superiores centrales E con la barra superior D con clavijas de madera grandes 2 como ilustrado Fije los paneles superiores centrales E con la barra superior D...

Page 37: ...uperiores centrales E con la barra posterior central C con clavijas de madera grandes 2 como ilustrado Fije los paneles superiores centrales E a la barra posterior central C girando los seguros de lev...

Page 38: ...madera grandes 2 en los paneles superiores centrales E y en el panel inferior central B como ilustrado m s abajo Una las barras I D y F con la parte ya ensamblada como ilustrado m s abajo Fije las ba...

Page 39: ...ETAPA 6 Alvar C moda de 7 Cajones DA7325 1 Inserte pernos de leva grandes 1 en la barra inferior anterior G y en la barra inferior central H como ilustrado...

Page 40: ...vija de madera grande 2 y seguros de leva grandes 3 en el panel inferior central B Una las barras G y H con la parte ensamblada como ilustrado Fije las barras G y H a la parte ensamblada girando los s...

Page 41: ...ETAPA 8 Alvar C moda de 7 Cajones DA7325 1 Inserte pernos de leva grandes 1 en los paneles laterales derecho e izquierdo J y K como ilustrado...

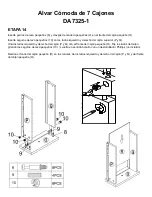
Page 42: ...l panel inferior posterior A como ilustrado Una los paneles laterales derecho e izquierdo J y K con la unidad ensamblada como ilustrado m s abajo Fije los paneles laterales derecho e izquierdo J y K a...

Page 43: ...lustrado Utilice la llave Allen 5 para ajustar los pernos NOTA La pata de soporte L y los paneles laterales J y K est n provistos de niveladores ajustables Una vez que haya completado el ensamblado y...

Page 44: ...ETAPA 11 Alvar C moda de 7 Cajones DA7325 1 Inserte pernos de leva grandes 1 en la tapa del mueble M como ilustrado...

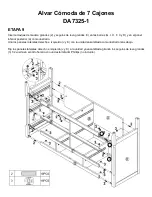
Page 45: ...n el panel lateral izquierdo K y el panel lateral derecho J como ilustrado Coloque la tapa del mueble M sobre la unidad ya ensamblada Fije la tapa del mueble M a la unidad ya ensamblada con tornillos...

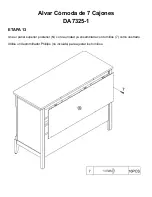
Page 46: ...13 Alvar C moda de 7 Cajones DA7325 1 Una el panel superior posterior N con la unidad ya ensamblada con tornillos 7 como ilustrado Utilice un destornillador Phillips no incluido para ajustar los torn...

Page 47: ...eque as 9 en el frente del caj n peque o O Una los lados izquierdo y derecho del caj n P y Q con el frente del caj n peque o O Fije los lados del caj n girando los seguros de leva peque os 10 vuelta e...

Page 48: ...Una el lado posterior del caj n peque o S con los lados izquierdo y derecho del caj n superior P y Q con tornillos 6 Coloque el pomo 12 en el frente del caj n peque o O con un perno 11 Utilice un des...

Page 49: ...madera peque as 9 en el frente caj n central T Una los lados izquierdo y derecho del caj n P y Q con el frente caj n central T Fije los lados del caj n girando los seguros de leva peque os 10 vuelta e...

Page 50: ...Alvar C moda de 7 Cajones DA7325 1 Una el lado posterior caj n central V con los lados izquierdo y derecho del caj n superior P y Q con tornillos 6 Coloque el pomo 12 en el frente caj n central T con...

Page 51: ...peque as 9 en el frente caj n grande W Una los lados izquierdo y derecho caj n grandes X y Y con el frente caj n grande W Fije los lados del caj n girando los seguros de leva peque os 10 vuelta en se...

Page 52: ...325 1 Una el lado posterior caj n grande AA con los lados izquierdo y derecho caj n grandes X y Y con tornillos 6 Coloque el manija 13 en el frente caj n grande W con un perno 11 Utilice un destornill...

Page 53: ...ETAPA 20 Alvar C moda de 7 Cajones DA7325 1 Coloque todos los cajones en la c moda ya armada como ilustrado...

Page 54: ...dad y causar heridas NO DEVUELVA EL PRODUCTO A LA TIENDA Si falta una pieza o est da ada contacte nuestro departamento de servicio a la clientela Reemplazaremos la pieza SIN cargo Tel 1 800 295 1980 C...

Page 55: ...Descripci n de pieza s y cantidad Por favor aseg rese de incluir n mero de modelo o n mero SKN Servicio a la Clientela POR FAVOR CONTACTE LOS REPRESENTANTES DEL SERVICIO A LA CLIENTELA A LOS SIGUIENTE...

Page 56: ...TAS POR FAVOR LLAME A NUESTRO N MERO DE ATENCI N AL CLIENTE 1 800 295 1980 ETAPA 1 CON EL TORNILLO CORTO D FIJE FIRMEMENTE UN GANCHO DE METAL A A LA BARRA TRANSVERSAL SUPERIOR POSTERIOR DEL MEUBLE A T...

Page 57: ...E CONSERVER POUR R F RENCE ULT RIEURE Num ro de lot SUR LA BO TE _____________________________________ Date d achat NE RETOURNEZ PAS LE PRODUIT AU MAGASIN Si une pi ce est manquante ou endommag e veui...

Page 58: ...d tre con u sp cifiquement pour accommoder ne pas placer de t l viseurs ou d autres objets lourds sur le dessus de ce produit Ne jamais laisser les enfants grimper ou se suspendre aux tiroirs portes o...

Page 59: ...E CAME 34 PCES Alvar Commode 7 Tiroirs DA7325 1 8 X 30mm 1 4 x 35mm 4 X 25mm GRAND BOULON 1 PCE CL ALLEN 1 PCE VIS 34 PCES PETIT VERROUILLAGE CAME 28 PCES PETIT BOULON 11 PCES BOUTON 3 PCES 3 X 15mm 6...

Page 60: ...1 1 PCE 1 PCE 1 PCE 2 PCES PANNEAU SUP RIEUR CENTRAL BARRE CENTRALE AVANT BARRE INF RIEURE AVANT BARRE INF RIEURE CENTRALE 2 PCES 1 PCE 1 PCE 1 PCE BARRE DE SUPPORT CADRE LAT RAL DROIT CADRE LAT RAL...

Page 61: ...OND DU PETIT TIROIR C T ARRI RE DU PETIT TIROIR DEVANT TIROIR CENTRAL 3 PCES 2 PCES 2 PCES 1 PCE FOND TIROIR CENTRAL C T ARRI RE TIROIR CENTRAL DEVANT GRAND TIROIR C T GAUCHE GRAND TIROIR 4 PCES 4 PCE...

Page 62: ...verrouillage came 3 dans le panneau inf rieur central B Attachez le panneau inf rieur central B au panneau inf rieur arri re A avec des grands goujons de bois 2 comme illustr Fixez le panneau inf rieu...

Page 63: ...tournant le grand verrouillage came 3 plac sur le panneau inf rieur central B 1 2 tour dans le sens des aiguilles d une montre l aide d un tournevis cruciforme non compris Alvar Commode 7 Tiroirs DA73...

Page 64: ...ieurs centraux E Attachez les panneaux sup rieurs centraux E la barre sup rieure D avec des grands goujons de bois 2 comme illustr Fixez les panneaux sup rieurs centraux E la barre sup rieure D en tou...

Page 65: ...rieurs centraux E la barre centrale arri re C avec des grands goujons de bois 2 comme illustr Fixez les panneaux sup rieurs centraux E la barre centrale arri re C en tournant les grands verrouillages...

Page 66: ...dans les panneaux sup rieurs centraux E et dans le panneau inf rieur central B comme illustr ci dessous Attachez les barres I D et F la partie d j assembl e comme illustr ci dessous Fixez les barres I...

Page 67: ...TAPE 6 Alvar Commode 7 Tiroirs DA7325 1 Ins rez des grands boulons came 1 dans la barre inf rieure avant G et dans la barre inf rieure centrale H comme illustr...

Page 68: ...et des grands verrouillages came 3 dans le panneau inf rieur central B Attachez les barres G et H l unit assembl e comme illustr Fixez les barres G et H l unit d j assembl e en tournant les grands ver...

Page 69: ...TAPE 8 Alvar Commode 7 Tiroirs DA7325 1 Ins rez des grands boulons came 1 dans les panneaux lat raux droit et gauche J et K comme illustr...

Page 70: ...le panneau inf rieur arri re A comme illustr Attachez les panneaux lat raux droit et gauche J et K l unit d j assembl e comme illustr ci dessous Fixez les panneaux lat raux droit et gauche J et K l un...

Page 71: ...cl Allen 5 pour serrer les boulons NOTE Le pied de support L et les panneaux lat raux J et K sont quip s de niveleurs ajustables Lorsque l assemblage sera compl t et le meuble plac l endroit d sir to...

Page 72: ...TAPE 11 Alvar Commode 7 Tiroirs DA7325 1 Ins rez des grands boulons came 1 dans le dessus du meuble M comme illustr...

Page 73: ...neau lat ral gauche K et dans le panneau lat ral droit J comme illustr Placez le dessus du meuble M sur l unit d j assembl e Fixez le dessus du meuble M l unit assembl e avec des vis 6 et en tournant...

Page 74: ...TAPE 13 Alvar Commode 7 Tiroirs DA7325 1 Attachez le panneau post rieur sup rieur N l unit assembl e avec des vis 7 comme illustr Servez vous d un tournevis cruciforme non compris pour serrer les vis...

Page 75: ...is 9 dans le devant du petit tiroir O Attachez les c t s gauche et droit du tiroir P et Q au devant du petit tiroir O Fixez les c t s du tiroir en tournant les petits verrouillages came 10 1 2 tour da...

Page 76: ...Attachez le c t arri re du petit tiroir S aux c t s gauche et droit du tiroir sup rieur P et Q avec des vis 6 Attachez le bouton 12 au devant du petit tiroir O avec un boulon 11 Servez vous d un tourn...

Page 77: ...is 9 dans le devant tiroir central T Attachez les c t s gauche et droit du tiroir P et Q au devant tiroir central T Fixez les c t s du tiroir en tournant les petits verrouillages came 10 1 2 tour dans...

Page 78: ...lvar Commode 7 Tiroirs DA7325 1 Attachez le c t arri re tiroir central V aux c t s gauche et droit du tiroir sup rieur P et Q avec des vis 6 Attachez le bouton 12 au devant tiroir central T avec un bo...

Page 79: ...dans le devant grand tiroir W Attachez les c t s gauche et droit grand tiroir X et Y au devant grand tiroir W Fixez les c t s du tiroir en tournant les petits verrouillages came 10 1 2 tour dans le s...

Page 80: ...25 1 Attachez le c t arri re grand tiroir AA aux c t s gauche et droit grand tiroir X et Y avec des vis 6 Attachez le poign e 13 au devant grand tiroir W avec un boulon 11 Servez vous d un tournevis c...

Page 81: ...TAPE 20 Alvar Commode 7 Tiroirs DA7325 1 Ins rez tous les tiroirs dans l unit d j assembl e comme illustr...

Page 82: ...l instabilit et causer des blessures NE PAS RETOURNER LE PRODUIT AU MAGASIN Si une pi ce est manquante ou endommag e contactez notre Service la client le Nous remplacerons la pi ce GRATUITEMENT T l 1...

Page 83: ...ince Code Postal No de t l phone jour incluant le code r gional Date Nom du Magasin Description quantit de pi ce s S V P ne pas oublier le num ro de mod le ou de SKU D partement du Service la client l...

Page 84: ...DES QUESTIONS VEUILLEZ APPELER NOTRE NUM RO DE SERVICE AUX CLIENTS 1 800 295 1980 TAPE 1 L AIDE DE LA VIS COURTE D FIXEZ FERMEMENT UN CROCHET DE M TAL A LA BARRE TRANSVERSALE SUP RIEURE POST RIEURE D...

Reviews: