background image

26

27

Re

v 001

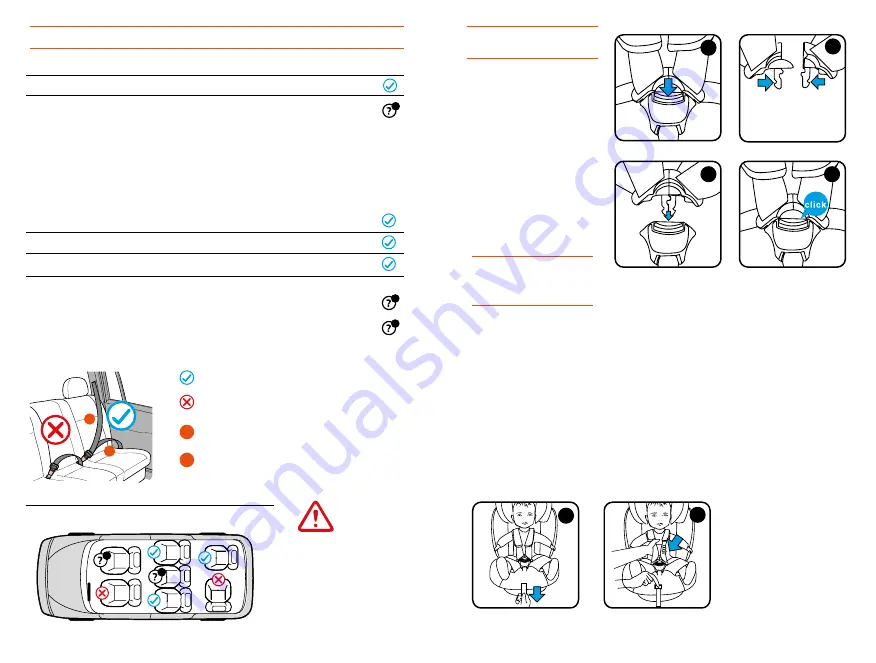
3. USES IN THE VEHICLE

WHERE:

In the vehicle rear seats.

Please, do NOT install the safety seat in forward seats except for the 

following cases:

1.  Whenever the vehicle does not count with rear seats.
2.  When all rear seats are already occupied by children exceeding 135 cm height.
3.  When it is not possible to install all child restraints systems in the rear seats.

1

HOW:

GROUP 0+ • 

Install rearward facing.

GROUP 1 • 

Install forward facing.

GROUP 2/3 • 

Install forward facing.

 (vehicle’s  3 point belt).

Notice

•  DO NOT place rear-facing child seat on front seat with active airbag.

•  The child seat must only be used in this seat IF it has a lap and diagonal 

belt (3 points).

1

2

1

2

3 point belt.

2 point belt.

Diagonal belt 

section.
Abdominal belt 

section.

B

A

B

A

WARNING

Refer to the 

vehicle’s instruction 

manual to install 

the seat in the front 

seat.

4.2 ADJUSTING HARNESS 

Tighten harness

Pull the adjuster strap until the harness lies flat and is close against your child‘s 

body (fig. 5).

Loosen harness

Press the center adjuster and at the same time pull both shoulder belts forwards.

(fig. 6) Do not pull on the shoulder pads

NOTICE:

 Make sure the space between the child and the shoulder harness is about 

the thickness of one hand.

5

6

1

2

3

4

4.   PREPARATORY 

WORKS

4.1 ADJUSTING BUCKLE
Open buckle

Press red button until 

buckle latches come out 

from the buckle (fig. 1).

Lock buckle

Guide the two buckle 

latches together (fig. 2), 

putting them into the 

harness buckle house (fig. 

3). Buckle locked when 

sounds click (fig. 4).

NOTICE:

 buckle can not 

lock only by putting one 

latch.

Summary of Contents for VOLTA 360

Page 1: ...VOLTA 360 MANUAL DE USO INSTRUCTIONS MANUAL MANUAL DE INSTRU ES Apto para Suitable for Adequado para 0 36 kg Grupo Group 1 2 3 0 ST 3...

Page 2: ...NO SENTIDO INVERSO AO DA MARCHA COM O AIRBAG ACTIVO IMPORTANTE Conservar para futuras consultas Procure que las instrucciones puedan conservarse en el sistema de retenci n infantil durante su ciclo v...

Page 3: ...a la normativa europea ECE R44 04 para su utilizaci n general en veh culos equipados con sistemas de anclaje ISOFIX 2 Debe instalarse en veh culos equipados con sistemas homologados de anclaje ISOFIX...

Page 4: ...ni o 12 La silla o accesorios del arn s que est n da ados o hayan sido utilizados incorrectamente deber n ser reemplazados 13 No deje objetos pesados en el interior del coche porque en caso de acciden...

Page 5: ...ent metros 3 Cuando no sea posible instalar en los asientos traseros todos los sistemas de retenci n infantil 1 C MO GRUPO 0 Instalar en sentido contrario a la marcha GRUPO 1 Instalar en sentido a la...

Page 6: ...bezas y reg lelo en funci n de la altura del ni o fig 9 4 4 AJUSTE DE LAS POSICIONES DE RECLINADO Tire hacia arriba de la palanca de reclinado y al mismo tiempo tire de la silla para reclinarla a la p...

Page 7: ...Desinstalar el sistema Isofix Empuje firmemente la silla contra el asiento fig 23 Al mismo tiempo pulse los botones de desbloqueo del sist Isofix y tire de la silla hacia afuera para liberarla fig 24...

Page 8: ...3 puntos del veh culo 1 Abra la hebilla del arn s y retire el coj n reductor fig 41 2 Gui el cintur n a trav s de las gu as inferiores de la silla y conecte el cintur n en su hebilla fig 42 Oir un cl...

Page 9: ...a os aprox NO utilizar la silla en sentido a la marcha hasta que el ni o no supere los 9 kg de peso ATENCI N ATENCI N Una vez completada la instalaci n de la silla si desea cambiar la posici n de recl...

Page 10: ...ix 54 55 56 5 INSTALACI N 7 Siente al ni o en la silla Ajuste el reposacabezas a la altura adecuada para el ni o ver punto 4 3 coloquele el arn s cierre la hebillla ver punto 4 1 y tense el arn s ver...

Page 11: ...tilice productos qu micos o lej a en ninguna parte de la silla 6 LIMPIEZA Y MANTENIMIENTO INSTRUCCIONES DE LAVADO La funda es desmontable y lavable a 30 s lo se debe secar al aire libre Lavar en m qui...

Page 12: ...dards For using as Semi universal category Group 0 NOTICE 1 This is an ISOFIX CHILD RESTRAINT SYSTEM It is approved to Regulation No 44 04 series of amendments for general use in vehicles fitted with...

Page 13: ...10 Never use the child safety seat without its cover and shoulder pads 11 Protect the child safety seat from direct sunlight as the seat can get very hot and harm the child 12 Child seats or accessor...

Page 14: ...point belt 2 point belt Diagonal belt section Abdominal belt section B A B A WARNING Refer to the vehicle s instruction manual to install the seat in the front seat 4 2 ADJUSTING HARNESS Tighten harn...

Page 15: ...d fig 9 4 4 ADJUSTING RECLINE POSITIONS Pull Recline lever at the same time incline seat to intend position fig 10 Adjust to most reclined position when installed rearward facing CAUTION 4 PREPARATORY...

Page 16: ...y green fig 27 4 8 REMOVE AND INSTALL HARNESS 4 PREPARATORY WORKS 4 6 2 Remove ISOFIX Push the child seat towards the backrest applying firm fig 23 At the same time squeeze ISOFIX button and pull back...

Page 17: ...the buckle latches are engaged in the harness buckle 5 1 2 Install use 3 point belt 1 Open buckle then remove infant cushion fig 41 2 Guide vehicle lap belt through both lower belt guides engage the b...

Page 18: ...D FACING 9 18kg from 9 months to 3 years approx DO NOT use forward facing before the child s weight exceeds 9 kg IMPORTANT WARNING once the car seat is installed if another recline position is selecte...

Page 19: ...eat Adjust headrest in proper height see section 4 3 adjust harness and lock buckle see section 4 1 and tighten harness see section 4 2 fig 54 FOR THE SAFETY OF YOUR CHILD BEFORE EVERY JOURNEY IN THE...

Page 20: ...ckle or metal pieces 3 Do not use chemical products or bleach on any part of the child seat 6 CARE AND MAINTENANCE WASHING INSTRUCTIONS The cover can be removed and washed at 30 C It should only be ai...

Page 21: ...universal Grupo 0 AVISO 1 Este sistema um SISTEMA DE RETEN O PARA CRIAN AS ISOFIX Foi homologado ao abrigo do Regulamento n o 44 04 para utiliza o em ve culos com ncora ISOFIX 2 Ele deve ser instalad...

Page 22: ...ess rios do arn s que estejam danificados ou que tenham sido utilizados de forma incorreta devem ser substitu dos 13 N o deixe objetos pesados dentro do carro porque podem magoar a crian a em caso de...

Page 23: ...e cinto de seguran a de 3 pontos 1 2 1 2 Cinto de 3 pontos Cinto de 2 pontos Se o diagonal do cinto Se o abdominal do cinto B A B A ATEN O Consulte o manual de instru es do ve culo para instalar a cad...

Page 24: ...rian a fig 9 4 4 AJUSTE DAS POSI ES DA RECLINA AO Puxe a alavanca para a frente e ajuste e recline a cadeira at posi o desejada sem soltar a alavanca fig 10 Quando coloque a cadeira de seguran a virad...

Page 25: ...9 22 21 4 7 AJUSTE DO TOP TETHER 1 Pegue noTopTethere pressione o reguladordoTopTetherpara esticara correia fig 25 27 25 26 2 Encaixe o mosquet o de seguran a no ponto de fixa o do Top Tether recomend...

Page 26: ...ntos ISOFIX do ve culo consulte a se o 4 6 fig 38 2 Guie as correias do top tether pelos dois lados da cadeira e encaixe o mosquet o de seguran a no ponto de fixa o do Top Tether recomendado no manual...

Page 27: ...os 3 anos aprox N O use a cadeira na dire o da viagem at que a crian a n o ultrapasse 9 kg ATEN O ATEN O Uma vez que a instala o da cadeira foi conclu da se voc deseja mudar a posi o de reclina o voc...

Page 28: ...to de 3 pontos do ve culo na instala o 4 Sente a crian a na cadeira Ajuste a altura do apoio para a cabe a ponto 4 3 Pegue ocinto do ve culo e passe o pela frente da crian a at fivela do cinto do ve c...

Page 29: ...e lav vel a 30 e s deve secar ao ar livre Lavar na m quina a frio N o utilizar lixivia Limpar a seco com qualquer dissolvente exceto tricloroetileno N o utilizar secador N o passar a ferro 30 C Se tiv...

Page 30: ...Rev 001...

Page 31: ...BYAUTO GROUP Parque Empresarial Zuatzu Edificio Donosti 2 planta Oficina 3 20018 San Sebasti n Gipuzkoa Spain t 34 943 833 013 f 34 943 833 004 e info babyauto com babyauto com GR 0 I II III 0 36 kg E...

Reviews: