background image

22

B A B Y B E E   R O V E R 3

P O D   P R O D U C T   M A N U A L

WA R R A N T Y   I N F O R M A T I O N

Your POD bedside sleeper comes 
with a 2 year defects warranty to 
cover against faults in materials 
and workmanship when your 
bedside sleeper is used under 
normal conditions, according to 
our user manuals and technical 
specifications.

The benefits under our warranty 
are in addition to other rights 
& remedies under the law in 
relation to consumer goods: Our 
goods come with guarantees 
that cannot be excluded under 
Consumer Law in the country of 
purchase. You are entitled to a 
replacement or refund for a major 
failure and for compensation for 
any other reasonably foreseeable 
loss or damage. You are also 
entitled to have the goods repaired 
or replaced if the goods fail to be 
of acceptable quality and  
the failure does not amount  
to a major failure.

The warranty period starts from 
the date that your bedside 
sleeper is dispatched from our 
warehouse and is valid in the 
country of purchase only.

To make a claim email us at:  

au.support@babybeeonline.com  

or 

nz.support@babybeeonline.com

Babybee reserves the right to repair, 
exchange or replace the damaged 
item with a replacement part. 

The warranty is not valid in the 
following cases: 

•  Defects or faults resulting from 

improper assembly, care, or use  
as outlined in our user manual.

•  Defects or faults resulting from 

an accident, airline or transport 
damage.

•  Normal wear and tear, including  

scratches to the frame or colour  
fading of the fabrics.

•  Corrosion, mould or rust due to 

extreme environmental conditions, 
including high humidity, or due  
to lack of regular maintenance.

•  Products that are purchased 

secondhand or from an 
unauthorised distributor.

•  Using a part or accessory that is 

not approved for use by Babybee.

•  Claims from anyone other than 

the original  purchaser (i.e. no 
longer valid if gifted or sold to 
another individual). 

•  Damage resulting from extreme 

heat conditions (i.e leaving in car 
on hot days).

Summary of Contents for pod

Page 1: ...ned and tested to comply with ASTM F2906 13 2019 ASTM F2194 16e1 EN 1130 2019 AS NZS 8811 1 2013 EN 16890 2017 A1 2021 IMPORTANT READ CAREFULLY AND KEEP FOR FUTURE REFERENCE P R O D U C T M A N U A L...

Page 2: ...t Bedside sleeper and bed height set up Bedside sleeper function fix to bed Using in standalone mode Moving the bedside sleeper Disassembly Accessories Keeping your POD in tip top shape Warranty infor...

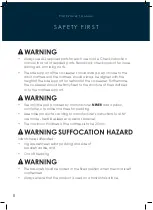
Page 3: ...another sleeping product when your child reaches this stage BEFORE USE REMOVE AND DISPOSE OF ALL PLASTIC BAGS AND PACKAGING MATERIALS AND KEEP THEM OUT OF REACH OF CHILDREN Failure to follow these war...

Page 4: ...the crib To help prevent falls do not use this product when the infant begins to push up on hands and knees or has reached 9kg whichever comes first Make sure the users of this product are knowledgeab...

Page 5: ...ined surface with the child inside of it Young children should not be allowed to play unsupervised in the vacinity of the crib Placing additional items in the product may cause suffocation Do not use...

Page 6: ...eper to the bed Do not adjust the product with the child inside Do not move the product with the child inside Do not use the product for more than one child at a time The product must be kept away fro...

Page 7: ...ib A prolonged exposure to the sun may cause changes of tones to the product s colour After a prolonged exposure of the product to high temperatures wait a few minutes prior to placing your child in i...

Page 8: ...d to the structure of the adult bed or to the mattress support Use only the pad provided by manufacturer NEVER add a pillow comforter or another mattress for padding Assemble product according to manu...

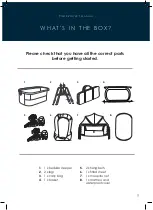
Page 9: ...s before getting started 1 2 3 4 1 x bedside sleeper 2 x legs 1 x carry bag 1 x basket 5 6 7 8 2 x fixing belts 1 x fitted sheet 1 x mosquito net 1 x mattress and waterproof cover 1 5 2 3 4 6 7 8 W H...

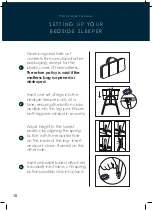
Page 10: ...d or destroyed 1 Insert one set of legs into the bedside sleeper body at a time ensuring the button clicks audibly into the leg joint Ensure both legs are clicked in securely 2 Adjust height to the lo...

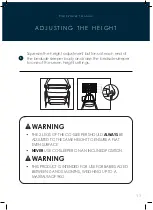
Page 11: ...e seven height settings 1 1 2 3 4 5 6 7 1 2 3 4 5 6 7 1 2 3 4 5 6 7 THE 2 LEGS OF THE CO SLEEPER SHOULD ALWAYS BE ADJUSTED TO THE SAME HEIGHT TO ENSURE A FLAT EVEN SURFACE NEVER USE CO SLEEPER ON AN I...

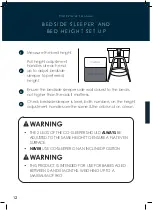
Page 12: ...bedside sleeper side wall closest to the bed is not higher than the adult mattress 3 Check bedside sleeper is level both numbers on the height adjustment handles are the same the crib is not on a lean...

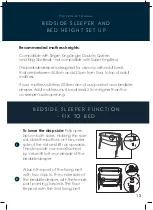
Page 13: ...leeper Adult mattress must be at least 2 5cm higher than the co sleeper s side opening B E D S I D E S L E E P E R F U N C T I O N F I X T O B E D 1 To lower the drop side Fully open zips on both side...

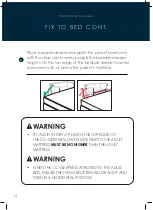
Page 14: ...de sleeper height until the top edge of the bedside sleeper s lowest side is level with or below the parent s mattress 3 TO AVOID INJURY OR DEATH THE TOP EDGE OF THE CO SLEEPER S LOWEST SIDE NEXT TO T...

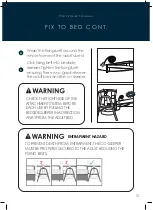
Page 15: ...ring there is no gap between the adult bed and the co sleeper CHECK THE TIGHTNESS OF THE ATTACHMENT SYSTEM BEFORE EACH USE BY PULLING THE BEDSIDE SLEEPER IN ADIRECTION AWAY FROM THE ADULT BED click EN...

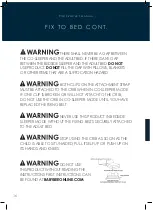
Page 16: ...E SLEEPER MODE WITHOUT THE FIXING BELTS SECURELY ATTACHED TO THE ADULT BED STOP USING THE CRIB AS SOON AS THE CHILD IS ABLE TO SIT UNAIDED PULL ITSELF UP OR PUSH UP ON ITS HANDS AND KNEES THERE SHALL...

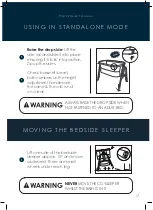
Page 17: ...eight adjustment handles are the same the crib is not on a lean 1 ALWAYS RAISE THE DROP SIDE WHEN NOT FASTENED TO AN ADULT BED 1 1 1 1 click NEVER MOVE THE CO SLEEPER WHILST THE BABY IS IN IT Lift one...

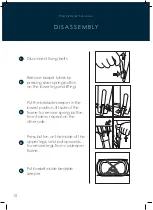
Page 18: ...lver spring button on the lower leg and lifting 2 Put the bedside sleeper in the lowest position lift side of the frame to remove spring button from frame repeat on the other side 3 Press button on th...

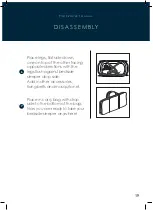
Page 19: ...wn one on top of the other facing opposite directions with the legs flush against bedside sleeper drop side Add in other accessories fixing belts and mosquito net 6 Place in carry bag with drop side t...

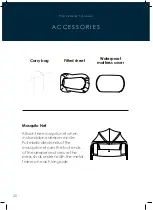
Page 20: ...U A L 20 Carry bag Fitted sheet Waterproof mattress cover Attach the mosquito net when in standalone sleeper mode Pull elasticated ends of the mosquito net over the foot ends of the sleeper and secure...

Page 21: ...ble requires regular maintenance Cleaning instructions The bedside sleeper body and mattress may only be spot cleaned To keep your fitted sheet in the best condition machine wash on a cold gentle cycl...

Page 22: ...ts from the date that your bedside sleeper is dispatched from our warehouse and is valid in the country of purchase only To make a claim email us at au support babybeeonline com or nz support babybeeo...

Page 23: ...23 S W E E T D R E A M S team babybee...

Page 24: ...eatable Value M O D E L B A BY B E E P O D V E R S I O N 3 M A R 2 0 2 3 babybeeonline com Slight variations in the design of your bedside sleeper to the images shown in this manual may be present Mos...

Reviews: