background image

21

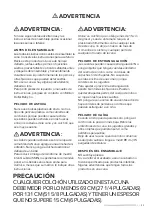
WARNING

Use a mattress that is no thicker than 15 cm 

and is of such a size that, when it is pushed 

firmly against any side of this crib, it does 

not leave a gap of more than 3 cm between 

the mattress and any part of any other side 

of the crib.

STRANGULATION HAZARD
Strings can cause strangulation! Do not 

place items with a string around a child’s 

neck, such as hood strings or pacifier cords. 

Do not suspend strings over a crib or attach 

strings to toys.

To help prevent strangulation tighten all 

fasteners. A child can trap parts of the body 

or clothing on loose fasteners.

DO NOT place crib near window where 

cords from blinds or drapes may strangle a 

child.

FALL HAZARD 
When child is able to pull to a standing 

position, set mattress to lowest position. 

Remove bumper pads, large toys and other 

objects that could serve as steps for 

climbing out.

Stop using crib when child begins to climb 

out or reaches the height of 35 in. (89 cm).

AFTER ASSEMBLY
DO NOT substitute parts.

If refinishing, use a non-toxic finish 

specified for children’s products.

Follow warnings on all products in a crib.

Failure to follow these warnings and the 

assembly instructions could result in serious 

injury or death.

BEFORE ASSEMBLY

Read all instructions before assembling crib. 

Keep instructions for future use. 

Check this product for damaged hardware, 

loose joints, loose bolts or other fasteners, 

missing parts, or sharp edges before and 

after assembly and frequently during use. 

Securely tighten loose bolts and other 

fasteners.

DO NOT use crib if any parts are missing, 

damaged, or broken.

For replacement parts or instruction 

manuals, contact Million Dollar Baby Co. 

SUFFOCATION HAZARD
Never use plastic shipping bags or other 

plastic film as mattress covers because they 

can cause suffocation.

Infants can suffocate in gaps between crib 

sides and a mattress that is too small.

Infants can suffocate on soft bedding. Never 

add a pillow or comforter. Never place 

additional padding under an infant.

To reduce the risk of SIDS, pediatricians 

recommend healthy infants be placed on 

their backs to sleep, unless otherwise 

advised by your physician.

WARNING:

WARNING:

WARNING:

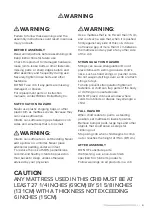
CAUTION

ANY MATTRESS USED IN THIS CRIB MUST BE AT 

LEAST 27 1/4 INCHES (69CM) BY 51 5/8 INCHES 

(131CM) WITH A THICKNESS NOT EXCEEDING 

6 INCHES (15CM).

Summary of Contents for Harlow M8601

Page 1: ...M8601 Harlow...

Page 2: ......

Page 3: ...s la importancia de nuestra comunidad babyletto por eso siempre estamos compartiendo consejos de decoraci n ideas para probar y una inspiraci n nica Comparte tu estilo con nosotros en babyletto Te dam...

Page 4: ...1 6 3 If you need help or have questions please let us know Si necesita ayuda o si tiene preguntas no deje de contactarnos Si vous avez besoin d aide ou avez des questions n h sitez pas nous le faire...

Page 5: ...s piezas A x2 C LEFT SIDE PANEL PANEL LATERAL IZQUIERDO PANNEAU LAT RAL GAUCHE FRONT BACK PANEL PANEL FRONTAL POSTERIOR PANNEAU AVANT ARRI RE D MATTRESS SUPPORT SOPORTE DE COLCH N SUPPORT DU MATELAS B...

Page 6: ...E BASE E LONG BASE FRAME RAIL RIEL DE MARCO DE BASE LARGA TRAVERSE LONGUE DE LA BASE SHORT BASE FRAME RAIL RIEL DE MARCO BASE CORTO TRAVERSE COURTE DE LA BASE x2 F x2 G H TODDLER BED CONVERSION KIT KI...

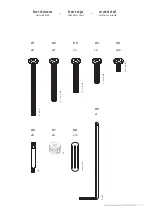
Page 7: ...7 tama o real taille actuelle hardware herraje mat riel actual size H1 H2 H3 x8 x8 x4 H4 x6 H7 x8 H8 x16 AWR H9 x1 H5 x22 1 3 4 AHB 3 AHB 2 1 4 AHB 1x4cm WD 5 8 AHBS 1 1 4 AHB H6 x8 CB CL...

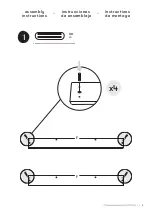
Page 8: ...8 assembly instructions instructions de montage instrucciones de ensamblaje 1 H8 x4 F F x4...

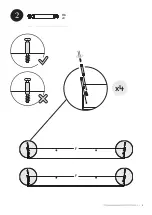
Page 9: ...9 2 H6 x8 x4 F F...

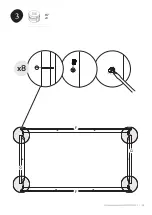
Page 10: ...10 H7 x8 3 x8 G F G F...

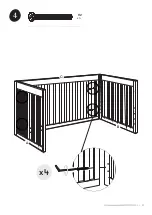
Page 11: ...11 4 H2 x4 C A B x4...

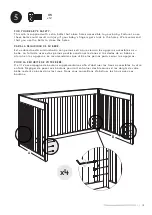
Page 12: ...extra que cierran los agujeros accesibles a su beb La falta de usar estos pernos podr a ocasionar lesiones si los dedos de su beb se atoran en los agujeros Le recomendamos que utilice los pernos para...

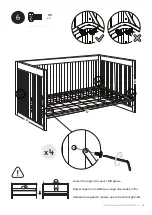
Page 13: ...13 H5 x4 Lower the support as your child grows Baje el soporte a medida que vaya creciendo el ni o Abaissez le support mesure que votre enfant grandit x4 6 D A B...

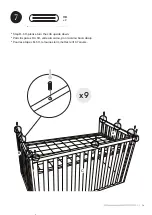
Page 14: ...H8 x9 Step 8 10 please turn the crib upside down Para los pasos 8 a 10 voltea la cama pon la cama boca abajo Pour les tapes 8 10 retournez le lit mettez le lit l envers 7 x9 B A C 14...

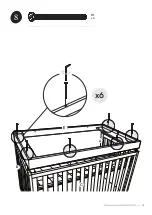
Page 15: ...E H1 x6 8 x6 B A C 15...

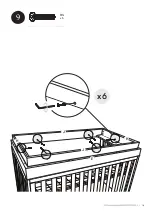
Page 16: ...H4 x6 9 x6 E J J H H 16...

Page 17: ...17 H8 x3 Step 11 12 turn the crib to the right position Paso 11 12 gire la cuna a la posici n correcta Pour les tapes 11 12 mettez le lit l endroit x3 10 E...

Page 18: ...18 H2 x4 11 x4 C E A B...

Page 19: ...19 H1 x2 Lay the crib down per below Coloque la cuna como se indica a continuaci n D poser le lit comme ci dessous 12 x2 C E...

Page 20: ...o be sure they are fastened securely Gire la cuna a la posici n correcta y lista para usar Volver a revisar todos los pernos para comprobar que est n apretados firmemente Mettez le lit l endroit Votre...

Page 21: ...ucts Follow warnings on all products in a crib Failure to follow these warnings and the assembly instructions could result in serious injury or death BEFORE ASSEMBLY Read all instructions before assem...

Page 22: ...abrasive chemi cals or materials For fabrics we recommend using a non toxic foaming fabric cleaner or leather cleaner where appropriate Touch up kits are available for purchase by contacting us at 32...

Page 23: ...ENSAMBLAJE NO sustituya piezas Si va a retocar el acabado use un acabado no t xico especificado para productos infantiles Siga las advertencias que tengan todos los productos en una cuna Si no se sigu...

Page 24: ...ar o da ar la superficie no use agentes qu micos ni materiales abrasivos En cuanto a las telas recomendamos usar una espuma limpiadora no t xica para telas o un limpiador para cuero seg n corresponda...

Page 25: ...E NE substituez PAS des pi ces En cas de remise en tat utilisez un fini non toxique convenant aux produits pour enfants Respectez les avertissements de tous les produits dans un lit pour b b La non ob...

Page 26: ...dommages veillez ne pas utiliser des produits chimiques ou des mat riaux abrasifs Pour les tissus il est recommand d utiliser un produit nettoyant pour tissus non toxique ou pour cuir le cas ch ant Il...

Page 27: ...27 Toddler bed conversion Conversi n para cama de beb que ya camina Conversion en lit de b b...

Page 28: ...28 1 H1 x2 assembly instructions instructions de montage instrucciones de ensamblaje x2 E C...

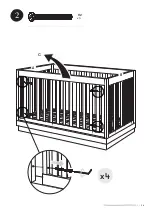
Page 29: ...29 H2 x4 C x4 2 A B...

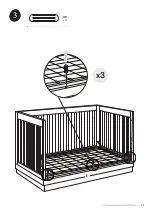
Page 30: ...30 3 H8 x3 E x3...

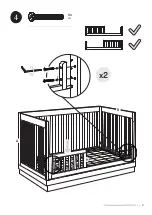
Page 31: ...31 4 H3 x4 x2 A B H...

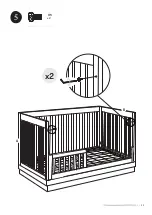
Page 32: ...H5 x2 5 A B x2 32...

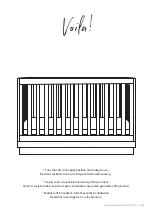
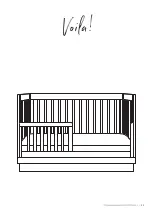
Page 33: ...33 Voila...

Page 34: ...34 Day bed conversion Conversi n para div n Conversion en lit de jour...

Page 35: ...35 1 H1 x2 assembly instructions instructions de montage instrucciones de ensamblaje x2 E C...

Page 36: ...36 H2 x4 C x4 2 A B...

Page 37: ...37 3 H8 x3 E x3...

Page 38: ...38 4 H5 x6 A B x6...

Page 39: ...39 Voila...

Page 40: ...A DEBE SER UN COLCH N DE CUNA DE TAMA O COMPLETO QUE MIDA POR LO MENOS 131 CM 51 5 8 PULGADA DE LARGO 69 CM 27 1 4 PULGADA DE ANCHO Y QUE TENGA UN ESPESOR M XIMO DE 15 CM 6 PULGADA LA EDAD M NIMA DEL...

Page 41: ...41...

Page 42: ...04 MAY 2023...

Reviews: