8
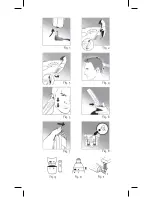
To remove the cutting guide, first
adjust the cutting length to 3mm
or 21mm and push the guide out of
the support lifting it up with your
thumb. (Fig. 3)
NOTE: The precision guide must
be placed like the cutting guides
but it is adjusted manually and
independently of the grooved
wheel.
TURNING ON AND USING
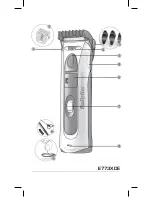
To adjust the clipper’s cutting
length, turn the grooved wheel (8)
up or down.
The selected length is displayed on
the right or left side of the clipper.
Switch the ON/OFF button.
You can change the cutting length
at any time.
Thanks to the SMART ADJUSTING
SYSTEM, the length of the cut is
maintained even if the angle of
the clipper varies, so it guarantees
precise result.
CUTTING
TECHNIQUES
AND
ADVICE FROM THE EXpERTS
• Use the clipper on clean, dry hair.
• To familiarize yourself with the
clipper, begin with the cutting
guide for a longer cut, then, if you
want a shorter cut, adjust it by
pushing the knob. You will soon
know the lengths of each guide
and each position.
• Always move the clipper against
the direction of hair growth.
• Begin at the nape. Place the guide
on the scalp and move the clipper
toward the crown of your head.
Move your clipper slowly, pointing
the teeth of the guide slightly
upward. Keep the clipper in contact
with your head at all times. (Fig. 4)
• For the crown of the head, move
from front to back, that is, from
your forehead to the crown of your
head.
• For the finishing touches, that is,
around the nape and sideburns, use
the clipper without a cutting guide.
Turn your clipper over and move it
from top to bottom. (Fig. 5)
• If you want a length greater than 30
mm, or if you are experienced, you
can create ‘comb’ or ‘finger’ cuts:
- Work without a cutting guide.
- Take up a small section of hair with
a comb or in your fingers.
- Move the comb or your fingers
along the section of hair to the
desired length.
- Cut your hair along the comb or
your fingers.
- Remove the cut hair using a comb
and check the evenness of the cut
regularly. (Fig. 6)
Using the thinning guide
Switch the clipper to the ‘THIN’
position. The thinning guide is in
front of the blades.
This technique allows you to thin out
hair to make styling easier.
The technique is particularly good
for the crown of the head where hair
is usually thicker.
To thin you hair, take a section of
hair (rest your little and ring fingers
on your scalp, using the middle
and index fingers to set the length),
hold 1 to 2 cm below the cutting
length. Then, using the clipper, cut
the section of hair steeply and at an
angle to create a saw-toothed ‘edge’.
MAINTENANCE
Remove the cutting guide after each
use.
Summary of Contents for E773XDE
Page 1: ...E773XDE...
Page 2: ...E773XDE...
Page 3: ......
Page 40: ...40 bo TURBO 3 21 2 2 3 21 3 8 ON OFF SMART ADJUS TING SYSTEM 4...
Page 41: ...41 5 30mm 6 THIN 1 2 BaByliss 7 BaByliss 8...
Page 42: ...42 BaByliss 1 AA 9 2 ON 10 11...
Page 53: ...53 E773XDE 3 0V 1000mA TURBO 3 21 2 3 21 3 8 ON OFF SMART AD JUSTING SYSTEM...
Page 54: ...54 4 5 30 6 THIN 1 2 BaByliss...
Page 55: ...55 7 BaByliss 8 BaByliss 1 9 2 ON 10 11...
Page 59: ...59...
Page 60: ...60...


