background image

Cleaning the Blade

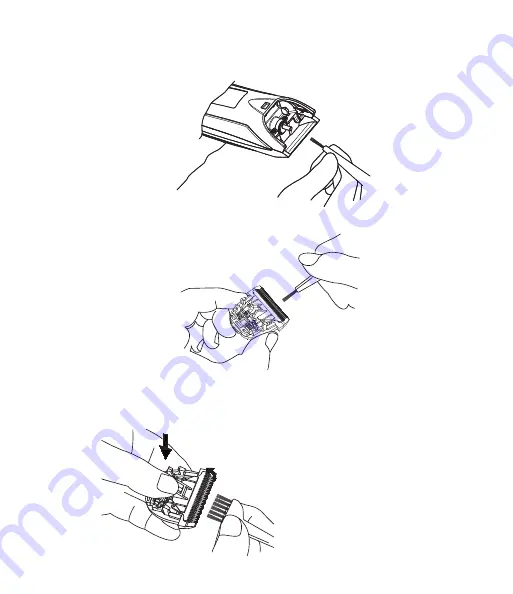
1.  Brush off any hairs from the clipper and from around the blade.

2.  Remove the blade and brush off hairs from the blade edge.

3.  Brush the hairs out from between the fixed comb blade and 

the moving cutter blade while sliding the taper control forward 

to raise the moving cutter blade.


Note:

 Do not attempt to take  


the blade apart or you will not  


be able to use it again.

Summary of Contents for FXX3C

Page 1: ... d emploi avant de l utiliser Directives d utilisation Modèle FXX3C Tondeuse avec sans fil professionnelle Para su seguridad y para disfrutar plenamente de este producto siempre lea cuidadosamente las instrucciones antes del uso Instrucciones de operación Modelo FXX3C Cortadora con sin cable profesional ...

Page 2: ...For your safety and continued enjoyment of this product always read the instruction book carefully before using Operating Instructions Model FXX3C Professional Cord Cordless Clipper ...

Page 3: ...iance that has fallen into water or other liquids Unplug immediately from receptacle 6 Unplug this appliance before cleaning WARNING To reduce the risk of burns electric shock fire or injury to persons 1 Never leave a plugged in appliance unattended except when charging 2 This appliance is not intended for use by persons including children with reduced physical sensory or mental capabilities or la...

Page 4: ...s are aligned properly and oiled 11 Do not use the appliance outdoors or operate while aerosol spray products are being used or where oxygen is being administered 12 Always attach plug to appliance first then to outlet To disconnect turn all controls to OFF position then remove from outlet SAVE THESE INSTRUCTIONS OPERATING INSTRUCTIONS 1 Before using the clipper for the first time charge continuou...

Page 5: ...otection against harmful interference in a residential installation This equipment generates uses and can radiate radio frequency energy and if not installed and used in accordance with the instructions may cause harmful interference to radio communications However there is no guarantee that interference will not occur in a particular installation If this equipment does cause harmful interference ...

Page 6: ...BaBylissPRO lubricating oil on the front and sides of the cutter blade Wipe off excess oil with a soft dry cloth Do not pull twist or wrap the supply cord around the appliance HOW TO USE COMB ATTACHMENTS Slide the taper control up or down to adjust the moving blade to the desired height The blade is adjustable in five 5 stages from 0 8 mm to 2 0 mm The actual cut length may be longer than the set ...

Page 7: ...move the attachment as illustrated Removing the Blade 1 Be sure to turn off the power before you remove the blade 2 Hold the clipper with the switch facing upward and push the blade with your thumb while catching the blade in your other hand ...

Page 8: ...the Blade 1 Set the taper control to 2 0 You cannot mount the blade in any other position or you will damage the engagement 2 Fit the mounting tab into the blade tongue on the clipper and push in until it clicks ...

Page 9: ...e the blade and brush off hairs from the blade edge 3 Brush the hairs out from between the fixed comb blade and the moving cutter blade while sliding the taper control forward to raise the moving cutter blade Note Do not attempt to take the blade apart or you will not be able to use it again ...

Page 10: ...ained to a rapid flashing red LED after the first use This operation will only have to be performed once The unit should then be fully charged until blue LED appears Note It may take 5 10 charging cycles for the battery to reach its full potential VERY IMPORTANT Blades must be cleaned and oiled on a regular basis so they will function properly Failure to regularly clean and oil the blades will voi...

Page 11: ...ric shock Parts Replacement parts are available through www babylisspro com or by calling 1 800 326 6247 Removing the Built in Rechargeable Battery Pack when Discarding this Product 1 Discharge the battery pack completely before removing it 2 Remove the blades and four screws 3 Lift off outer housing 4 Remove the lithium polymer battery ...

Page 12: ...rque Brushless Motor 3 2 Speeds HI LO a 6 000 RPM 7 000 RPM 4 Lithium Battery with 5 hour runtime 5 DLC Titanium T Blade 6 Cord Cordless 7 4 Stage LED 8 Lightweight Low Heat Low Noise Adapter Cleaning Brush Lubricating Oil Screwdriver Taper Control HI LO OFF Switch HI marked 2 LO marked 1 OFF marked O 4 Stage LED 100 80 capacity 79 60 capacity 59 20 capacity 19 0 capacity ...

Page 13: ... cleaning or when not in use 5 Be sure voltage is correct before plugging in For connection to power supply not in the U S A use an attachment plug adapter of the proper configuration for power outlet The included adapter automatically adjusts to the input voltage DO NOT USE A VOLTAGE CONVERTER Clipper CHARGING PRECAUTIONS Avoid charging the battery at temperatures below 41 F 5 C or above 95 F 35 ...

Page 14: ...n But did you know that an electrical appliance is still electrically live even if the switch is off If the plug is in the power is on So when you are not using the appliances keep them unplugged WARNING IF YOU THINK THE POWER IS OFF WHEN THE SWITCH IS OFF YOU RE WRONG ...

Page 15: ...ure ANY IMPLIED WARRANTIES OBLIGATIONS OR LIABILITIES INCLUDING BUT NOT LIMITED TO THE IMPLIED WARRANTY OF MERCHANTABILITY AND FITNESS FOR A PARTICULAR PURPOSE SHALL BE LIMITED IN DURATION TO THE 24 MONTH DURATION OF THIS WRITTEN LIMITED WARRANTY Some states do not allow limitations on how long an implied warranty lasts so the above limitations may not apply to you IN NO EVENT SHALL BaBylissPRO BE...

Page 16: ...issPRO service department by calling 1 800 326 6247 Please provide your product name model number details date of purchase and part you require Service Center BaBylissPRO Service Department 7475 N Glen Harbor Blvd Glendale AZ 85307 1 800 326 6247 2021 BaBylissPRO 205 Shelhouse Drive Rantoul IL 61866 www BaBylissPRO com 20FA075638 ...

Page 17: ...ide ne pas tenter de rattraper le débrancher immédiatement 6 Débrancher l appareil avant de le nettoyer AVERTISSEMENT Afin de réduire le risque de brûlures de choc électrique d incendie ou de blessures 1 Ne jamais laisser l appareil sans surveillance alors qu il est branché 2 Cet appareil ne devrait pas être utilisé par des enfants ou des personnes atteintes de certains handicaps physiques mentaux...

Page 18: ...e de l oxygène 12 Toujours connecter le cordon électrique à l appareil avant de le brancher dans la prise de courant Toujours éteindre en mettant tous les contrôles sur OFF l appareil avant de le débrancher CONSERVER CES INSTRUCTIONS DIRECTIVES D UTILISATION 1 Charger l appareil pendant 5 heures sans interruption avant la première utilisation La batterie rechargeable n atteindra sa capacité maxima...

Page 19: ...nt aux instructions il peut provoquer des interférences nuisibles aux communications radio Cependant il n y a aucune garantie que des interférences ne se produiront pas dans une installation particulière Si cet appareil cause des interférences nuisant au fonctionnement d un équipement radio ou d un téléviseur ce qui peut être déterminé en allumant puis en éteignant l appareil nous vous encourageon...

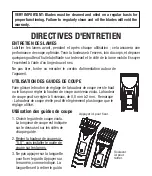
Page 20: ...ation autour de l appareil UTILISATION DES GUIDES DE COUPE Faire glisser le bouton de réglage de la hauteur de coupe vers le haut ou le bas pour régler la hauteur de coupe au niveau voulu La hauteur de coupe peut se régler à 5 niveaux de 0 8 mm à 2 mm Remarque La hauteur de coupe réelle peut être légèrement plus longue que le réglage utilisé Utilisation des guides de coupe 1 Choisir le guide de co...

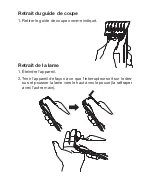
Page 21: ...Retirer le guide de coupe comme indiqué Retrait de la lame 1 Éteindre l appareil 2 Tenir l appareil de façon à ce que l interrupteur soit sur le des sus et pousser la lame vers le haut avec le pouce la rattraper avec l autre main ...

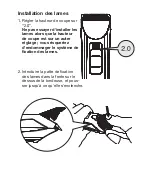
Page 22: ...yer d installer les lames alors que la hauteur de coupe est sur un autre réglage vous risqueriez d endommager le système de fixation des lames 2 Introduire la patte de fixation des lames dans la fente sur le dessus de la tondeuse et pous ser jusqu à ce qu elle s enclenche ...

Page 23: ...er et nettoyer l extérieur des lames avec la brosse de nettoyage 3 Faire glisser le bouton de réglage de la hauteur de coupe vers l avant pour remonter la lame mobile puis nettoyer l espace entre la lame fixe et la lame mobile Remarque Ne pas essayer de démonter le jeu de lames vous risqueriez de le rendre inutilisable ...

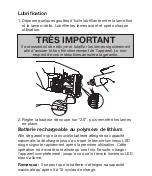
Page 24: ...idement après la première utilisation Cette opération ne devra être réalisée qu une fois Ensuite charger l appareil complètement jusqu à ce que le témoin lumineux LED bleu s allume Remarque Il se peut que la batterie n atteigne sa capacité maximale qu après 5 à 10 cycles de charge TRÈS IMPORTANT Il est essentiel de nettoyer et lubrifier les lames régulièrement afin d assurer le bon fonctionnement ...

Page 25: ...echange Pour commander des pièces de rechange visiter www babyliss pro com ou appeler le 1 800 326 6247 Retrait de la batterie rechargeable en fin de vie de l appareil 1 Décharger la batterie complètement avant de la retirer 2 Retirer les lames et les quatre vis 3 Séparer la partie supérieure de la partie inférieure du boîtier 4 Retirer la batterie au polymère de lithium ...

Page 26: ... 6000 tr mn b Haute 7000 tr mn 4 Batterie au lithium d une autonomie 5 heures 5 Lame en T DLC Titane 6 Avec sans fil 7 Quatre indicateurs LED 8 Légère faible émission de chaleur faible niveau de bruit Bouton de réglage de la hauteur de coupe Bouton haut bas arrêt haut 2 bas 1 arrêt O Quatre indicateurs LED Capacité à 100 80 Capacité à 79 60 Capacité à 59 20 Capacité à 19 0 Tournevis Adaptateur Bro...

Page 27: ...l utilisez pas 5 Veiller à ce que le sélecteur de tension soit sur la bonne position avant de brancher l appareil Il se peut qu un adaptateur de voyage non inclus soit nécessaire pour utiliser l appareil à l extérieur des É U et du Canada L adaptateur fourni s adapte automatiquement à la tension secteur NE PAS UTILISER L APPAREIL AVEC UN CONVERTISSEUR DE TENSION PRÉCAUTIONS DE CHARGE Éviter de cha...

Page 28: ... saviez vous qu un appareil est toujours sous tension même lorsqu il est éteint S il est branché il est sous tension Alors si vous n utilisez pas l appareil débranchez le AVERTISSEMENT SI VOUS PENSEZ QUE LE COURANT EST COUPÉ PARCE QUE L APPAREIL EST ÉTEINT VOUS VOUS TROMPEZ ...

Page 29: ...a date de fabrication TOUTE GARANTIE OBLIGATION OU RESPONSABILITÉ IMPLICITE Y COMPRIS MAIS SANS Y ÊTRE LIMITÉE LA GARANTIE IMPLICITE DE QUALITÉ MARCHANDE ET D APTITUDE À PRODUIRE UNE TÂCHE PARTICULIÈRE SERA LIMITÉE À LA PÉRIODE DE 24 MOIS DE CETTE GARANTIE ÉCRITE Certains États ne permettent pas la limite de durée d une garantie implicite cette limite peut donc ne pas s appliquer dans votre cas BA...

Page 30: ...er le service après vente de BaBylissPRO au 1 800 326 6247 Il vous faudra fournir le nom du produit numéro de modèle la date d achat et le nom ou la description de la pièce dont vous avez besoin Service Center BaBylissPRO Service Department 7475 N Glen Harbor Blvd Glendale AZ 85307 1 800 326 6247 2021 BaBylissPRO 205 Shelhouse Drive Rantoul IL 61866 www BaBylissPRO com 20FA075638 ...

Page 31: ...o después de que se haya caído en agua u otro líquido desenchúfelo inmediatamente 6 Desenchufe el aparato antes de limpiarlo ADVERTENCIA Para reducir el riesgo de quemaduras descarga eléctrica incendio o heridas 1 Nunca descuide deje el aparato sin vigilancia mientras está conectado excepto cuando lo esté cagando 2 Los niños o las personas que carezcan de la experiencia o de los conocimientos nece...

Page 32: ...aerosol spray o donde se esté administrando oxígeno 12 Siempre conecte el cable al aparato antes de enchufarlo en la toma de corriente Para desconectar ponga todos los controles en la posición de apagado OFF y luego desenchufe el cable GUARDE ESTAS INSTRUCCIONES INSTRUCCIONES DE OPERACIÓN 1 Cargue el aparato continuamente por 5 horas antes del primer uso La batería recargable alcanzará su capacida...

Page 33: ...ha sido instalado o usado conforme a las instrucciones puede ocasionar interferencias perjudiciales para las comunicaciones por radio No obstante no hay garantía de que aquellas interferencias no ocurran en una instalación particular Si este equipo produce alguna interferencia perjudicial en la recepción de radio o televisión lo que podrá determinarse encendiendo y apagando el equipo se recomienda...

Page 34: ... blade Wipe off excess oil with a soft dry cloth Do not pull twist or wrap the supply cord around the appliance HOW TO USE COMB ATTACHMENTS Slide the taper control up or down to adjust the moving blade to the desired height The blade is adjustable in five 5 stages from 0 8 mm to 2 0 mm The actual cut length may be longer than the set length Using the Cutting Guide 1 Select the desired comb attachm...

Page 35: ...la guía 1 Retire la guía según se indica Remoción de la cuchilla 1 Apague el aparato 2 Sostenga el aparato con el interruptor apuntando hacia arriba y empuje la cuchilla con el pulgar recogiéndola con la otra mano ...

Page 36: ...ongitud de corte a 2 0 No intente instalar la cuchilla con el ajuste de longitud de corte en otra posición esto podría dañar la lengüeta de montaje 2 Introduzca la lengüeta de montaje en la hendidura del cabezal y presione hasta que haga clic ...

Page 37: ...ovisto 2 Retire la cuchilla y límpiela con el cepillo de limpieza 3 Deslice el botón de ajuste de longitud de corte hacia adelante para levantar la cuchilla movediza y luego limpie el espacio entre la cuchilla fija y la cuchilla movediza Nota No intente desarmar la cuchilla No podría volver a usarla ...

Page 38: ... rojo empiece a parpadear rápidamente Tiene que hacer esto solamente una vez Después cargue el aparato hasta que el indicador luminoso LED azul se encienda Nota Puede que la batería recargable no alcance su capacidad máxima hasta después de 5 a 10 ciclos de carga MUY IMPORTANTE Es imprescindible limpiar y lubricar las cuchillas regularmente para asegurar el buen funcionamiento del aparato El incum...

Page 39: ...s Para pedir repuestos visítenos en www babylisspro com o llame al 1 800 326 6247 Remoción de la batería recargable al final de la vida útil del aparato 1 Descargue la batería completamente antes de sacarla 2 Retire las cuchillas y los cuatro tornillos 3 Separe la parte superior de la parte inferior de la carcasa 4 Retire la batería de polímero de litio ...

Page 40: ...ocidades a Baja 6000 RPM b Alta 7000 RPM 4 Batería de litio con autonomía de 5 horas 5 Cuchilla en T de DLC titanio 6 Con sin cable 7 Cuatro indicadores LED 8 Ligera calor bajo vibración baja Adaptador Cepillo de limpieza Aceite lubricante Destornillador Cuatro indicadores LED Capacidad en 100 80 Capacidad en 79 60 Capacidad en 59 20 Capacidad en 19 0 Botón alto bajo apagado alto 2 bajo 1 apagado ...

Page 41: ...y antes de limpiar la unidad 5 Compruebe que el selector de voltaje está en la posición correcta antes de conectar el aparato a la toma de corriente Puede que sea necesario usar un adaptador de viaje no incluido para conectar el aparato fuera de los EE UU El adaptador provisto se ajusta automáticamente al voltaje adecuado NO USE ESTE APARATO CON UN CONVERTIDOR DE VOLTAJE PRECAUCIONES DE CARGA Evit...

Page 42: ...Sabe usted que un aparato eléctrico permanece bajo tensión aunque esté apagado Si está conectado hay corriente Por lo tanto siempre desenchufe los aparatos eléctricos después del uso ADVERTENCIA SI CREE QUE NO HAY CORRIENTE CUANDO EL APARATO ESTÁ APAGADO ESTÁ EQUIVOCADO ...

Page 43: ...e 24 meses a partir de la fecha de fabricación CUALQUIER GARANTÍA OBLIGACIÓN O RESPONSABILIDAD IMPLÍCITAS INCLUYENDO PERONOLIMITADASALAGARANTÍAIMPLÍCITADECOMERCIABILIDAD Y APTITUD PARA UN PROPÓSITO ESPECÍFICO ESTARÁN LIMITADAS POR LOS 24 MESES DE LA PRESENTE GARANTÍA ESCRITA Algunos Estados no permiten limitaciones en la duración de una garantía implícita de modo que las limitaciones mencionadas p...

Page 44: ...posventa de BaBylissPRO llamando al 1 800 326 6247 Deberá proveer el nombre del producto número de modelo la fecha de compra y el nombre o la descripción de la pieza que necesita Service Center BaBylissPRO Service Department 7475 N Glen Harbor Blvd Glendale AZ 85307 1 800 326 6247 2021 BaBylissPRO 205 Shelhouse Drive Rantoul IL 61866 www BaBylissPRO com 20FA075638 ...

Reviews: