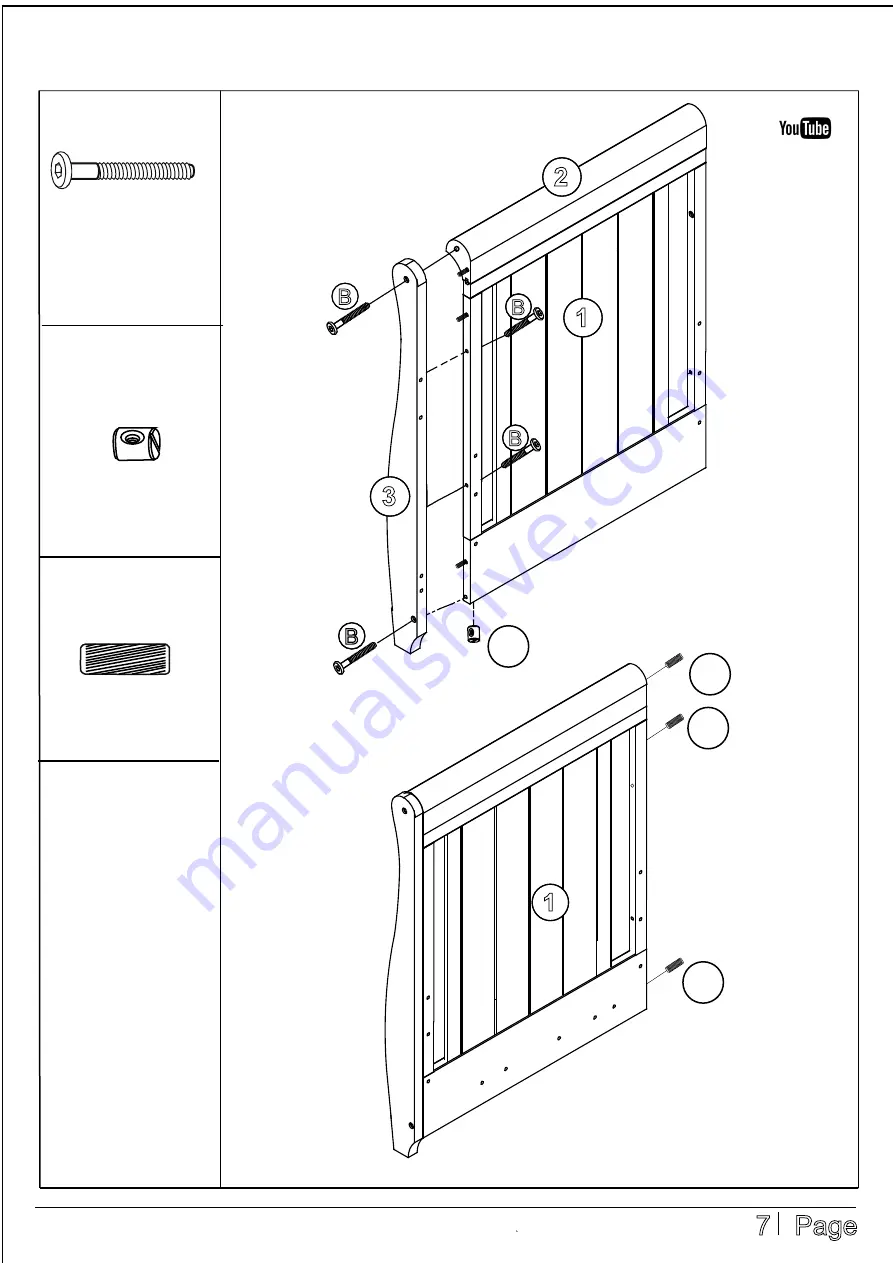
background image

7

Page

F/ Dowels 30mm x 3

Step  2

cot  ends

As  show, 

use  B  bolts  55mm 

to  assembly  cot 

leg  on  to  cot 

ends. 

NOTE  E  -  BARREL 

NUT  use  at 

bottom

  of  cot  end 

Insert  wooden 

dowel  at  otherside 

of  cot  end  as 

show  on  previous 

step. 

B/ Bolts 


55mm x 4

E/ Barrel Nuts  x 1

2

B

B

B

B

3

1

B

B

E

1

F

F

F

Summary of Contents for Stella Cot Bed

Page 1: ...1 P a g e INSTRUCTIONS STELLA COT BED STELLA V2 15 Babymore Ltd 2012 Babymore Animated Assembly Videos YouTube search Babymore Stella Product Page www babymore co uk...

Page 2: ...dge of the cot frame is at least 500mm in the lowest posi on of the bed base and at least 200mm in the highest posi on of the bed base The line engraved on the cot end indicates the maximum thickness...

Page 3: ...any packaging you are sure you have all the parts and If you do nd that any parts are missing or damaged or incorrect contact customer services of above Read the thoroughly before a construct the cot...

Page 4: ...End Panel 2 10 L 1 2 Cot End Top 2 10 R Drawer Right 3 Leg A 2 11 Drawer Centre Support 1 4 Leg B 2 12 Drawer Base 2 5 Drop side 1 13 6 Fixed side 1 14 7 Base Slat 1 15 Bed Convert Bar 8 Drawer Front...

Page 5: ...i w w o h s s a provided Ensurecorrect sides left andright assembled for the operation of drawer E Barrel Nuts x 2 5 PUSH 8 10 R A B A A A E A A A 9 B E 3 ASSEMBLING THE COT 12 11 9 A B Bolts 55mm x...

Page 6: ...6 Page F Dowels30mm x 3 Step 2 cot ends Asdiagram show assemble bothcot end with part 1 2 Insert Wooden Dowels 2 1 F F F 2 1 1 PUSH...

Page 7: ...ds As show use B bolts 55mm to assembly cot leg on to cot ends NOTE E BARREL NUT use at bottom of cot end Insert wooden dowel at otherside of cot end as show on previous step B Bolts 55mm x 4 E Barrel...

Page 8: ...I B B 14 A A A 15 1 5 6 E 1 F F Step 2 cot ends Assemle otherside of Leg with B bolts Attach runner 15 with 2 x Dowels and 3 x A bolts Repeat Step 2 of cot end assembly for both ends B Bolts 55mmx 4...

Page 9: ...B Bolts 55mm x 4 and E Barrel Nuts x4 Ensure base label side upward Leave bolts connections loosen until step 8 B x 4 E 3 4 16 16 3 4 Top position Middle position Bottom position Step 4 Alignand inst...

Page 10: ...SIDE PANEL It regulate operation of drop side and drawer function with 2 x B Bolts 2 x E Barrel Nuts Leave bolts connections loosen until step 8 10 B x 2 4 3 13 7 x 2 B E B Bolts 55mm x 4 Step 6 Conne...

Page 11: ...des at same time OUTSIDE INSIDE H H 5 G H Step 8 Rotate the bottom edge of dropside carefully align the lower recess with the lower pins of cot end Push down pins to pass through and be inserted into...

Page 12: ...lide down or pull up until it clicks into locking position Always verify both ends of dropside are locked in the raised position whenever a child is in the cot Step up PUSH IN Step 2 1 5 Step 10 Slide...

Page 13: ...of the dropside push down lower pins of cot ends to allow remove of dropside by reverse the assembly step 8 6 I Allen Key C Bolts 40mm x 6 Step 2 Use Bolts C to attach side support 14 onto convert bar...

Page 14: ...de support panel onto bed end panels Fully tighen all connections Day Bed ready for use B B 3 4 B 14 7 Step 4 B 14 3 B 7 4 B C Bolts 40mm x 6 B Bolts 55mm x 2 Repeat step 2 3 at otherside of the bed F...

Page 15: ...w units with original packaging and ownership and is not transferable It does not cover any used second hand or demo models This warranty does not cover an and tear abuse negligence improper use incid...

Reviews: