01
02
03
3
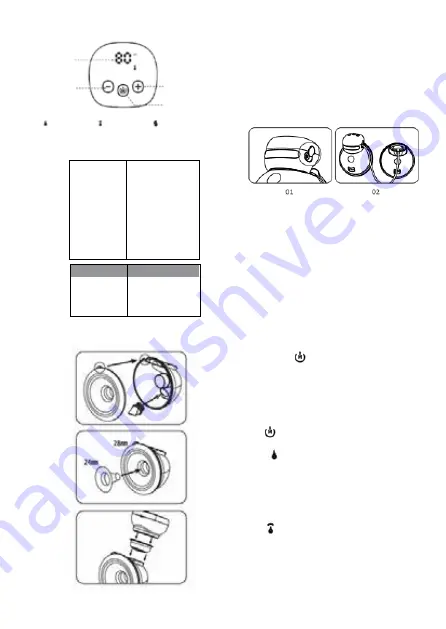
CONTROL PANEL INSTRUCTIONS
PRODUCT PARAMETER INFORMATION
ASSEMBLY INSTRUCTIONS
01. Insert the duckbill valve into the interface of the
bowl and install the breast shield to the bowl. Please
note that it is installed place when the milk outlet of
the bowl fits the protrusion of the breast shield.
02. Choose 28 mm breast shield or 24 mm or 21 mm
insert, depending on your needs.
03. Install the pump unit-silicone gas storage-storage
bowl as shown in the above picture.
NOTE: When using single pumping, please make sure
the silicone plug is inserted tightly.
When using double pumping
1. Pull out the silicone plus
2. Connect the tubing to the main pump unit and the
collection cup
OPERATING INSTRUCTIONS
Maintain proper posture and relax. Place the breast
shield on your breast with the nipple in the centre.
Press and hold on top of main pump unit to turn on
the power. The digital display screen will turn on and
the 1 minute timer will start once the main pump unit
is being turned on. If the main pump unit is idle for 1
minute, it will turn off automatically.
Press to select desired mode.
Select to enter EXPRESSION MODE. Touch + to
increase suction strength, - to reduce suction strength.
Suction strength can be set between L1 and L9. Each
setting offers a different pumping strength, from weak
to strong.
Select to enter TWO-IN-ONE MODE. The breast pump
will provide a pumping cycle of massaging eight (8)
times and pumping once (1). This is a good way to
relieve pain in full breasts and to produce plenty of
breast milk in little time. Touch + to increase suction
Model 5018
Input Power 100-240V, 50/60Hz
Suction Strength =<0.038MPa
Charging Time —150 mins
Rated Power 5W
Output Power 5V/1A
Battery Capacity 1100 mAh
Running Time —120 mins
MODE LEVEL RANGE
Expression 1-9
Two-in-one 1-9
Dual-frequency 1-9
level up
level down
power on/off
mode selector
level display
time display
expression mode
two in one mode
dual-frequency mode
Summary of Contents for TWINNY
Page 10: ...10 BG TWINNY...
Page 12: ...12 1 L1 L9 8 1 L1 L9 L1 L9 30 30 1...
Page 13: ...13 30 37 C 1 2 3...
Page 34: ...34 hand free GR TWINNY 01 02 03 04 05 28mm 06 07 USB C 08 24mm 09 21mm...
Page 36: ...36 L1 L9 8 1 L1 L9 4 4 L1 L9 30 30 1...
Page 37: ...37 30 37 C 1 2 24 3...
Page 70: ...70 RU TWINNY 01 02 03 04 05 28 06 07 USB C 08 24...
Page 72: ...72 L1 L9 8 1 L1 L9 L1 L9 30 30 1...
Page 73: ...73 30 37 C 1 2 24 3...
Page 82: ...82 i UA TWINNY 01 02 03 04 05 28...
Page 84: ...84 1 1 L1 L9 8 1 L1 L9 L1 L9 30 30 1...
Page 85: ...85 30 37 C 1 2 24 3...
Page 86: ...AR 01 02 03 04 05 28 06 07 C 08 24 09 21 10 11 TWINNY 86...
Page 88: ...88 8 1 9L 1L 9L 1L 03 03 03...
Page 89: ...89 73 42...
Page 90: ......


