background image

11

Hinweis: Um die Situation, dass die Bedienungsanweisungen verloren ist und in Zu-

kunft für Probleme sorgt, zu vermeiden, bitte setzen Sie bitte die Anweisung auf der 

ursprünglichen Weise in die Bewahnungshülle zurück, wenn Sie sie nicht benutzen.

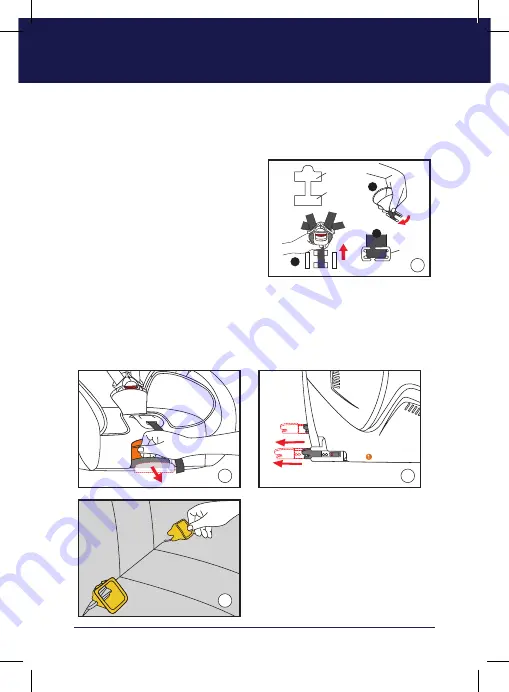
5.4  Einstellung des Hüftgurts

• Der Fabrikstatus des Hüftgurts nähert 

er sich der hinteren Führungsbahn, 

wenn das Kind in den Kindersitz gelegt 

wird und der Hüftgurt zu nah der Hüft 

des Kindes ist, kneifen Sie den Hüftgurt, 

um ihn zu verzerren und lassen den 

Gurt durch die „I”-fömiiger -Schlitz und 

von der hinteren Führungsbahn zur 

vornen Führungsbahn gehen (Bild 5).

6. Installation von der Kinderfahrzeug-Sicherheitssitzen in der Gruppe I und 

wie man sie nutzt

6.1  Kinderautositz Hochziehensband ist befestigt

(geeignet für Gruppe 1, Gewicht zwischen 9-18 Kilo, Kinder im Alter zwischen ca. 9 

Monate bis 4 Jahren)

10

09

Pull  the  ISOFIX  release  key, 

ISOFIX  Connection  Parts  will  pop 

out (Picture 6,7).

Fix  ISOFIX  guide  sleeves  in  the 

car seat anchors (Picture 8).

6

7

5.5 Crotch belt position 

adjustment

Crotch belt clings tightly with the 

backrest  groove  when  it  is  produced. 

when you put baby in the car seat 

and  feel  it  is  too  close  to  baby's 

crotch,  pinch  the  crotch  belt  to  a 

twisted status and make it through 

the slot (Picture 5).

Note: Make sure they are not wrapped.

5

1

2

3

Day

buckle

Rear slot

Front slot

6.1 Baby Car Seat Top Tether Fixation 

(Applicable for 

Group 1, Weight 9-18kg, Age 9 months to 4 years old)

8

User manual

Baby safety seat

1

9

13

11

Push  the Car  Seat  Base  (Picture 

9).Until you hear the "Click", which 

indicates  that  ISOFIX  connectors 

are  locked  with  car  seat  anchors 

(Picture 10).

adjust the backrest angle suitable for children.

2

3

4

1

10

12

Check  the  ISOFIX  unlock  key, 

"Green"  indicates  "Locked"  and 

"Red" indicates " Unlocked" (Picture 

16).

Press  top  tether  adjustment 

button, and pull the top tether until 

the hook is locked with the anchor 

in  the  back  of  the  vehicle  seat 

(Picture 17).

Note: Possibly there are 4 top tether anchors 
in the back of the vehicle seat A/B/C/D, you can 
choose a proper one.

Hold  the  other  end  of  the  top 

tether and tighten it (Picture 18).

Note:  "Green"  in  the  release  key  indicates  " 
Fixed well" "Red" indicates "Not Fixed Well" .

10

09

Pull  the  ISOFIX  release  key, 

ISOFIX  Connection  Parts  will  pop 

out (Picture 6,7).

Fix  ISOFIX  guide  sleeves  in  the 

car seat anchors (Picture 8).

6

7

5.5 Crotch belt position 

adjustment

Crotch belt clings tightly with the 

backrest  groove  when  it  is  produced. 

when you put baby in the car seat 

and  feel  it  is  too  close  to  baby's 

crotch,  pinch  the  crotch  belt  to  a 

twisted status and make it through 

the slot (Picture 5).

Note: Make sure they are not wrapped.

5

1

2

3

Day

buckle

Rear slot

Front slot

6.1 Baby Car Seat Top Tether Fixation 

(Applicable for 

Group 1, Weight 9-18kg, Age 9 months to 4 years old)

8

User manual

Baby safety seat

1

9

13

11

Push  the Car  Seat  Base  (Picture 

9).Until you hear the "Click", which 

indicates  that  ISOFIX  connectors 

are  locked  with  car  seat  anchors 

(Picture 10).

adjust the backrest angle suitable for children.

2

3

4

1

10

12

Check  the  ISOFIX  unlock  key, 

"Green"  indicates  "Locked"  and 

"Red" indicates " Unlocked" (Picture 

16).

Press  top  tether  adjustment 

button, and pull the top tether until 

the hook is locked with the anchor 

in  the  back  of  the  vehicle  seat 

(Picture 17).

Note: Possibly there are 4 top tether anchors 
in the back of the vehicle seat A/B/C/D, you can 
choose a proper one.

Hold  the  other  end  of  the  top 

tether and tighten it (Picture 18).

Note:  "Green"  in  the  release  key  indicates  " 
Fixed well" "Red" indicates "Not Fixed Well" .

• Ziehen Sie der ISOFIX-Auslöser des 

Sitzes, so dass der ISOFIX-Verbindun-

gsstück freigegeben wird (Bild 6, 7).

• Fixieren Sie die ISOFIX-Orientierun-

gshülle auf dern Fixpunkt des Sitzanker 

(Bild 8).

Summary of Contents for Corso

Page 1: ...ead the instruction carefully before using the baby car seat Keep this instruction well for future reading This corporate is certificated by ISO9001 2008 Applicable for 9 36KG Corso 9 36 kg 9 M 12 lat...

Page 2: ...2...

Page 3: ...yczy SYSTEMU MOCOWANIA DZIECKA W POJE DZIE Z U YCIEM SYSTEMU PAS W ISOFIX Produkt posiada zatwierdzenie wg Rozporz dzenia 44 seria poprawek 04 do og lnego u ytkowania w pojazdach z systemami moco wani...

Page 4: ...5 4 Regulacja pasa cz ci krokowej 7 6 Monta fotelika i zabezpieczanie dziecka Grupa 1 7 6 1 Mocowanie fotelika ze z czem ISOFIX i g rnym paskiem zabezpieczaj cym 7 6 2 Mocowanie dziecka za pomoc syst...

Page 5: ...y dla dziecka 2 Nota dotycz ca u ytkowania Ostrze enie Przed rozpocz ciem u ytkowania fotelika nale y dok adnie zapozna si z instrukcj Nieprzestrzeganie niniejszej instrukcji mo e prowadzi do powa nyc...

Page 6: ...mu uprz y dziecka powinny by odpo wiednio rozmieszczone i pod czone eliminuj c ryzyko zakleszczenia przez cz ci fotela lub drzwi przy normalnym u ytkowaniu pojazdu 04 User manual n n DO NOT use the pr...

Page 7: ...III 15 36kg 3 12 lat Monta twarz w prz d Pasy bezpie cze stwa samochodu Poziom 1 Pasy bezpie cze stwa 05 Baby safety seat 3 Comparison table of children s range of application and installation method...

Page 8: ...nica pasa w oparciu g owy 2 Nak adka ramienna 3 Podk adka 4 Pas bezpiecze stwa 5 Sprz czka 6 Nak adka podstawy 7 Przycisk blokady regulacji pasa 8 Pas regulowany 9 Uchwyt regulacji k ta 10 Przycisk zw...

Page 9: ...owy 13 Uk ad regulacji g rnego paska 14 Pasek g rny 15 Zaczep paska g rnego 16 Os ona tylna 17 Z cza ISOFIX 18 Stopnie regulacji 19 Prowadnica pasa Ostrze enie Stan fotelika pokazano na rysunku 1 Zdj...

Page 10: ...2 08 1 4 3 2 1 5 Main Functions of Baby Safety Seat 5 1 Angle Adjustment Hold the angle adjustment puller in the front part of the base push the car seat forward or backward to recline Picture 1 Make...

Page 11: ...otch pinch the crotch belt to a twisted status and make it through the slot Picture 5 Note Makesuretheyarenotwrapped 5 1 2 3 Day buckle Rear slot Front slot 6 1 Baby Car Seat ISOFIX Top Tether Fixatio...

Page 12: ...ates Fixedwell Red indicates NotFixedWell Sprawdzi po o enie przycisku zwal niaj cego z cze ISOFIX Kolor zielony oznacza pozycj zablokowania a ko lor czerwony oznacza pozycj odblo kowania rysunek 16 N...

Page 13: ...ntral adjuster with one hand and pull outward the safety belts b c d e with the other hand Note Do not pull the shoulder pad Picture 15b Press the red buckle button and open the buckle Picture15c Put...

Page 14: ...body weight age from 3 to 12 years old User manual 12 e ot e n y at w le o he e Press Push 1 2 18 hook Picture 18 ISOFIX unlock key button at the same time with the hand push ISOFIX unlock button red...

Page 15: ...il you hear click Picture 23 The car seat belt shall pass under the red base belt guide groove not through above the guide groove Picture 24 25 23 f f 24 25 child car seat on the car seat is the backr...

Page 16: ...ym roztworem wody z my d em 9 3 Zdejmowanie pokrowca i 5 punktowych pas w Wsun d onie pod podstaw fotelika i ci gn pokrowiec nast pnie zdj po krowiec z cz ci oparcia rysunek 27 28 14 d s t t t e 9 3 D...

Page 17: ...ric whole fabric on chair Picture 32 33 32 9 a s T Baby safety seat 15 polypropylene belt on shoulder pad Picture 29 Picture 30 29 30 1 Ribbon 2 31 33 belt and warp it and using I shaped 31 Pull out o...

Page 18: ...olipropylenowego nak adki ramiennej i przymocowa pas bezpie cze stwa ze sprz czk T Za o y pokrowiec tylny na oparcie rysunek 36 Po czy z cze T ze z czem pod u nym w kszta cie I poci gn w prz d a na st...

Page 19: ...X connector to the inner side of the baby car seat and press to unlock it in order to match the car seat ISOFIX U type W s Ostrze enie Je eli z cze ISOFIX nagle si rozepnie pod czenie ca ego pasa od n...

Page 20: ...abezpieczania dziecka w foteliku Podczas ponownego pod czenia z cza ISOFIX upewni si e wci ni te jest mak symalnie aby u atwi p niejsze zwolnienie Podczas zwalniania z cza ISOFIX je eli z cze nie wysk...

Page 21: ...y otherwise Leakage of the green unlock key will not work hook can t be locked B A 1 2 3 Warning Baby safety seat Ostrze enie Podczas przymocowywania dziecka w foteliku za pomoc z cza iSOFIX i zaczepu...

Page 22: ...kodzenia spowodowane przez naturalne zjawiska podczas procesu u ywania lub uszkodzenia fotelika spowodowane przez nadmierny docisk Nieprawid owe u ywanie fotelika prowadz ce do uszkodze Uszkodzenia sp...

Page 23: ...23...

Page 24: ......

Page 25: ...Read the instruction carefully before using the baby car seat Keep this instruction well for future reading This corporate is certificated by ISO9001 2008 Applicable for 9 36KG Corso...

Page 26: ...2...

Page 27: ...RESTRAINT SYSTEM It is approved to Regulation No 44 04 series of amendments for general use in vehicles fitted with ISOFIX anchora ges systems It will fit vehicles with positions approved as ISOFIX p...

Page 28: ...ent 09 6 Baby Car Seat Installation and Children Fixation for Group 1 09 6 1 Baby Car Seat ISOFIX Top Tether Fixation 09 6 2 Children Fixation on 5 Point Harness System 11 7 Remove of the baby car sea...

Page 29: ...ion instructions provided by the child restraint manufacturer 2 Using Note Warning P l ease read this instruction very carefully before using this car seat Not follo wing this instruction may lead to...

Page 30: ...ensure that child restraint system is not jammed by active seat or door in normal vehicle use 04 User manual n n DO NOT use the product in seating positions where an active frontal airbag installed Do...

Page 31: ...cing installation Car seat belt Level 1 Safety seat belt 05 Baby safety seat 3 Comparison table of children s range of application and installation methods Group Weight 9 18kg 9 months 4yo 15 36kg 3 1...

Page 32: ...er manual 1 Headrest Belt Guide Sleeve 2 Shoulder Pad 3 Seat cushion 4 Safety belt 5 Safety Buckle 6 Crotch Pad 7 Safety Belt Adjustment Button 8 Adjustment Belt 9 Angle Adjustment Puller 10 ISOFIX Re...

Page 33: ...er Adjustment Device 14 Top Tether 15 Top Tether Pothook 16 Back cover 17 ISOFIX Connectors 18 Gears 19 Belt Guide Sleeve Warm Prompt The state of baby car seat is shown in the picture figure 1 Please...

Page 34: ...1 5 Main Functions of Baby Safety Seat 5 1 Angle Adjustment Hold the angle adjustment puller in the front part of the base push the car seat forward or backward to recline Picture 1 Make the Indicator...

Page 35: ...elt to a twisted status and make it through the slot Picture 5 Note Makesuretheyarenotwrapped 5 1 2 3 Day buckle Rear slot Front slot 6 1 Baby Car Seat ISOFIX Top Tether Fixation Applicable for Group...

Page 36: ...it Picture 18 Note Green in the release key indicates Fixedwell Red indicates NotFixedWell Check the ISOFIX unlock key Green indicates Locked and Red indicates Unlocked Picture 16 Press top tether adj...

Page 37: ...central adjuster with one hand and pull outward the safety belts b c d e with the other hand Note Do not pull the shoulder pad Picture 15b Press the red buckle button and open the buckle Picture15c Pu...

Page 38: ...3 to 12 years old User manual 12 e ot e n y at w le o he e Press Push 1 2 18 hook Picture 18 ISOFIX unlock key button at the same time with the hand push ISOFIX unlock button red is to unlock can mak...

Page 39: ...assing through the base belt guide slot buckle up the car seat belt buckle until you hear click Picture 23 The car seat belt shall pass under the red base belt guide groove not through above the guide...

Page 40: ...oints harness Put hands onto the bottom of the chair and pull out the cover then it open the back cover on the back of the chair Picture27 28 14 d s t t t e 9 3 Dismantlement of cloth cover and 5 poin...

Page 41: ...hole fabric on chair Picture 32 33 32 9 a s T Baby safety seat 15 polypropylene belt on shoulder pad Picture 29 Picture 30 29 30 1 Ribbon 2 31 33 belt and warp it and using I shaped 31 Pull out of hea...

Page 42: ...ix the hook on the shoulder pad polypropylene belt and fix the safety belt with T buc kle and install the back cover on the backrest of the chair Picture 36 Stuff the Tri glide button into the I shape...

Page 43: ...baby car seat and press to unlock it in order to match the car seat ISOFIX U type W s Warning ISOFIX connector accidentally pops out when it is not necessary to connect the car seat figure 1 Please a...

Page 44: ...SOFIX connector be sure to push it to the innermost state so that it can be released normally when used next time When releasing the ISOFIX connector if the ISOFIX connector can t pop out to the outer...

Page 45: ...rmost end appear the green unlock key otherwise Leakage of the green unlock key will not work hook can t be locked B A 1 2 3 Warning Baby safety seat Warning When installing the baby car seat ISO FIX...

Page 46: ...not cover Damaged caused by natural phenomena in the process of use or the damage of car seats caused by excessive pressure Improper or incorrect use of car seat damage to children s car The damage c...

Page 47: ...23...

Page 48: ......

Page 49: ...Read the instruction carefully before using the baby car seat Keep this instruction well for future reading This corporate is certificated by ISO9001 2008 Applicable for 9 36KG Corso...

Page 50: ...2...

Page 51: ...der Handlar fur die KinderRuckhaltesysteme wenden Hinweis Gilt nur wenn das entsprechende Fahrzeug mit einem 3 Punkte Si cherheitsgurt ausgestattet ist der von GB14166 2013 oder ECE R16 aufgefordert w...

Page 52: ...Huftgurts 9 6 lnstallation von der Kinderfahrzeug Sicherheitssitzen in der Gruppe I und wie man sie nutzt 9 6 2 Gebrauchsmethode des Funf Punkte Sicherheitsgurtsystems 11 7 Entfernung des Kindersitzes...

Page 53: ...sungen des Herstellers in der N he nicht verf gbar sind sind gef hrlich Wenn Sie irgendwelche nderungen an dem Kindersitz vornehmen ist dieses Zertiiizierungsergebnis ung ltig Kein Anderer als die Pro...

Page 54: ...ihe sicherer fahren als in der ersten Reihe sind Bild 1 c 1 d Die starren Teile der Kinder R ckhalteeinrichtung und die Kunststoffteile sol lten richtig platziert und montiert werden damit die Kinder...

Page 55: ...ung Bef tigung swe1se I 9 18 Kilo 9 Monate 4 Jahre Nach vorne montieren F nf Punk te Sic herheits gurtsystem Klasse 1 2 3 4 ISO FIX Hoch ziehrnsband II III 15 36 Kilo 3 12 Jahre Nach vorne montieren S...

Page 56: ...e Sicherheits gurtsf hrungsbahn 2 Schulterpolster 3 Baumwoll matte 4 Sicherheitsgurt 5 sicherheitsverschluss 6 H ftschutz 7 Einstellungsknopf des Sicherheitsgurts 8 Einstellungsgurt des Sicherheitsgur...

Page 57: ...14 Hochziehensband 15 Hochzeihensbandsaufh ngung 16 R ckenlehnenfl cheschnalle 17 ISOFIX Verbindungsst ck 18 Zeichnung der Klasse 19 Basisgurt Orientierungsh lle Tipps Werkstatus f r die Kindersitze...

Page 58: ...ie den Klick Ton Bild 3 08 1 4 3 2 1 5 Main Functions of Baby Safety Seat 5 1 Angle Adjustment Hold the angle adjustment puller in the front part of the base push the car seat forward or backward to r...

Page 59: ...ch belt clings tightly with the backrest groove when it is produced when you put baby in the car seat and feel it is too close to baby s crotch pinch the crotch belt to a twisted status and make it th...

Page 60: ...sie als gesper rter Zustand dargestellt wenn sie rot angezeigt wird wird sie als ungesperrt dargestellt Bild 11 Dr cken Sie den Hochziehensbandseinstellungsknopf um die Hochziehens band auf eine ausre...

Page 61: ...ture 15b Press the red buckle button and open the buckle Picture15c Put the belt on two sides separately and place the baby inside the car seat and make baby s shoulders go below the belts Picture 16d...

Page 62: ...3 to 12 years old User manual 12 e ot e n y at w le o he e Press Push 1 2 18 hook Picture 18 ISOFIX unlock key button at the same time with the hand push ISOFIX unlock button red is to unlock can mak...

Page 63: ...eadrest seat belt guide slot Picture 22 Keep the belt strap passing through the base belt guide slot buckle up the car seat belt buckle until you hear click Picture 23 The car seat belt shall pass und...

Page 64: ...t kann mit mildem Seifenwasser gereinigt werden Der Schul terpolster kam entfernt sein und mit mildem Seifenwasser gereinigt werden 9 3 Entfernung des Stoffbezugs und des F nf Punkte Sicherheitssystem...

Page 65: ...base release the fabric whole fabric on chair Picture 32 33 32 9 a s T Baby safety seat 15 polypropylene belt on shoulder pad Picture 29 Picture 30 29 30 1 Ribbon 2 31 33 belt and warp it and using I...

Page 66: ...rpolsters durch das R ckloch des Kindersitzes fixieren Sie den Schulterpolster Gurthaken befestigen Sie den Si cherheitsgurt an der Drei Glieder Schnalle und schnallen Sie die Kindersitzlehne Bild 36...

Page 67: ...ISOFIX Verbindungsst ck unerwartet freigegeben wenn es nicht mit dem Autositz verbunden ist Bild 1 Bitte h ngen Sie den Schl ssel der TT Bancl auf der Hochziehensband hinter der R ckenlehne auf die IS...

Page 68: ...s der ISO FIX Verbindungsst ck zu den Innersten gedr ckt wird so dass er in zuk nftiger Ver wendung normal freigegeben werden kann Bitte ziehen Sie das ISOFIX Verbindungsst ck manuell zum u ersten wen...

Page 69: ...ntil the outermost end appear the green unlock key otherwise Leakage of the green unlock key will not work hook can t be locked B A 1 2 3 Warning Baby safety seat Warnung Wenn Sie der IS FIX Verbindun...

Page 70: ...Benutzung oder Besch digung des Kindersitzes durch berm igen Druck Eine unpassende oder falsche Nutzung f hrt zu Sch den am Kindersitz Die bei dem Verkehrsunfall entstehende Sch den am Kindersitz Die...

Page 71: ...23...

Page 72: ......

Page 73: ...Read the instruction carefully before using the baby car seat Keep this instruction well for future reading This corporate is certificated by ISO9001 2008 Applicable for 9 36KG Corso...

Page 74: ...2...

Page 75: ...ista del sistema de retenci n infantil Nota Este producto solo es aplicable si el autom vil est equipado con un cintur n de seguridad de 3 puntos requerido por GB14166 2013 o ECE R1 a Warnung Cada cor...

Page 76: ...ra 9 6 Instalaci n y uso de silla de coche para ni os de grupo 1 9 6 1 M todo de fijaci n para el cintur n de tracci n de la silla de coche para ni os ISOFIX 9 6 2 Uso del sistema de cintur n de segur...

Page 77: ...s los productos modiilcados y los produc tos que no tienen las instrucciones de instalaci n del fabricante son peligrosos Si realiza alg n cambio en la silla de coche para ni os la oertificaci n se co...

Page 78: ...s Kinder in der hinteren Reihe sicherer fahren als in der ersten Reihe sind Bild 1 c 1 d Die starren Teile der Kinder R ckhalteeinrichtung und die Kunststoffteile sol lten richtig platziert und montie...

Page 79: ...n I 9 18kg 9 meses 4 a os Instalaci n hacia adelante Cintur n de seguridad de cinco puntos Klasse 1 2 3 4 Cintur n de tracci n ISOFIX II III 15 36 Kg 3 12 a os Instalaci n hacia adelante Cintur n de s...

Page 80: ...del reposacabezas 2 Hombreras 3 Almohadilla de algod n 4 Cintur n de seguridad 5 Hebilla de seguridad 6 Protecci n de cadera 7 Bot n de ajuste del cintur n de seguridad 8 Cinta de ajuste del cintur n...

Page 81: ...el cintur n de tracci n 16 Hebilla de la cubierta de respaldo 17 Conector de ISOFIXI 18 Marca de ngulo 19 Ranura de gu a del cintur n de seguridad de base Consejo El estado de salida de f brica de la...

Page 82: ...ase En este punto puede escuchar el sonido del engranaje atascado Figura 3 08 1 4 3 2 1 5 Main Functions of Baby Safety Seat 5 1 Angle Adjustment Hold the angle adjustment puller in the front part of...

Page 83: ...ackrest groove when it is produced when you put baby in the car seat and feel it is too close to baby s crotch pinch the crotch belt to a twisted status and make it through the slot Picture 5 Note Mak...

Page 84: ...o ISOFIX indica el estado de bloqueo el rojo indica el estado de desbloqueo Figura 11 Presione el bot n del ajustador del cintur n de tracci n para estirarlo a una lon gitud suficiente hasta que se pu...

Page 85: ...d Picture 15b Press the red buckle button and open the buckle Picture15c Put the belt on two sides separately and place the baby inside the car seat and make baby s shoulders go below the belts Pictur...

Page 86: ...al 12 e ot e n y at w le o he e Press Push 1 2 18 hook Picture 18 ISOFIX unlock key button at the same time with the hand push ISOFIX unlock button red is to unlock can make children car seats and car...

Page 87: ...t put the children in the child car seat pull out the car seat belt let the car seat belt shoulder strap pass through the headrest seat belt guide slot Picture 22 Keep the belt strap passing through t...

Page 88: ...dad se puede hacer aplicando agua con jab n suave Las hombreras se pueden quitar y lavar con agua jabonosa suave 9 3 Extracci n de la funda y el sistema de seguridad de cinco puntos Coloque su mano en...

Page 89: ...ase the fabric whole fabric on chair Picture 32 33 32 9 a s T Baby safety seat 15 polypropylene belt on shoulder pad Picture 29 Picture 30 29 30 1 Ribbon 2 31 33 belt and warp it and using I shaped 31...

Page 90: ...en por el orificio del respaldo de la silla de coche para ni os fije el gancho del cintur n de polipropileno de la hombrera y fije el cintur n de seguridad a la hebilla de tres v as y ffjela en la cub...

Page 91: ...rder to match the car seat ISOFIX U type W s Advertencia El conector ISOFIX aparece inesperadamente cuando no es necesario conectar la silla de autom vil Figura 1 0 Acople la llave en el cintur nTT en...

Page 92: ...ese de empujarlo hacia el lado m s interno para que pueda liberarse normalmente en un uso futuro Al liberar el conector ISOFIX si el conector ISOFIX no rebota correctamente hacia el extremo m s extern...

Page 93: ...the outermost end appear the green unlock key otherwise Leakage of the green unlock key will not work hook can t be locked B A 1 2 3 Warning Baby safety seat Advertencia Cuando el conector ISOFIX de l...

Page 94: ...s por fen menos naturales o presi n excesiva durante el uso Da os a la silla de coche para ni os causados por un uso inadecuado o incor recto Da os a la silla de coche para ni os causados por un accid...

Page 95: ...23...

Page 96: ...24 LOGIS S A ul Mszczonowska 96 200 Rawa Mazowiecka POLAND Tel 48 46 814 73 13 Fax 48 46 814 73 00 E mail biuro babysafe eu www babysafe eu BS 09 12 2019 10 05...

Reviews: